Insert Tick and Cross Marks in Excel: Fast and Easy Methods
When building checklists, tracking task status, marking approval results, or highlighting right and wrong answers in Excel, tick (✓) and cross (✗) marks are often much clearer than using plain text like “Yes/No” or “Done/Not Done”. They make worksheets easier to read and give your data a cleaner, more professional look.
In this guide, you will learn the best ways to quickly insert tick and cross marks into Excel cells, along with step-by-step instructions and tips for choosing the right method.

Why use tick and cross marks in Excel?
Insert Tick and Cross Marks into Cells
- Method 1: Use the Symbol feature
- Method 2: Use shortcuts with special fonts
- Method 3: Use Kutools for Excel
- Method 4: Use VBA code
- Method 5: Use drop-down list
Advanced solution: Display tick and cross marks automatically with formulas
Why use tick and cross marks in Excel?
Tick and cross marks are widely used in Excel because they help present information more visually and compactly. They are especially useful when you want to show completion status, approval results, pass/fail outcomes, or correct/incorrect answers.
Main benefits of using tick and cross marks:
- Make data easier to scan quickly
- Save space compared with longer text labels
- Improve worksheet readability
- Create cleaner and more professional reports
- Help highlight status information more clearly
For example, in a project checklist, a tick can represent completed tasks, while a cross can show pending or failed items. In a grading sheet, a tick can indicate correct answers and a cross can show incorrect ones.
Insert Tick and Cross Marks into Cells
In this section, you will learn several practical ways to insert tick and cross marks into Excel cells. Whether you prefer built-in Excel tools, keyboard tricks, formulas, Kutools for Excel, or even VBA automation, there is a method to match your needs.
Method 1: Insert tick and cross marks by the Symbol feature
The Symbol feature in Excel allows you to insert special characters directly into cells. This is one of the most straightforward methods, especially if you only need to insert a few tick or cross marks manually.
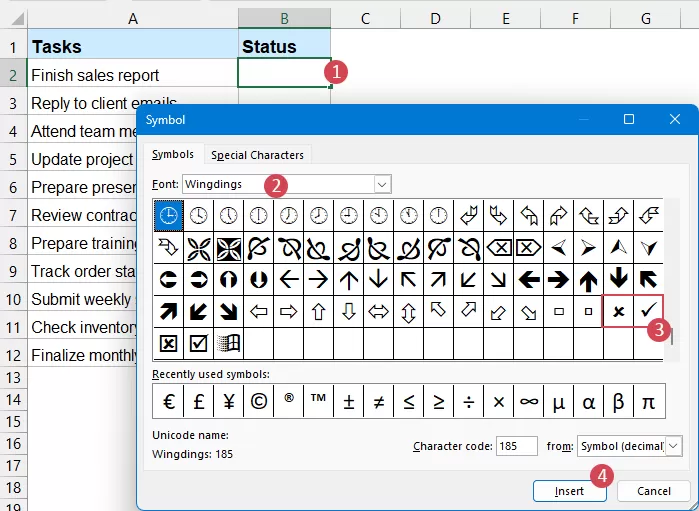
- Select the cell where you want to insert the symbol. Click the Insert > Symbol.
- In the Symbol dialog box:
- Select Wingdings or Wingdings 2 from the Font drop-down list.
- Scroll through the available symbols and choose the tick mark or cross mark you want to insert.
- Click Insert to add the selected symbol to the cell.
- Repeat the above steps to insert the tick or cross mark one by one to other cells.

- Easy to use with no formulas or code required
- Built into Excel, so no extra tools are needed
- Good for occasional manual insertion
- Lets you choose from different symbol styles
- Slow if you need to insert many symbols
- You may need to search manually for the correct symbol each time
- Not ideal for repetitive work or large datasets
Method 2: Insert tick and cross marks by shortcuts with special fonts
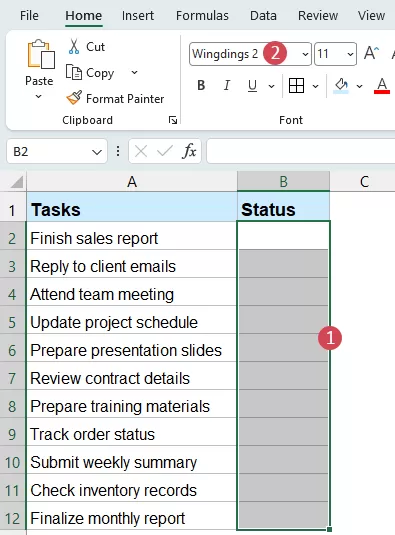
If you frequently insert tick and cross marks, using keyboard shortcuts together with symbol fonts can be much faster than opening the Symbol dialog every time. In Excel, some characters can display as tick or cross symbols when the cell font is changed to Wingdings 2.
- Select the column cells where you want to insert the tick and cross marks, and then choose the Wingdings 2 font under the Home tab, see screenshot:
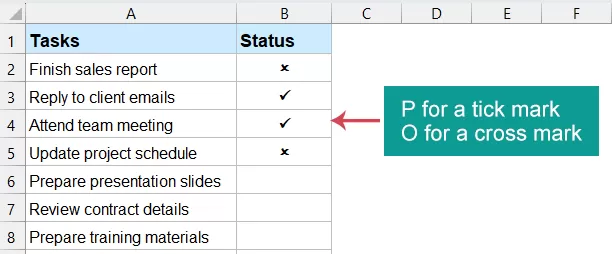
- After changing the font of the selected cell to Wingdings 2, now, typing “P” in a cell displays a tick mark, while typing “O” displays a cross mark, as shown in the screenshot below.


- Faster than inserting symbols from the Symbol dialog
- Useful for repeated manual input
- No formulas or VBA required
- Great for small checklists and simple worksheets
- Requires remembering which letter represents which symbol
- Symbols depend on the font, so they may look confusing if the font changes
- Not ideal when sharing files with users unfamiliar with symbol fonts
Method 3: Insert tick and cross marks by Kutools for Excel
If you want a quicker and more user-friendly solution, Kutools provides a range of preset tick and cross symbols to help you insert them into Excel cells more quickly, without having to search for them manually.
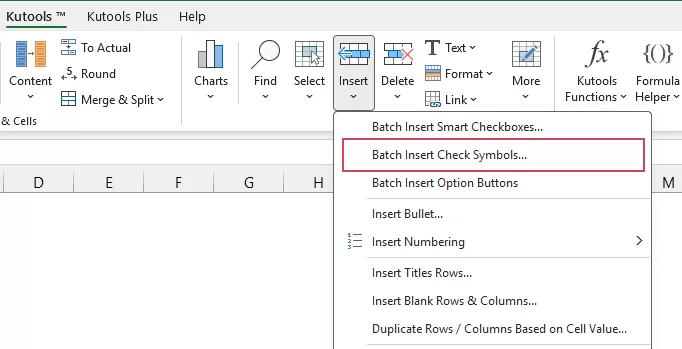
- Click a cell where you want to insert tick or cross marks. Then, click Kutools > Insert > Batch Insert Check Symbols, see screenshot:
- In the dialog box, click the tick or cross mark you want to insert, and the selected symbol will be inserted immediately.
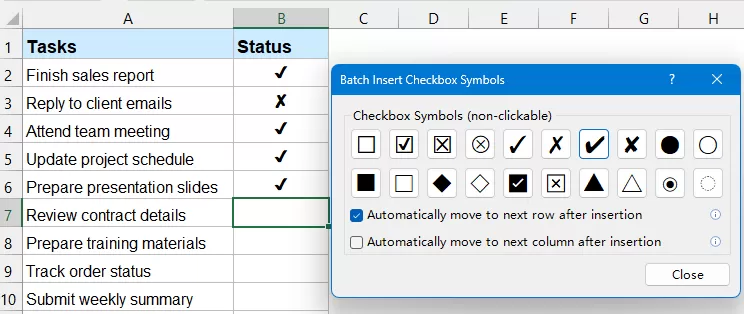 Tip: Check Automatically move to next row after insertion if you want the cursor to move down automatically after each insertion.
 - Then click the selected cells one by one to insert the chosen symbol quickly.
- When you finish, click Close to exit the dialog box.


Kutools is especially helpful if you work with Excel frequently and want to save time. Instead of relying on symbol dialogs, memorized shortcuts, or complex setup, it offers a more user-friendly workflow.
- Faster and more convenient than Excel’s built-in Symbol feature
- More beginner-friendly for users who want visual tools
- Can save time when working with many cells
- Suitable for users who frequently handle formatted Excel data
Try Kutools for Excel
Get access to powerful tools that help you work faster and more efficiently in Excel.
Method 4: Insert tick and cross marks by VBA code
If you need to insert tick and cross marks into many cells automatically, VBA can be a powerful solution. It is especially useful for repetitive or large-scale tasks.
- Right click the sheet tab that you want to insert tick and cross marks, and then choose View Code from the context menu.
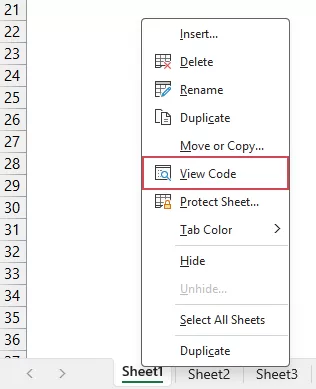
- In the opened Microsoft Visual Basic for Applications window, copy and paste the following code into the blank Module:
Private Sub Worksheet_BeforeDoubleClick(ByVal Target As Range, Cancel As Boolean)
'Updateby Extendoffice
    If Target.Cells.Count = 1 Then
        If Not Intersect(Target, Range("B2:B12")) Is Nothing Then
            With Target
                .Font.Name = "Wingdings"
                .Font.Size = 12
                If .FormulaR1C1 = " û " Then
                    .FormulaR1C1 = "ü"
                Else
                    .FormulaR1C1 = " û "
                End If
            End With
        End If
        Cancel = True
    End If
End Sub
Note: In the above code, B2:B12 is the cells where you want to insert the tick and cross marks, you can change the cell reference to your need. - After saving the code and closing the VBA editor, double-click a cell once to insert a cross mark, and double-click it again to switch to a tick mark, as shown in the screenshot below.


- Excellent for batch insertion
- Saves time when dealing with large ranges
- Useful for repeated tasks and automation
- Requires basic VBA knowledge
- Macro-enabled files may trigger security warnings
- Not suitable for users who avoid macros
- Symbols still depend on specific fonts in some cases
Method 5: Insert tick and cross marks by drop down list
A drop-down list is a great option if you want users to choose between a tick mark and a cross mark from a predefined list. This is especially useful for forms, task trackers, and shared worksheets.
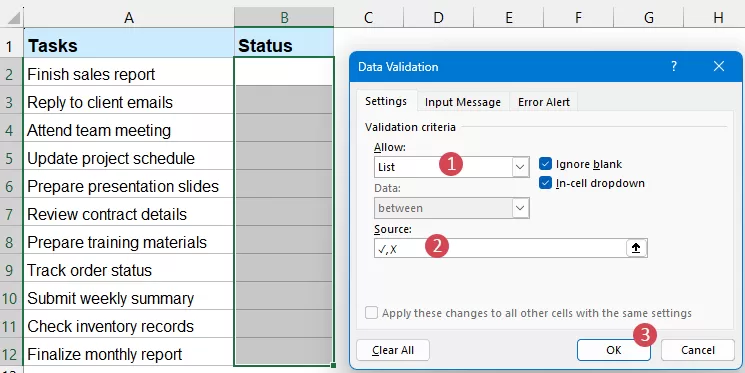
- Select the cells where you want the drop-down list. Click Data > Data Validation.
- In the Data Validation dialog box:
- Choose List from the Allow drop-down
- In the Source box, copy and paste these two symbols: ✓,✗
- Click OK.
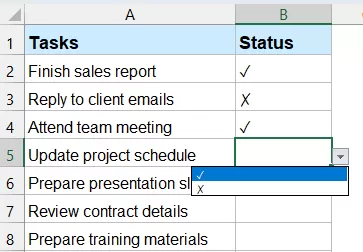
- Now each selected cell will have a drop-down arrow, allowing you to choose a tick or cross instantly.


- Easy for users to apply consistently
- Reduces typing errors
- Great for interactive forms and shared worksheets
- Makes data entry more controlled and standardized
- Requires setup in advance
- Slightly less flexible for quick one-time insertion
- Drop-down arrows may affect the worksheet’s visual simplicity
- Best suited for structured data entry rather than free editing
Advanced solution: Display tick and cross marks automatically with formulas
If you want tick and cross marks to appear automatically based on a condition, formulas are the best solution. For example, you can display a tick mark if a task is completed, and a cross mark if it is not.
- Enter or copy the following formula into a blank cell:
=IF(B2="Completed","✓","✗")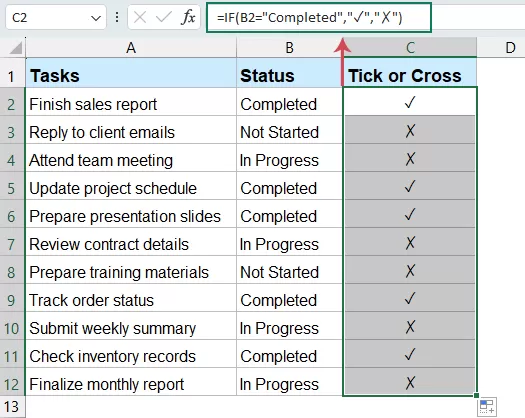
- Then drag the fill handle down to fill the formula to other cells, see screenshot:

For example, if a score in A2 is 60 or higher, show a tick mark; otherwise, show a cross mark:
Enter or copy the following formula into a blank cell:
=IF(B2>=60,"✓","✗")
These symbols usually work well with standard fonts like Calibri, Arial, or Segoe UI Symbol. If the symbol does not display correctly, try changing the font.
- Fully automatic
- Ideal for dynamic worksheets and dashboards
- Easy to update when source data changes
- No manual insertion needed after setup
- Requires understanding of formulas
- Best for condition-based display, not manual selection
- Less suitable when users want to input symbols directly
Tips for using tick and cross marks more effectively
To make tick and cross marks more useful and professional in Excel, keep the following tips in mind:
Conclusion
There are several effective ways to insert tick and cross marks in Excel, and the best method depends on how you plan to use them.
If you only need to insert a few symbols occasionally, the Symbol feature is simple and built into Excel. If you want a faster manual method, using shortcut keys with symbol fonts can save time. For users who prefer a more visual and convenient solution, Kutools for Excel makes inserting tick and cross marks much quicker and easier. If you need automation or want to apply symbols in bulk, VBA code is a powerful choice. Meanwhile, drop-down lists are ideal for creating interactive forms or standardized worksheets, and formulas work best when you want tick and cross marks to appear automatically based on cell values or conditions.
In short, each method has its own strengths. You can choose the one that best matches your Excel skill level, the size of your worksheet, and whether you need manual input, controlled selection, or automatic results.
Best Office Productivity Tools
Supercharge Your Excel Skills with Kutools for Excel, and Experience Efficiency Like Never Before. Kutools for Excel Offers Over 300 Advanced Features to Boost Productivity and Save Time. Click Here to Get The Feature You Need The Most...
Office Tab Brings Tabbed interface to Office, and Make Your Work Much Easier
- Enable tabbed editing and reading in Word, Excel, PowerPoint, Publisher, Access, Visio and Project.
- Open and create multiple documents in new tabs of the same window, rather than in new windows.
- Increases your productivity by 50%, and reduces hundreds of mouse clicks for you every day!
All Kutools add-ins. One installer
Kutools for Office suite bundles add-ins for Excel, Word, Outlook & PowerPoint plus Office Tab Pro, which is ideal for teams working across Office apps.
- All-in-one suite — Excel, Word, Outlook & PowerPoint add-ins + Office Tab Pro
- One installer, one license — set up in minutes (MSI-ready)
- Works better together — streamlined productivity across Office apps
- 30-day full-featured trial — no registration, no credit card
- Best value — save vs buying individual add-in
Table of contents
- Why use tick and cross marks in Excel?
- Insert Tick and Cross Marks into Cells
- Method 1: Use the Symbol feature
- Method 2: Use shortcuts with special fonts
- Method 3: Use Kutools for Excel
- Method 4: Use VBA code
- Method 5: Use drop-down list
- Display tick and cross marks automatically with formulas
- Tips for using tick and cross marks more effectively
- Conclusion
- The Best Office Productivity Tools
Kutools for Excel
Brings 300+ advanced features to Excel
- ⬇️ Free Download
- 🛒 Purchase Now
- 📘 Feature Tutorials
- 🎁 30-Day Free Trial