How to extract all records between two dates in Excel?
When working with large amounts of time-stamped data in Excel, you may often need to extract or filter all records that fall between two specific dates. For example, you might want to analyze transactions within a billing period, review attendance for a particular month, or simply examine entries logged within a custom date range. Manually searching and copying each relevant row can be both tedious and error-prone, especially as your data grows in volume. Efficiently extracting all records between two given dates not only saves you significant time and effort, but also reduces the likelihood of missing important entries or introducing mistakes during data handling.
 |  |
Below, you'll find several practical methods to extract all records between two dates in Excel. Each approach has its own applicable scenarios and advantages, from formula-based extraction (no add-ins required), to using Kutools for Excel for increased convenience, to VBA code and Excel's built-in filter—providing flexible solutions for different needs and user preferences.
Extract all records between two dates by formulas
Extract all records between two dates by Kutools for Excel![]()
Use VBA to Extract Records Between Two Dates
Use Excel Filter to Extract Records Between Two Dates
Extract all records between two dates by formulas
To extract all records between two dates in Excel using formulas, you can follow these steps. This solution is especially useful when you want dynamic updating: whenever the original dataset or the date conditions change, the results update automatically. However, if you are less familiar with array formulas, initial setup may seem a bit complex. If your dataset is very large, this method may cause slower calculation performance.
1. Prepare a new worksheet, for example, Sheet2, where you will specify the date boundaries and display extracted records. Enter the desired start date and end date in cells A2 and B2, respectively. For clarity, you may add headers in A1 and B1 (such as "Start Date" and "End Date").
2. In cell C2 of Sheet2, input the following formula to count how many rows in Sheet1 have dates that fall within the specified range:
=SUMPRODUCT((Sheet1!$A$2:$A$22>=A2)*(Sheet1!$A$2:$A$22<=B2))After entering the formula, press Enter. This helps you understand how many entries match your filter condition, making it easy to know how many results to expect.
Note: In this formula, Sheet1 refers to your original data sheet; $A$2:$A$22 is the date column in your data. Adjust these references as needed for your data. A2 and B2 are your start and end date cells.
3. To display the matching records, select a blank cell where you want the extracted list to begin (for example, in Sheet2, cell A5). Enter the following array formula:
=IF(ROWS(A$5:A5)>$C$2,"",INDEX(Sheet1!A$2:A$22,SMALL(IF((Sheet1!$A$2:$A$22>=$A$2)*(Sheet1!$A$2:$A$22<=$B$2),ROW(Sheet1!A$2:A$22)-ROW(Sheet1!$A$2)+1),ROWS(A$5:A5))))After typing the formula, press Ctrl + Shift + Enter (instead of just Enter) to make it work as an array formula. Then use the fill handle to drag it rightwards across as many columns as you have data, and then downwards so that all matching rows are displayed. Continue dragging until you see blanks, which means all matching data has been extracted.
Tips:
- If you get zeros, it means there are no more matching records to return. Simply stop dragging further.
- The INDEX(...) part of the formula can be adapted to extract other columns. Change the referenced column in the Sheet1!A$2:A$22 part if you want to return other fields.
- This formula can be expanded to work with multiple criteria or to extract entire rows (by repeating the formula in each column).
4. Some date results may appear as 5-digit numbers (Excel serial date numbers). To convert them to readable date format, select the corresponding cells, go to the Home tab, open the formatting dropdown, and choose Short Date. This will make the extracted data clearer and more usable.
Precautions:
- Make sure all date entries in your original data are truly in date format, not stored as text. Otherwise, the formula may not work as expected.
- Adjust array ranges if your data size changes.
- If you see #NUM! or #N/A errors, check for blank input dates or inconsistencies in your source data.
Extract all records between two dates by Kutools for Excel
If you prefer a more streamlined and interactive solution, the Select Specific Cells feature in Kutools for Excel can help you extract entire rows matching your date range with just a few clicks, minimizing the need for formulas or manual setting. This is particularly suitable for users who often handle complex filtering tasks or perform batch operations on large datasets, as it reduces the chance of formula errors and speeds up workflow.
After installing Kutools for Excel, please follow the steps below: (Free Download Kutools for Excel Now!)
1. First, select the range of your dataset you wish to analyze and extract from. Then, click Kutools > Select > Select Specific Cells from the Excel ribbon. This brings up a dialog window for advanced selection.
2. In the Select Specific Cells dialog:
- Tick the "Entire row" option to select full matching rows.
- Set the filter condition: choose Greater than and Less than in the drop-down lists for your date column.
- Manually enter your start and end dates into the text boxes (make sure format matches your data).
- Ensure “And” logic is chosen so both conditions apply at once.
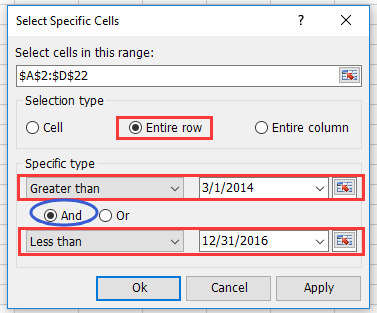
3. Click OK. Kutools will instantly select all rows whose date column falls within your specified range. Then, press Ctrl + C to copy the selected rows, go to a blank sheet or new location, and press Ctrl + V to paste the extracted results.
Tips and Cautions:
- The Kutools approach does not require changing your original data or writing any formulas.
- If you have date format inconsistencies, preview selection results before copying.
- Use the feature for repeated or batch filtering jobs—repeating the steps quickly for different date ranges.
- If your version of Kutools does not show a feature as described, update to the latest version for best compatibility.
Scenario Analysis: This method is ideal for users managing lists with many columns or for those who need to repeatedly extract full records based on changing date limits.
VBA Code - Use a macro to automatically filter and extract all rows between two specified dates
If your workflow often includes extracting data between two dates and you’d like to automate the process entirely, using a VBA macro can be a smart choice. With VBA, you can prompt users to select the date column, enter start and end dates, and automatically filter and copy matched rows to a new sheet. This approach saves manual effort and reduces mistakes, but requires enabling macros and some familiarity with the Visual Basic editor.
Here is how to set up such a macro:
1. Click Developer > Visual Basic to open the VBA editor. In the new Microsoft Visual Basic for Applications window, click Insert > Module, then copy and paste the following code into the Module:
Sub ExtractRowsBetweenDates_Final()
'Updated by Extendoffice
    Dim wsSrc As Worksheet
    Dim wsDest As Worksheet
    Dim rngTable As Range
    Dim colDate As Range
    Dim StartDate As Date
    Dim EndDate As Date
    Dim i As Long
    Dim destRow As Long
    Dim dateColIndex As Long
    Dim cellDate As Variant

    Set wsSrc = ActiveSheet
    Set rngTable = Application.InputBox("Select the data table (including headers):", "KutoolsforExcel", Type:=8)
    If rngTable Is Nothing Then Exit Sub

    Set colDate = Application.InputBox("Select the date column (including header):", "KutoolsforExcel", Type:=8)
    If colDate Is Nothing Then Exit Sub

    On Error GoTo DateError
    StartDate = CDate(Application.InputBox("Enter the start date (yyyy-mm-dd):", "KutoolsforExcel", "", Type:=2))
    EndDate = CDate(Application.InputBox("Enter the end date (yyyy-mm-dd):", "KutoolsforExcel", "", Type:=2))
    On Error GoTo 0

    On Error Resume Next
    Set wsDest = Worksheets("FilteredRecords")
    On Error GoTo 0
    If wsDest Is Nothing Then
        Set wsDest = Worksheets.Add
        wsDest.Name = "FilteredRecords"

        rngTable.Rows(1).Copy
        wsDest.Cells(1, 1).PasteSpecial Paste:=xlPasteValuesAndNumberFormats
        wsDest.Cells(1, 1).PasteSpecial Paste:=xlPasteFormats
    End If

    destRow = wsDest.Cells(wsDest.Rows.Count, 1).End(xlUp).Row + 1
    dateColIndex = colDate.Column - rngTable.Columns(1).Column + 1

    For i = 2 To rngTable.Rows.Count
        cellDate = rngTable.Cells(i, dateColIndex).Value
        If IsDate(cellDate) Then
            If cellDate >= StartDate And cellDate <= EndDate Then
                rngTable.Rows(i).Copy
                wsDest.Cells(destRow, 1).PasteSpecial Paste:=xlPasteValuesAndNumberFormats
                wsDest.Cells(destRow, 1).PasteSpecial Paste:=xlPasteFormats
                destRow = destRow + 1
            End If
        End If
    Next i

    Application.CutCopyMode = False
    wsDest.Columns.AutoFit
    MsgBox "Filtered results have been added to '" & wsDest.Name & "'.", vbInformation
    Exit Sub

DateError:
    MsgBox "Invalid date format. Please enter dates as yyyy-mm-dd.", vbExclamation
End Sub
2. To run the macro, click the ![]() (Run) button or press F5.
(Run) button or press F5.
Then follow the prompts to finish the steps:
- Select the data table (including headers)When the first input box appears, select the entire table, including the header row. Click OK.
- Select the date column (including header)When the second input box appears, select only the date column, including the header. Click OK.
- Enter start and end datesYou’ll be asked to enter the start date (format: yyyy-mm-dd, e.g., 2025-06-01)Then enter the end date (e.g., 2025-06-30)Click OK after each.
A worksheet named FilteredRecords will be created automatically (if it doesn't already exist). The matching rows (where the date falls between the start and end dates) will be copied to that sheet. And any new matching rows will be appended below existing results each time you run the macro.
Troubleshooting:
- If nothing happens after running, check your selected ranges—invalid ranges or canceled dialogs will exit the macro.
- Make sure your date column entries are true Excel dates; if stored as text, convert them first for accurate filtering.
Scenario Analysis: This VBA solution is particularly valuable for repetitive tasks, advanced workflows, or when sharing a semi-automated solution with non-technical users—just assign a button for even easier operation.
Other Built-in Excel Methods - Use Excel's built-in Filter feature
For users who prefer a simple, interactive approach without writing formulas or code, Excel's built-in Filter feature offers a quick way to view and extract rows between two dates. This is ideal for occasional tasks, visual checking, or when you need to work directly with the worksheet interface. However, it doesn't provide automatic updates if your date criteria or data change—you need to repeat the steps for each new filter session.
Here's how to use it:
- Select your data range, ensuring the column headers are included.
- Go to the Data tab on the ribbon, then click Filter. Small drop-down arrows will appear next to each header.
- Click the arrow for your date column and choose Date Filters > Between....
- In the dialog box, enter your desired start and end dates. Make sure the format matches your data's date format.
- Click OK. Only the rows with dates in your specified range will remain visible.
- Select all visible rows, press Ctrl + C to copy, go to a blank area or another sheet, and press Ctrl + V to paste the filtered results.
Tips and Precautions:
- This method is best for quick and visual inspection or ad-hoc extraction.
- If your date column uses inconsistent formats, correct these beforehand to ensure the filter works accurately.
- Remember to clear the filter when you’re done to reveal the full data set again.
- Filtered rows are hidden, not deleted—your original data remains intact.
Scenario Analysis: Excel's built-in Filter is most suitable for moderate-sized tables and when you need to instantly preview or copy subsets without saving formulas or macros.
Troubleshooting and Summary Suggestions:
- Always confirm your date cells are formatted consistently across the worksheet for all solutions to work correctly.
- When using formulas or VBA, adjust column and range references to match the actual structure of your sheet to avoid index or reference errors.
- For performance on very large datasets, Kutools or built-in filtering typically offer faster results and are less likely to exceed memory/formula calculation limits compared to extensive array formulas.
- If you encounter unexpected blanks or missing records in the output, double-check that your date conditions, input ranges, and data formats are set as intended.
Demo: Extract all records between two dates by Kutools for Excel
Best Office Productivity Tools
Supercharge Your Excel Skills with Kutools for Excel, and Experience Efficiency Like Never Before. Kutools for Excel Offers Over 300 Advanced Features to Boost Productivity and Save Time. Click Here to Get The Feature You Need The Most...
Office Tab Brings Tabbed interface to Office, and Make Your Work Much Easier
- Enable tabbed editing and reading in Word, Excel, PowerPoint, Publisher, Access, Visio and Project.
- Open and create multiple documents in new tabs of the same window, rather than in new windows.
- Increases your productivity by 50%, and reduces hundreds of mouse clicks for you every day!
All Kutools add-ins. One installer
Kutools for Office suite bundles add-ins for Excel, Word, Outlook & PowerPoint plus Office Tab Pro, which is ideal for teams working across Office apps.
- All-in-one suite — Excel, Word, Outlook & PowerPoint add-ins + Office Tab Pro
- One installer, one license — set up in minutes (MSI-ready)
- Works better together — streamlined productivity across Office apps
- 30-day full-featured trial — no registration, no credit card
- Best value — save vs buying individual add-in