Protect Excel file with password – Step by step tutorial
When it comes to preserving the integrity and confidentiality of your Excel files, one of the most effective strategies is to protect them with a password. This means that when you open an Excel file, you will need to input a password to access. Password-protecting Excel files not only prevents unauthorized access but also ensures the privacy and security of data in shared spaces. In this tutorial, we'll guide you on how to password-protect your Excel files effectively.

Password protect an Excel file
Password protect an Excel file
To prevent others from accessing data or modifying the data in your Excel file, you can set a password to protect the Excel file. Excel offers straightforward methods to encrypt an entire workbook with a password, ensuring restricted access or preventing any alterations to the file.
Password protect an Excel file from opening
Securing an Excel file with a password is a great way to keep your data private. If you'd like to set this up, just follow these steps:
Step 1: Select the Encrypt with Password option
- Open the workbook you want to set a password for.
- Then, click "File" > "Info", and then, click "Protect Workbook" button, and select "Encrypt with Password" in the drop-down list.


Step 2: Set the password for protecting the Excel file
- In the popped out "Encrypt Document" window, enter a password in the "Password" box, and click "OK".

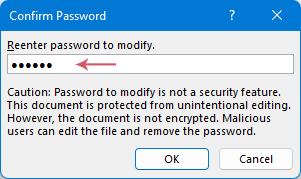
- Retype the password in the following "Confirm Password" window, and click "OK".


Step 3: Save the workbook
After setting the password, you should save the file for the password protection to take effect.
Result:
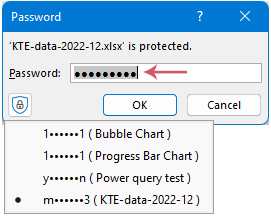
Now, every time the workbook is opened, the password will be required.
To remove the encryption from the workbook, you should access the workbook first, then follow the same steps as mentioned above. In the Encrypt Document window, delete the password from the Password box, click OK, and then save your workbook.
Never worry about forgetting passwords again!
Do you find yourself forgetting your passwords frequently? Say goodbye to those forgetful moments with Password Manager! With Kutools for Excel's Password Manager, you don't have to worry about that challenge anymore. It can help you:
- Store your passwords into the Password Manager securely.
- Enter the password automatically when opening password-protected files.
- Eliminate the need to memorize passwords.
- Read more about the tool Download Kutools
Password protect an Excel file from modifying
Suppose you want others to access your Excel file but prevent modifications, even without knowing the password. In that case, you can set your Excel workbook to read-only and protect it with a password. This allows users to view the data without altering it. Let's go through the steps to activate this protective feature.
Step 1: Select the Save As feature
Open the workbook, and then click "File" > "Save As" > "Browse", see screenshot:
Step 2: Choose General Options
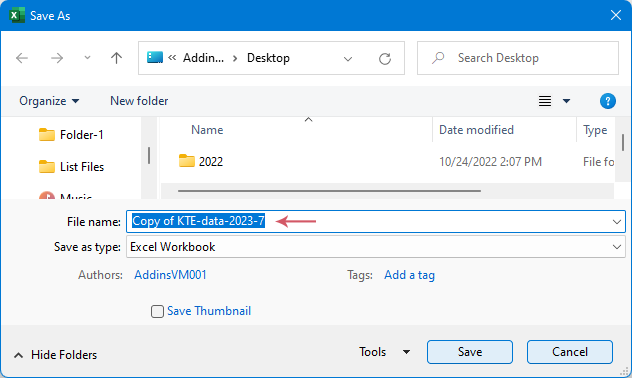
A "Save As" window will open, give a name to this Excel file into the "File name" box, and then click "General Options" from the Tools drop down. See screenshot: 
Step 3: Set Password to Read Only
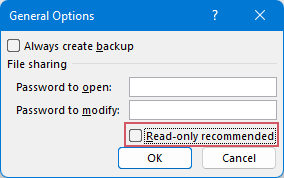
- In the "General Options" dialog box, type a password in the "Password to modify" text box, and check "Read-only recommended" option. Then, click "OK". See screenshot:

- In the next "Confirm Password" dialog box, enter the password again. And then, click "OK" to close the dialog.


Step 4: Save the workbook
After clicking OK, Excel will get back to the "Save As" window, click "Save" to save this workbook. Now the Excel workbook is both read-only and password-protected.
Step 5: Result (Open Password Protected workbook as Read Only)
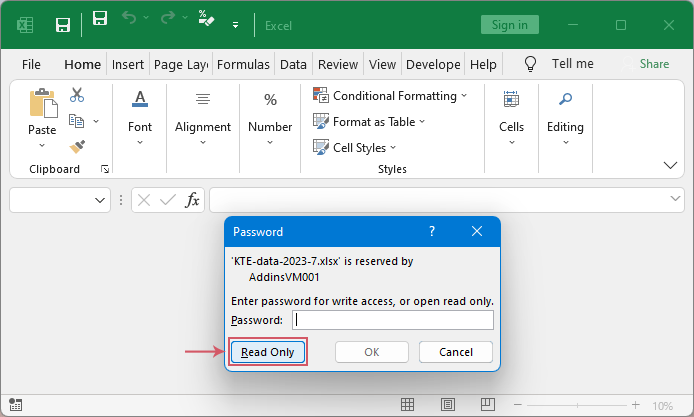
- From now on, when others open this Excel file, they needn’t type the password, just click "Read Only" button to access the workbook. See screenshot:
- When they try to make changes and save the workbook, a warning message box will appear, reminding to save the workbook with a new name or in a different location. And the original workbook will not be affected. See screenshot:


If you want to disable the Read-only recommended option that you previously enabled for an Excel workbook as well as the password, you can follow these steps:
- After opening this read-only Excel file, go to "File" > "Save As" > "Browse".
- In the "Save As" window, click "Tools" > "General Options". In the "General Options" dialog box, uncheck the "Read-only recommended" option and click "OK". See screenshot:
- Then, click "Save" button, the Excel file will be saved with a new name.
- When this newly named workbook is opened next time, a password will not be required, and it will not open as Read-only. You can make changes to the workbook and save it without any restrictions.


Password protect multiple Excel files from opening
When you have multiple Excel files to protect, setting a password for each file individually can be quite tedious and complex. Here, I will introduce you two quick methods to bulk password-protect your Excel files.
Password protect multiple Excel files with just a few clicks by Kutools for Excel
When it comes to managing and protecting multiple Excel files, "Kutools for Excel" can be an excellent option. Its "Encrypt Workbooks" feature allows you to protect numerous Excel files with a same password at once, whether they are stored locally or on your OneDrive cloud storage.
After downloading and installing Kutools for Excel, please click "Kutools Plus" > "Encrypt Workbooks" > "Encrypt Workbooks" to enable this feature. Then follow the below steps:
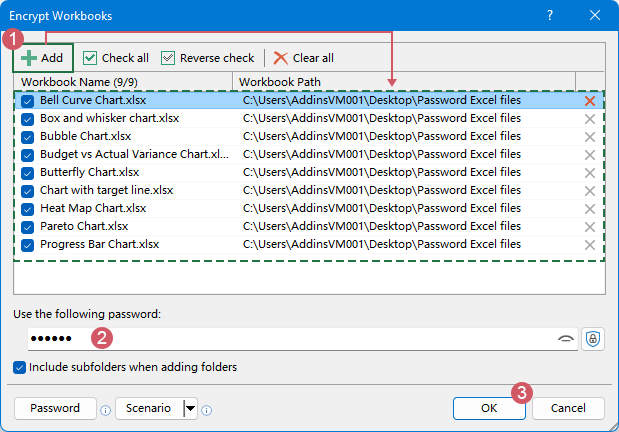
- Click "Add" button to select the Excel files that you want to password-protect. (Either from your local computer or OneDrive cloud) All selected files are added and listed into the list box;
- Type a password into the "Use the following password" textbox;
- Click "OK" to protect these Excel files.

- To apply this feature, please click to download and install Kutools for Excel.
- To remove the password from these Excel files, please click "Kutools Plus" > "Encrypt Workbooks" > Decrypt Workbooks. In the "Decrypt Workbooks" dialog box, add the Excel files you want to remove the password, then, type the password to decrypt the workbooks.
Password protect multiple Excel files with VBA code
In the following steps, I will provide you with a VBA code that allows you to protect multiple Excel files with the same password:
Step 1:Open the VBA module editor and copy the code
- Hold down the "ALT" + "F11" keys in Excel, and it opens the "Microsoft Visual Basic for Applications" window.
- Click "Insert" > "Module", and paste the following code in the "Module" Window.
VBA code: password protect multiple Excel filesSub ProtectAll() 'Update by Extendoffice Dim xWorkBooks As Workbook Dim xExitFile As String Dim xPassWord As Variant Dim xStrPath As String Dim xFileDialog As FileDialog Dim xFile As String On Error Resume Next Set xFileDialog = Application.FileDialog(msoFileDialogFolderPicker) xFileDialog.AllowMultiSelect = False xFileDialog.Title = "Select a folder [Kutools for Excel]" If xFileDialog.Show = -1 Then xStrPath = xFileDialog.SelectedItems(1) End If If xStrPath = "" Then MsgBox "No folder selected. The process has been canceled.", vbExclamation, "Kutools for Excel" Exit Sub Else xStrPath = xStrPath + "\" End If ' Check if there are Excel files in the selected folder xFile = Dir(xStrPath & "*.xls*") If xFile = "" Then MsgBox "No Excel files found in the selected folder.", vbExclamation, "Kutools for Excel" Exit Sub End If xPassWord = Application.InputBox("Enter password", "Kutools for Excel", , , , , , 2) If (xPassWord = False) Or (xPassWord = "") Then MsgBox "Password cannot be blank!", vbInformation, "Kutools for Excel" Exit Sub End If On Error Resume Next Application.ScreenUpdating = False Do While xFile <> "" Set xWorkBooks = Workbooks.Open(xStrPath & xFile) Application.DisplayAlerts = False xWorkBooks.SaveAs Filename:=xWorkBooks.FullName, Password:=xPassWord Application.DisplayAlerts = True xWorkBooks.Close False Set xWorkBooks = Nothing xFile = Dir Loop Application.ScreenUpdating = True MsgBox "Successfully protect!", vbInformation, "Kutools for Excel" End Sub
Step 2: Execute the code to password protect all Excel files in a folder
- After pasting this code, please press "F5" key to run this code. A "Select a folder" window will appear, select a folder which contains the workbooks that you want to protect with a password. Then, click "OK". see screenshot:

- In the following prompt box, enter a password for protecting workbooks. And then, click "OK".

- After finishing the protection, a prompt box will pop out to remind you all workbooks in the selected folder have been successfully protected, see screenshot:


To remove the encryption from a workbook, you should access the workbook first. And then, click "File" > "Info" > "Protect Workbook" > "Encrypt with Password". In the "Encrypt Document" window, delete the password from the Password box, click "OK", and then save your workbook.
Password protection warning:
- "Remember Your Password": Excel does not provide an option to recover the password if you forget it. If you forget the password you set on an Excel file, you might not be able to open the file again. Thus, remembering your password or securely storing it somewhere safe is crucial.
- "Case Sensitivity": Excel passwords are case-sensitive, so be careful when setting or inputting the password.
This is how you can protect an Excel or multiple Excel files with password. If you're interested in exploring more Excel tips and tricks, our website offers thousands of tutorials, please click here to access them. Thank you for reading, and we look forward to providing you with more helpful information in the future!
Related Articles:
- Protect multiple worksheets at once
- Supposing you have a workbook which contains multiple worksheets, and now you need to protect all of the worksheets or some specific worksheets, normally in Excel, you only can protect the sheet one by one with the Protect Sheet function, but this method is tedious and time-consuming if there are numerous sheets need to be protected. How do you protect multiple sheets at once in Excel quickly and easily?
- Set password to protect hidden sheet
- If you have a workbook which contains some important hidden worksheets, and do not allow others to unhide them. Now, you need to set a password to protect the hidden worksheets completely, when other users unhide them, they must enter the password. Do you have any ways to deal with this task quickly and easily in Excel?
- Set passwords to protect individual worksheets by users
- In Excel, you can set different passwords for different sheets, this means that one user could make changes to one worksheet using one password, and another could use a different password to make changes to another worksheet. But, sometimes, you just only want each user to be able to view and access their own sheet. Is this possible to be solved in Excel?
- Lock and protect cells in Excel
- In Excel, it's common to protect all cells from being modified by others. Sometimes, you may only need to protect specific cells or formula cells that shouldn't be changed, while allowing other cells to be edited or modified, as shown in the screenshot below. In this tutorial, we'll introduce quick methods for tackling these tasks in Excel.
Best Office Productivity Tools
Supercharge Your Excel Skills with Kutools for Excel, and Experience Efficiency Like Never Before. Kutools for Excel Offers Over 300 Advanced Features to Boost Productivity and Save Time. Click Here to Get The Feature You Need The Most...
Office Tab Brings Tabbed interface to Office, and Make Your Work Much Easier
- Enable tabbed editing and reading in Word, Excel, PowerPoint, Publisher, Access, Visio and Project.
- Open and create multiple documents in new tabs of the same window, rather than in new windows.
- Increases your productivity by 50%, and reduces hundreds of mouse clicks for you every day!
All Kutools add-ins. One installer
Kutools for Office suite bundles add-ins for Excel, Word, Outlook & PowerPoint plus Office Tab Pro, which is ideal for teams working across Office apps.
- All-in-one suite — Excel, Word, Outlook & PowerPoint add-ins + Office Tab Pro
- One installer, one license — set up in minutes (MSI-ready)
- Works better together — streamlined productivity across Office apps
- 30-day full-featured trial — no registration, no credit card
- Best value — save vs buying individual add-in
Table of contents
- Video
- Protect an Excel file with password
- Password protect Excel file from opening
- Password protect Excel file from modifying
- Password protect multiple Excel files from opening
- With a powerful tool – Kutools for Excel
- With VBA code
- Password protection warning
- Related Articles
- The Best Office Productivity Tools
- Comments