Tricks for changing the column width and row height in Excel
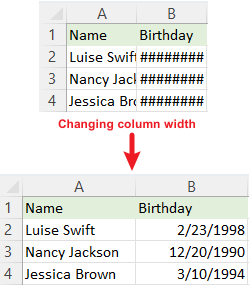
Have you ever input a date or some data into Excel, only to have it display as '####'? Or encountered content within cells that exceeds the default row height, making it hard to read? Such frustrating moments are all too common and typically mean your cell is just too narrow for its content. But fear not! In this article, we'll delve deep into the art of adjusting column width and row height, ensuring your data looks neat, tidy, and fully visible.
Change the column width
- By dragging the mouse
- By a versatile tool (change cell size based on inches, cm, pounds, pixels units)
- By setting to a specific number
- By using AutoFit to automatically fit the cell content
- By using copy and paste to match the width of another column
- By dragging mouse
- By setting to a specific number
- By using AutoFit to automatically fit the cell content
Video: Change cell column width and row height
Column width and row height – the basic things you need to know
Before diving into change column width and row height of cells, let's get acquainted with some basics:
The table below provides the minimum, default and maximum sizes for both column width and row height of a cell. While we won’t delve into exact units here (they can be a tad tricky), this table will be a helpful reference.
| Type | Min | Default | Max |
| Column | 0 (hidden) | 8.43 (64 pixels) | 255 |
| Row | 0 (hidden) | 15 (20 pixels) | 409 |
Clicking at the right boundary of a column header without releasing will show the column width; Clicking at the bottom line of a row number without releasing will show the row height.


By default, Excel uses 'point' as the unit under the normal view. However, when change to the page layout view, it's set to 'inch'.


A crucial thing to remember: Adjusting the width of a single cell affects the entire column. Similarly, adjusting a cell's height affects its entire row.
Change the column width
For fully showing the cell contents, you need to change the column width. In this section, we introduce 5 ways to make your work smoother whether you are a beginner or a seasoned user.
Change the column width by dragging mouse
The most commonly used method for changing column width is often manual dragging.
Hover over the right border of the column you wish to adjust at the top until it becomes a double arrow. Then click and drag to right or left to the desired size.
Change the column width by a versatile tool (change cell size based on inches, cm, mm, pixels units)
When it comes to adjusting cell sizes in Excel, Kutools for Excel's Adjust Cell Size feature offers a more advanced and user-friendly interface. It enables users to adjust column widths and row heights simultaneously within a single interface, streamlining the process. Furthermore, this feature provides flexibility in adjusting cell sizes, with options to use various units including inches, cm, pounds, and pixels. Let's explore how to utilize it to efficiently resize multiple cells.
After installing Kutools for Excel, select cells you want to adjust their sizes, click Kutools> Format> Adjust Cell Size, then in the popping dialog:
- Choose the unit type you want to resize based on.
- Specify the column width and row height, then click OK.


Result

- If you only wish to adjust the column width, tick the Column width checkbox and leave the Row height checkbox unchecked, then set your desired column size. The same principle applies in reverse for row height adjustments.
- To experience the power of the Adjust Cell Size feature, you must install Kutools for Excel first. Not yet? Download and get a free 30-day trial today and improve your Excel now.
Change column width by setting to a specific number
In Excel, you also can set a specific number for customizing the column width.
Step 1: Select the columns or cells you want to adjust
- A single column: Click the column header or any cell inside it.
- Several columns next to each other: Click the first column header and drag right.
- Columns not next to each other: Hold Ctrl and click the column headers or cells.
- Whole worksheet: Click at the Select All button
 between column A and row 1.
 between column A and row 1.
Here we select column A to column B.

Step 2: Format column width
Click Hometab, then go to Cellsgroup, select Format> Column Width.

Or you can right-click to choose Column Width in the context menu.

Step 3: Set the column width and click OK

Result

Change column width by using AutoFit to automatically fit the cell content
For those with diverse data lengths in a column or multiple columns, to quickly change the column width for showing the whole cell contents, the AutoFit feature is a lifesaver.
To auto-fit column width:
For one column:
Click the column header, then double click at the right boundary of the column header.
For multiple adjacent columns:
Click the first column header and drag to right to select columns, then double click at the right boundary of any selected column header.
For multiple non-adjacent columns:
Click the first column header, then hold Ctrl key to select other columns, then double click at the right boundary of any selected column header.
Or after selecting the columns, you can go to Hometab, select Format> AutoFit Column Widthto automatically adjust the column width to fit the cell contents.

Change column width by using copy and paste special to match the width of another column
To apply the column width from one column to another, follow these steps:
Step 1: Copy the cell
Select the cell with the desired column width, press Ctrl + C to copy it.

Step 2: Paste the column width
Highlight the target columns or cells, then right-click to select Paste Specialfrom the context menu.

In the Paste Special dialog, choose Column widths, click OK.


Result
Now, the width of the selected columns has been adjusted to match the copied cells'width.

Change the row height
There are three easy methods provided in Excel for changing the row height of cells. Let's explore them to get this done.
Change the row height by dragging mouse
For those who like hands-on adjustments, changing row height by dragging with your mouse is the most intuitive method.
Navigate to the row number on the left side of the Excel window, and hover over the bottom edge of the row number until the cursor changes to a two-sided arrow, click and drag up or down to adjust the row height.
Quickly change cell size in one interface
Revolutionize your Excel experience with Kutools for Excel's Adjust Cell Size feature! Easily tweak both column widths and row heights in one intuitive interface. Plus, choose from multiple measurement units like inches, cm, pounds, and pixels. Elevate your productivity – download and try it now!
Change the row height by setting to a specific number
If you want to set a specific row height for design or print purposes, setting a specific number is your best bet.
Step 1: Select the rows or cells you want to adjust
- A single row: Click the row number or any cell inside it.
- Several rows next to each other: Click the first row number and drag down.
- Rows not next to each other: Hold Ctrl and click the row numbers or cells.
- Whole worksheet: Click at the Select Allbutton between column A and row 1 .
Here we select row 2 to row 4.

Step 2: Format row height
Click Hometab, then go to Cellsgroup, select Format> Row Height.

Or you can right-click to choose Row Height in the context menu.

Step 3: Set the row height and click OK

Result

Change the row height by using AutoFit to automatically fit the cell content
Have you ever encountered rows where the content doesn't fit quite right? AutoFit is a magical tool designed for such scenarios. It automatically adjusts the row height to fit the content.
To auto-fit row height:
For one row:
Click the row number, then double click at the bottom edge of the row number.
For multiple adjacent rows:
Click the first row number and then drag down to select rows, double click at the bottom edge of any selected row number.
For multiple non-adjacent rows:
Click the first row number, then hold Ctrl key to select other rows, then double click at bottom edge of any selected row number.
Or you can go to Hometab, select Format> AutoFit Row Height to automatically change row height after selecting rows.

Change the default column width in the sheets or whole workbook
To maintain consistency across your workbook, you might consider adjusting the default column width. For example, the default column width in Excel is 8.43, now we will change the default column width to 12.
Step 1: Select the sheets you want to change the default column width
- To select a single sheet, click its sheet tab.
- To select several sheets, click on their sheet tabs while holding Ctrl key.

- To select all sheets, right-click on one sheet tab then choose Select All Sheets from the context menu.


Step 2: Change default column width
- Click Hometab, go to Cellsgroup, select Format> Default Width.

- Set a standard column width and click OK.


The information provided above details how to change cell size in Excel. I hope you find it valuable and beneficial. For more invaluable Excel tips and tricks that can transform your data processing, dive in here.
The Best Office Productivity Tools
Kutools for Excel - Helps You To Stand Out From Crowd
Kutools for Excel Boasts Over 300 Features, Ensuring That What You Need is Just A Click Away...
Office Tab - Enable Tabbed Reading and Editing in Microsoft Office (include Excel)
- One second to switch between dozens of open documents!
- Reduce hundreds of mouse clicks for you every day, say goodbye to mouse hand.
- Increases your productivity by 50% when viewing and editing multiple documents.
- Brings Efficient Tabs to Office (include Excel), Just Like Chrome, Edge and Firefox.
Table of contents
- Video: Change cell column width and row height
- Column width and row height – the basic things
- Change the column width
- By dragging the mouse
- By a versatile tool (change cell size based on inches, cm, mm, pixels units)
- By setting to a specific number
- By using AutoFit to automatically fit the cell content
- By using copy and paste to match the width of another column
- Change the row height
- By dragging mouse
- By setting to a specific number
- By using AutoFit to automatically fit the cell content
- Change the default column width in sheets or whole workbook
- Related Articles
- Best Office Productivity Tools
- Comments