How to (auto) archive completed tasks only in Outlook?
It’s easy to archive a whole task folder in Outlook. However, normal archiving method deletes tasks by modified date, which may delete in-processing or not started tasks. Therefore, is there a way to archive completed tasks only without affecting any in-processing or not started ones? This article will introduce a workaround for you.
(Auto) archive completed tasks only in Outlook
(Auto) archive completed tasks only in Outlook
To archive all completed tasks only in a task folder in Outlook, please do as follows:
1. In the "Tasks" view, click "Folder" > "New Folder" to create a new task folder.

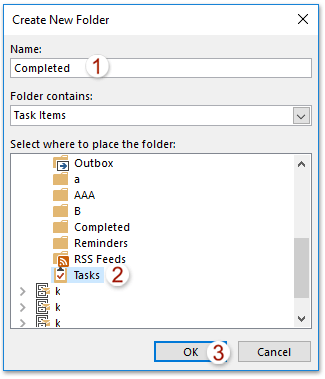
2. In the opening Create New Folder dialog box, (1) type a new name for the new task folder in the "Name" box, (2) click to highlight the "Tasks" folder where you will place the new folder in the "Select where to place the folder" list box, and (3) click the "OK" button. See screenshot:
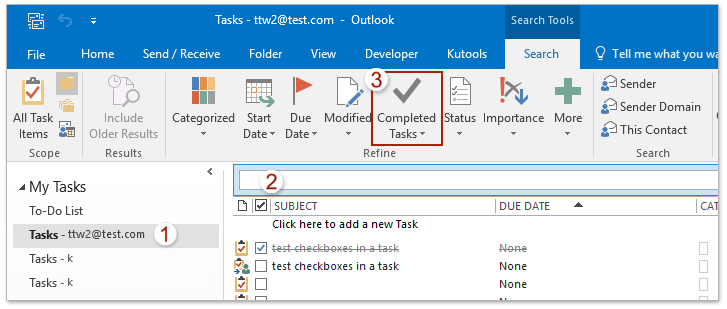
3. Click to open the task folder where you will archive completed tasks only, press "Ctrl" + "E" keys together to activate the "Search Tools", and then click "Search" > "Completed Tasks". See screenshot:
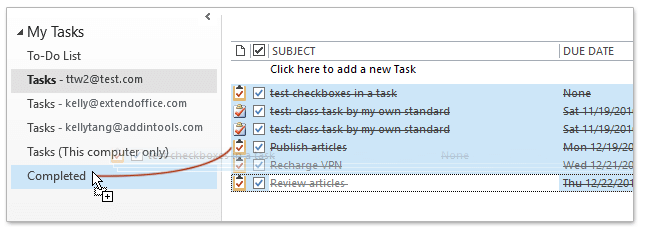
4. Now all completed tasks are found out. Select and drag all of them to the new created task folder on the "Navigation Pane". See screenshot:
5. Click "File" > "Info" > "Tools" > "Clean Up Older Items" (or "File" > "Info" > "Cleanup Tools" > "Archive") to open the Archive dialog box.
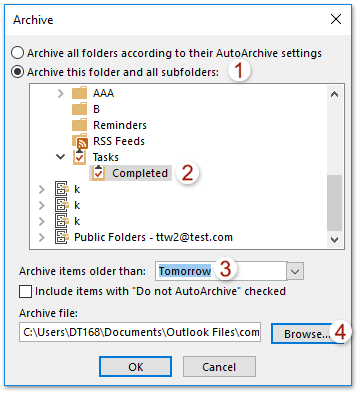
6. In the popping out Archive dialog box, (1) check the "Archive this folder and all subfolders" option, (2) click to select the new created task folder in below list box, (3) type "Tomorrow" in the "Archive items older than" box, and (4) click the "Browse" button. See screenshot:
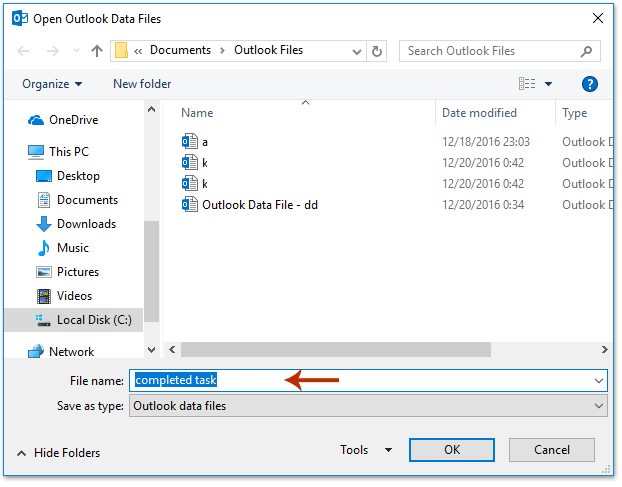
7. Now the Open Outlook Data Files dialog box comes out, type a name for the new archive file in the "File name" box, and then click the "OK" buttons successively to close two dialog boxes.
8. In the popping out Microsoft Outlook, please click the "Yes" button to go ahead.

So far, all completed tasks you moved to the new task folder have been archived manually.
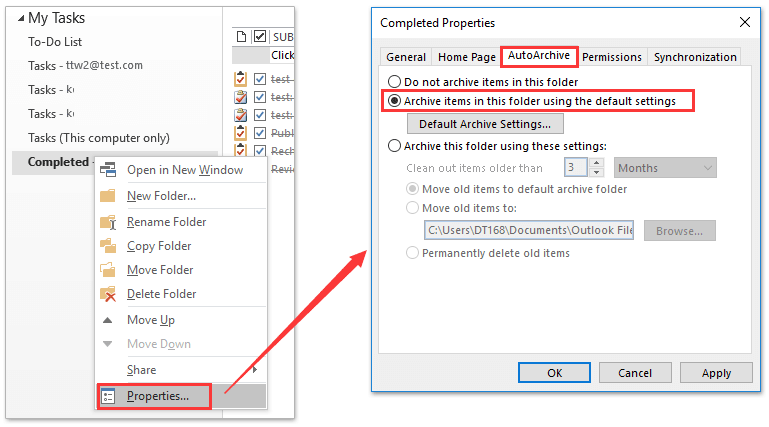
Note: If you need to set AutoArchive settings for the new task folder, please right-click the new task folder, select "Properties" from the context menu, and then specify the AutoArchive settings in the popping out Properties dialog box. See screenshot:
Related Articles
Best Office Productivity Tools
Experience the all-new Kutools for Outlook with 100+ incredible features! Click to download now!
📧 Email Automation: Auto Reply (Available for POP and IMAP) / Schedule Send Emails / Auto CC/BCC by Rules When Sending Email / Auto Forward (Advanced Rules) / Auto Add Greeting / Automatically Split Multi-Recipient Emails into Individual Messages ...
📨 Email Management: Recall Emails / Block Scam Emails by Subjects and Others / Delete Duplicate Emails / Advanced Search / Consolidate Folders ...
📁 Attachments Pro: Batch Save / Batch Detach / Batch Compress / Auto Save / Auto Detach / Auto Compress ...
🌟 Interface Magic: 😊More Pretty and Cool Emojis / Remind you when important emails come / Minimize Outlook Instead of Closing ...
👍 One-click Wonders: Reply All with Attachments / Anti-Phishing Emails / 🕘Show Sender's Time Zone ...
👩🏼🤝👩🏻 Contacts & Calendar: Batch Add Contacts From Selected Emails / Split a Contact Group to Individual Groups / Remove Birthday Reminders ...
Use Kutools in your preferred language – supports English, Spanish, German, French, Chinese, and 40+ others!


🚀 One-Click Download — Get All Office Add-ins
Strongly Recommended: Kutools for Office (5-in-1)
One click to download five installers at once — Kutools for Excel, Outlook, Word, PowerPoint and Office Tab Pro. Click to download now!
- ✅ One-click convenience: Download all five setup packages in a single action.
- 🚀 Ready for any Office task: Install the add-ins you need, when you need them.
- 🧰 Included: Kutools for Excel / Kutools for Outlook / Kutools for Word / Office Tab Pro / Kutools for PowerPoint