How to Insert Multiple Pictures with Filenames in Word?
To insert multiple pictures with filenames in Word, you can use several methods depending on how many images you need to add. For a few pictures, you can insert them manually and type the filenames below each image. For a large number of pictures, you can use VBA code to automatically insert images and display their filenames. If you want a more structured layout, you can add filenames as captions. For the easiest batch solution, Kutools for Word allows you to insert multiple pictures with filenames quickly without writing code.
Why Insert Pictures with Filenames in Word?
Insert Multiple Pictures with Filenames in a Word Document
- Method 1: Insert Manually and Add Filenames
- Method 2: Insert with VBA code
- Method 3: Insert Pictures with Filenames as Captions
- Method 4: Insert with Kutools for Word
Why Insert Pictures with Filenames in Word?
When creating a Word document that contains many pictures, inserting the images alone is often not enough. In many cases, you may also need to display the original filename under or above each picture so that readers can easily identify the image source, file order, product name, document reference, or related information.
For example, you may want to insert a batch of product photos into Word and show each product image’s filename below it. Or you may need to create a photo report, image catalog, inspection document, training material, or archive file where every picture must be clearly labeled.
Manually inserting pictures one by one and typing filenames can be time-consuming, especially when you have dozens or hundreds of images. This article introduces several practical methods to insert multiple pictures with filenames in Word, including manual insertion, VBA code, Word captions, and Kutools for Word.
Method 1: Insert Manually and Add Filenames
If the document is already open in Word, you should never rename it directly from File Explorer. Instead, use one of the safe methods below.
Steps:
- Open the Word document where you want to insert the pictures, and place the cursor where you want the pictures to appear.
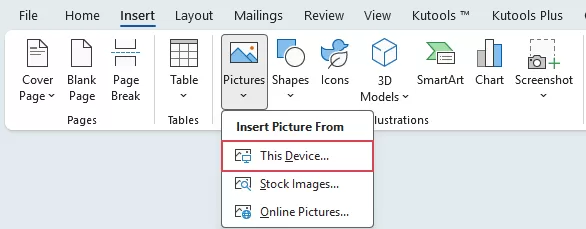
- Click Insert > Pictures > This Device.
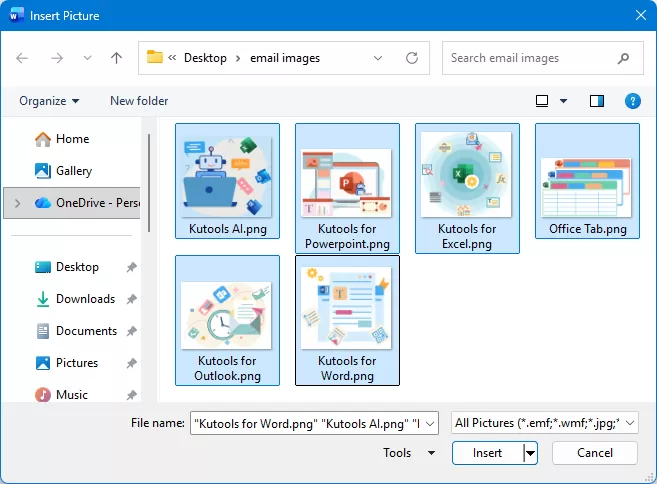
- In the Insert Picture dialog box, select one or more pictures. Click Insert to add them to the document.
- All selected pictures are inserted into the Word document. You can add the corresponding filename before or after each image as a caption or normal text.


This method is easy to understand and does not require any special tools or code. It is suitable when you only need to insert a few pictures.
It can be slow and repetitive if you need to insert many images. You also need to type each filename manually, which may cause spelling mistakes or inconsistent formatting.
Method 2: Insert Multiple Pictures with Filenames Using VBA
If you need to insert many pictures and automatically display each filename, using a VBA macro is a better solution. The macro can insert all images from a selected folder and add the filename for each picture automatically.
Steps:
- Open the Word document where you want to insert the pictures.
- Press Alt + F11 to open the Microsoft Visual Basic for Applications window.
- Click Insert > Module. Then, copy and paste the following VBA code into the module window:
Sub PicWithfilename()
    Dim xFileDialog As FileDialog
    Dim xPath, xFile As Variant
    On Error Resume Next
    Set xFileDialog = Application.FileDialog(msoFileDialogFolderPicker)
    If xFileDialog.Show = -1 Then
        xPath = xFileDialog.SelectedItems.Item(1)
        If xPath <> "" Then
            xFile = Dir(xPath & "\*.*")
            Do While xFile <> ""
                If UCase(Right(xFile, 3)) = "PNG" Or _
                    UCase(Right(xFile, 3)) = "TIF" Or _
                    UCase(Right(xFile, 3)) = "JPG" Or _
                    UCase(Right(xFile, 3)) = "GIF" Or _
                    UCase(Right(xFile, 3)) = "BMP" Then
                    With Selection
                        .InlineShapes.AddPicture xPath & "\" & xFile, False, True
                        .InsertAfter vbCrLf
                        .MoveDown wdLine
                        .Text = xPath & "\" & xFile & Chr(10)
                        .MoveDown wdLine
                    End With
                End If
                xFile = Dir()
            Loop
        End If
    End If
End Sub- Press F5 or click Run to execute the code. In the file picker window, select the folder containing pictures you want to insert.
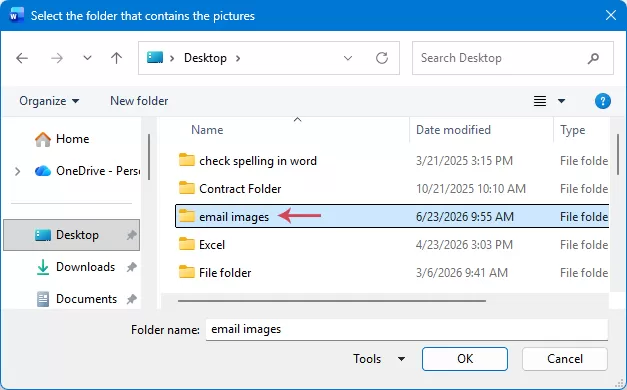
- Click OK. The selected pictures are inserted into the Word document one by one, and each file path and name is automatically added below its corresponding picture.


- This method can save a lot of time when inserting many pictures.
- It reduces manual typing errors because filenames are generated automatically from the selected image files.
- This method requires VBA.
- Some users may not be familiar with macros.
- Macro settings may need to be enabled in Word before the code can run.
Method 3: Insert Pictures with Filenames as Captions with VBA code
Another option is to use filenames as captions. This is especially helpful when you want the filenames to appear in a more formal document format. Captions can make the document look more structured. They are useful for reports, manuals, catalogs, and documents that require image labels.
This method works best when the filenames need to be shown as formal figure captions, such as “Figure 1: Product-A.jpg” or “Image 2: Meeting-Room.png”.
Steps:
- Open the Word document where you want to insert the pictures.
- Press Alt + F11 to open the Microsoft Visual Basic for Applications window.
- Click Insert > Module. Then, copy and paste the following VBA code into the module window:
Sub InsertPicturesWithFilenameCaptions()
    Dim fd As FileDialog
    Dim folderPath As String
    Dim fileName As String
    Dim doc As Document
    Dim img As InlineShape
    Dim rng As Range
    Dim maxWidth As Single
    Set doc = ActiveDocument
    Set fd = Application.FileDialog(msoFileDialogFolderPicker)
    With fd
        .Title = "Select the folder that contains the pictures"
        If .Show <> -1 Then Exit Sub
        folderPath = .SelectedItems(1) & "\"
    End With
    maxWidth = doc.PageSetup.PageWidth - doc.PageSetup.LeftMargin - doc.PageSetup.RightMargin
    fileName = Dir(folderPath & "*.*")
    Do While fileName <> ""
        If LCase(fileName) Like "*.jpg" _
            Or LCase(fileName) Like "*.jpeg" _
            Or LCase(fileName) Like "*.png" _
            Or LCase(fileName) Like "*.bmp" _
            Or LCase(fileName) Like "*.gif" _
            Or LCase(fileName) Like "*.tif" _
            Or LCase(fileName) Like "*.tiff" Then
            Set rng = doc.Range(doc.Content.End - 1)
            Set img = doc.InlineShapes.AddPicture( _
                FileName:=folderPath & fileName, _
                LinkToFile:=False, _
                SaveWithDocument:=True, _
                Range:=rng)
            If img.Width > maxWidth Then
                img.LockAspectRatio = True
                img.Width = maxWidth
            End If
            'Add filename as a caption
            img.Range.InsertCaption _
                Label:="Figure", _
                Title:=": " & fileName, _
                Position:=wdCaptionPositionBelow
            Set rng = doc.Range(doc.Content.End - 1)
            rng.InsertAfter vbCrLf
        End If
        fileName = Dir
    Loop
    MsgBox "Pictures with filename captions have been inserted successfully.", vbInformation
End Sub- Press F5 or click Run to execute the code. In the file picker window, select the folder containing pictures you want to insert.
- Click OK. All images in the selected folder will be inserted into the Word document, and each image’s filename will be automatically added as a caption.


- Inserts many pictures at once without adding them one by one.
- Uses each picture’s filename as a caption, reducing manual typing.
- Captions make the Word document clearer and easier to read.
- Useful for reports, product images, photo records, and image archives.
- This method requires VBA.
- Some users may not be familiar with macros.
- Macro settings may need to be enabled in Word before the code can run.
Method 4: Insert Pictures with Filenames Using Kutools for Word
If you want a faster and easier way to insert multiple pictures with filenames, Kutools for Word provides a more convenient solution. Instead of inserting pictures manually or writing VBA code, you can use the built-in feature to batch insert images and automatically include filenames.
Steps:
- Open the Word document where you want to insert the pictures.
- Click Kutools > Multi-Picture, see screenshot:

- In the popped-out Multi-Picture dialog box, perform the following operations:

- Add pictures by using one of the following buttons:
- Click Add Files to select individual image files.
- Click Add Folder to import all pictures from a selected folder.
- Click Add Folder (Including Subfolders) to import pictures from the selected folder and its subfolders.
- Check the Insert file path of each picture as caption option to insert the file path or filename as a caption for each picture.
- Click Insert button.
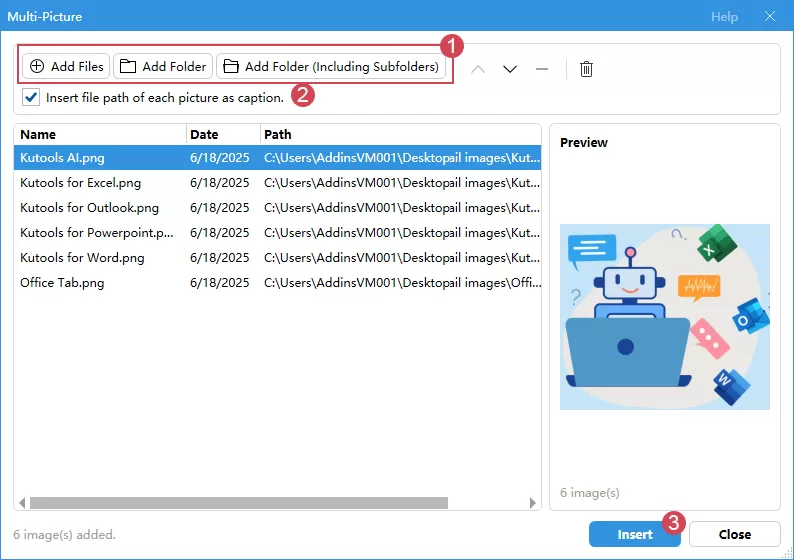

If needed, use the move up, move down, or delete buttons to adjust the picture order or remove unwanted pictures from the list.
All selected pictures will be inserted into the Word document, and the file path and name of each picture will be automatically added as a caption. 
Insert Multiple Pictures with Filenames Easily
Use Kutools for Word to quickly insert pictures from files, folders, or subfolders, and automatically add filenames or file paths as captions.
- ✓ Add many pictures from files, folders, or subfolders quickly.
- ✓ Insert filenames or file paths as captions automatically.
- ✓ Save time and avoid manual typing mistakes.
- ✓ Move pictures up or down, or remove unwanted pictures easily.
Comparison of Different Methods
Frequently Asked Questions
Can I insert multiple pictures into Word at once?
Yes. You can select multiple pictures in the Insert Picture dialog box and insert them into Word at the same time. However, Word does not automatically add filenames for each picture by default.
Which method is best for inserting many pictures with filenames?
If you only have a few pictures, manual insertion is enough. If you have many pictures, VBA or Kutools for Word is more efficient. Kutools is easier for users who prefer a visual interface, while VBA is useful for users who are comfortable with macros.
Can I resize pictures automatically when inserting them?
Yes, this can be done with VBA by setting the image width or height in the code. If you use Kutools for Word, you can insert the pictures first and then use Word’s picture formatting tools to adjust their size.
Why are my pictures inserted in the wrong order?
Pictures may be inserted based on the order in which they are selected or listed in the file dialog. To keep the correct order, rename your pictures with sequential numbers, such as 001.jpg, 002.jpg, and 003.jpg, before inserting them.
Conclusion
Inserting multiple pictures with filenames in Word is useful when you need to create organized image documents, photo reports, product catalogs, reference materials, or picture-based records.
- For a small number of images, you can insert pictures manually and type the filenames yourself.
- If you want to automate the process, VBA code can help insert pictures and filenames at the same time.
- If you prefer a more user-friendly and visual solution, Kutools for Word provides a convenient way to batch insert pictures with filenames without writing code.
Best Office Productivity Tools
Kutools for Word - Elevate Your Word Experience with Over 100 Remarkable Features!
🤖 Kutools AI Features: AI Assistant / Real-Time Assistant / Super Polish (Preserve Format) / Super Translate (Preserve Format) / AI Redaction / AI Proofread...
📘 Document Mastery: Split Pages / Merge Documents / Export Selection in Various Formats (PDF/TXT/DOC/HTML...) / Batch Convert to PDF...
✏ Contents Editing: Batch Find and Replace across Multiple Files / Resize All Pictures / Transpose Table Rows and Columns / Convert Table to Text...
🧹 Effortless Clean: Sweap away Extra Spaces / Section Breaks / Text Boxes / Hyperlinks / For more removing tools, head to the Remove group...
➕ Creative Inserts: Insert Thousand Separators / Check Boxes / Radio Buttons / QR Code / Barcode / Multiple Pictures / Discover more in the Insert group...
🔍 Precision Selections: Pinpoint Specific Pages / Tables / Shapes / Heading Paragraphs / Enhance navigation with more Select features...
⭐ Star Enhancements: Navigate to Any Location / Auto-Insert Repetitive Text / Toggle Between Document Windows / 11 Conversion Tools...
🌍 Supports 40+ Languages: Use Kutools in your preferred language – supports English, Spanish, German, French, Chinese, and 40+ others!

Office Tab - Brings Tabbed interface to Office, Make Your Work Much Easier
- Enable tabbed editing and reading in Word, Excel, PowerPoint, Publisher, Access, Visio and Project.
- Open and create multiple documents in new tabs of the same window, rather than in new windows.
- Increases your productivity by 50%, and reduces hundreds of mouse clicks for you every day!
✨ Kutools for Office – One Installation, Five Powerful Tools!
Includes Office Tab Pro · Kutools for Excel · Kutools for Outlook · Kutools for Word · Kutools for PowerPoint
📦 Get all 5 tools in one suite | 🔗 Seamless integration with Microsoft Office | ⚡ Save time and boost productivity instantly
Best Office Productivity Tools
Kutools for Word - 100+ Tools for Word
- 🤖 Kutools AI Features: AI Assistant / Real-Time Assistant / Super Polish / Super Translate / AI Redaction / AI Proofread
- 📘 Document Mastery: Split Pages / Merge Documents / Batch Convert to PDF
- ✏ Contents Editing: Batch Find and Replace / Resize All Pictures
- 🧹 Effortless Clean: Remove Extra Spaces / Remove Section Breaks
- ➕ Creative Inserts: Insert Thousand Separators / Insert Check Boxes / Create QR Codes
- 🌍 Supports 40+ Languages: Kutools speaks your language – 40+ languages supported!
Table of contents
- Why Insert Pictures with Filenames in Word?
- Method 1: Insert Manually and Add Filenames
- Method 2: Insert with VBA code
- Method 3: Insert Pictures with Filenames as Captions
- Method 4: Insert with Kutools for Word
- Comparison of Different Methods
- Frequently Asked Questions
- Conclusion
- The Best Office Productivity Tools
Kutools for Word
Brings 100+ advanced features to Word
- ⬇️ Free Download
- 🛒 Purchase Now
- 📘 Feature Tutorials
- 🎁 60-Day Free Trial