How to resize all charts or pictures in Excel quickly?
If you work with Excel files that include multiple charts or images, you’ve probably seen how mismatched sizes can clutter your worksheet, complicate interpretation, and throw off alignment in printouts or dashboards. By standardizing every chart and picture—whether via built-in sizing tools or a simple VBA macro—you’ll instantly create a clean, cohesive layout that highlights your data and looks professional, whether you’re preparing for a meeting, sharing reports, or just keeping your own workspace organized. This tutorial provides practical, easy-to-follow steps—using built-in Excel features and VBA macros—to quickly and uniformly resize all charts or pictures at once.
 Resize all charts at once
When your worksheet includes several charts—such as bar graphs, line charts, or pie charts—each with different dimensions, it can be challenging to present your data in a cohesive way. To ensure that all charts appear uniform, follow these detailed instructions:
Step1: Select all charts in active worksheet
Select all charts in the active worksheet at once, which is essential if you want to make changes to all of them simultaneously. Manually clicking each chart while holding down the Ctrl key works, but it can be time-consuming, especially in large worksheets. For increased efficiency, you can use a simple VBA macro to automatically select all chart objects at once. To use the VBA macro:
- Press Alt + F11 to open the VBA editor.
- In the VBA window, click Insert > Module.
- Copy and paste the following code into the module:
- After adding the macro, press F5 or click the Run button to select all the charts automatically in your active worksheet.
Public Sub SelectAllCharts()
'Updated by Extendoffice 2025/7/15
ActiveSheet.ChartObjects.Select
End Sub
Step 2: Set size for the selected charts
- Once all charts are selected, the Drawing Tools, also known as Chart Tools (depending on your Excel version), will appear in the Ribbon, typically under a highlighted Format tab.
- In the Size group, enter the desired height and width for the charts. For example, if you want every chart to be 5 cm high and 8 cm wide, input those values directly. Units can be adjusted as needed—Excel will recognize measurements in centimeters, inches, or pixels depending on your regional settings.


Result: All selected charts will instantly adopt the set size, neatly aligning your worksheet and improving visual uniformity:


Unlock Excel Magic with Kutools AI
- Smart Execution: Perform cell operations, analyze data, and create charts—all driven by simple commands.
- Custom Formulas: Generate tailored formulas to streamline your workflows.
- VBA Coding: Write and implement VBA code effortlessly.
- Formula Interpretation: Understand complex formulas with ease.
- Text Translation: Break language barriers within your spreadsheets.
Resize all pictures at once
Pictures in Excel serve many purposes such as company logos, icons, and illustrations to support your data. When pictures of various sizes are scattered throughout a worksheet, it can lead to a disorganized appearance and alignment issues. Instead of resizing pictures one by one, you can adjust all images to your preferred size in one efficient process:
Step1: Select all pictures in active worksheet
First, select all pictures in the active worksheet. This can be done manually by holding the Ctrl key and clicking each picture. However, for greater speed and accuracy, use this VBA macro to select all pictures at once:
- Press Alt + F11 to open the VBA editor.
- Click Insert > Module to add a new module.
- Copy and paste the code below into the module window:
- Run the macro by pressing F5 or choosing Run. All pictures in the current worksheet will be selected at once, ensuring none are missed, even if some are layered or partially hidden.
Public Sub SelectAllPics()
'Updated by Extendoffice 2025/7/15
ActiveSheet.Pictures.Select
End SubStep 2: Set size for the selected pictures
- With all pictures selected, right-click any picture among those selected and choose Format Object from the context menu. Please note that on some versions of Excel or with some images, the menu might instead read Format Picture.

- In the Format Picture dialog box that opens, click the Size option from the sidebar. Here, carefully enter your desired width and height values. Make sure the aspect ratio lock is disabled if you want to specify both dimensions exactly; otherwise, Excel will keep the proportions fixed, adjusting one dimension automatically as you change the other.
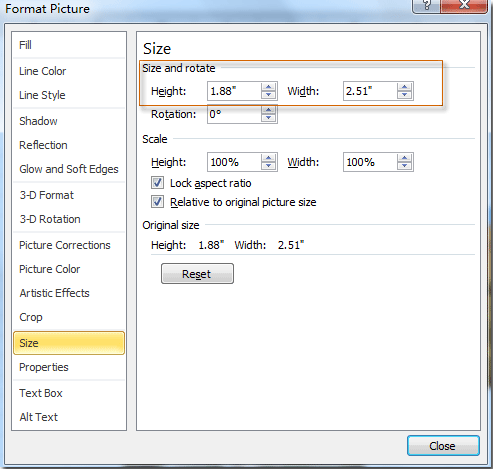
- Check over your entries before clicking OK, as any mistaken value (such as swapping width and height or entering excessively large sizes) can distort your pictures. After clicking OK, all selected pictures will instantly update to the specified size, giving your worksheet a consistent look that aids both readability and professional appearance.


This approach is especially useful when preparing reports containing multiple images or when arranging visual materials for dashboards. If you notice that some images are not resizing, ensure they are not grouped or set as backgrounds, as these may require special treatment.
By applying these methods for both charts and pictures, you can quickly standardize their dimensions, creating organized and visually appealing worksheets. If you frequently perform such formatting tasks, consider saving these VBA macros for repeated use. For complex scenarios, such as resizing objects across multiple sheets or only resizing selected image types, custom VBA solutions can be further tailored.
Troubleshooting Tips and Practical Suggestions:
- If resizing does not apply to all intended objects, check for hidden, grouped, or protected items that may block changes.
- To avoid overwriting original objects, it is advisable to save your workbook or create a backup before large batch changes.
- When resizing images or charts with important details, double-check that the chosen size does not make text or details unreadable. Use the print preview to assess results.
Best Office Productivity Tools
Supercharge Your Excel Skills with Kutools for Excel, and Experience Efficiency Like Never Before. Kutools for Excel Offers Over 300 Advanced Features to Boost Productivity and Save Time. Click Here to Get The Feature You Need The Most...
Office Tab Brings Tabbed interface to Office, and Make Your Work Much Easier
- Enable tabbed editing and reading in Word, Excel, PowerPoint, Publisher, Access, Visio and Project.
- Open and create multiple documents in new tabs of the same window, rather than in new windows.
- Increases your productivity by 50%, and reduces hundreds of mouse clicks for you every day!
All Kutools add-ins. One installer
Kutools for Office suite bundles add-ins for Excel, Word, Outlook & PowerPoint plus Office Tab Pro, which is ideal for teams working across Office apps.
- All-in-one suite — Excel, Word, Outlook & PowerPoint add-ins + Office Tab Pro
- One installer, one license — set up in minutes (MSI-ready)
- Works better together — streamlined productivity across Office apps
- 30-day full-featured trial — no registration, no credit card
- Best value — save vs buying individual add-in