How to auto update drop down list in Excel?
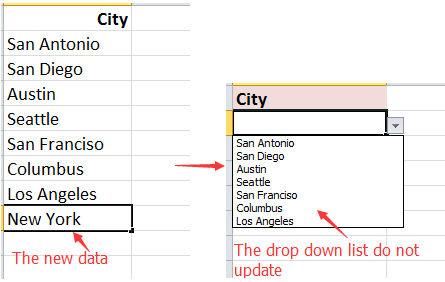
Drop down lists are frequently used in Excel to make data entry more standardized and efficient, especially for daily reporting, inventory selection, and data classification tasks. However, many users encounter a common limitation: when you add new items immediately below the original source range, the drop down list does not automatically include these additions. By default, Excel only recognizes the initially specified range, so new entries outside that range do not appear in the drop down by default. To address this, Excel provides several methods to create a dynamically updating drop down list that automatically expands when you add new data.
This guide introduces practical methods to implement an auto-updating drop down list in Excel, helping reduce maintenance effort and potential input errors, especially in tables and lists that regularly grow.
 Auto update drop down list with formula
There are several scenarios where you need the drop down list to update automatically — for example, maintaining a product list, managing members in a sign-up form, or keeping track of project tasks that are regularly modified. This method leverages the OFFSET function to create a dynamic range so that your drop down list can automatically include all items as you add new entries in a column.
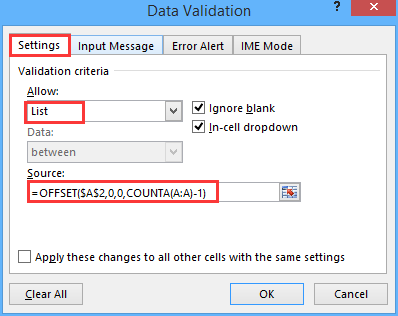
1. Select the cell where you want to insert the drop down list, then navigate to Data > Data Validation > Data Validation. See screenshot:

2. In the Data Validation dialog, go to the Settings tab, select List from the Allow options, then enter the dynamic range formula below into the Source box:
=OFFSET($A$2,0,0,COUNTA(A:A)-1)
Parameter explanation and practical tips:
- A2 is the first cell of your intended data range. Adjust this to match the starting cell of your actual list.
- A:A refers to the entire column containing your list data. This setup ensures that as you add more items in this column, the function dynamically recalculates the range size.
- If you have blank cells within the column or use subheaders, you may need to adjust the formula or ensure consistency in your data placement to avoid blank items in your drop down.
- For large data sets, keep in mind that volatile functions like OFFSET may affect performance slightly, as they recalculate on each change.
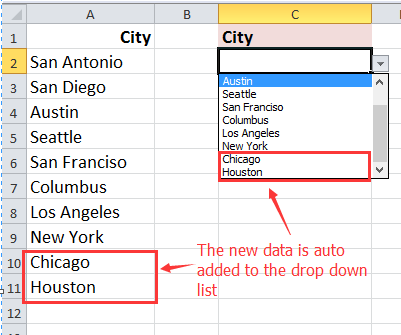
3. Click OK. Now you have created a drop down list that updates whenever new data is entered into the original column. When you add more items within the expected range, they will instantly appear as selectable values in the drop down list.

Troubleshooting and tips:
- If the drop down displays unexpected blank entries, check for extra spaces or hidden rows in your source column.
- If the formula returns an error, verify that your data does not contain non-contiguous ranges or completely blank columns.
- Remember to extend your source formula if your list starts somewhere other than row 2, modifying both the cell reference and COUNTA(A:A) appropriately.
Use Table as the drop down list source (auto-expands with new items)
Using an Excel Table as the source range for your drop down list is an efficient and beginner-friendly approach. Excel Tables automatically expand as new items are added, so the drop down list remains up to date without the need to adjust range references or formulas manually.
This method is particularly suitable for users managing lists that frequently grow or change, such as employee rosters, inventory, or event sign-up sheets. The main advantage is simplicity and reliability in maintaining up-to-date lists, but note that this approach works best when the source data is on the same sheet or workbook, as Tables do not support cross-workbook references in data validation.
1. Highlight your source data range (for example, A2:A6).
2. Go to the Insert tab and choose Table. Ensure the “My table has headers” box is checked if your list includes headers.
3. Excel will format your range as a Table. By default, it might be named Table1 (you can check or rename the Table from the Table Design tab, using the Table Name box on the left).
4. Click on the cell where you need the drop down list, then go to Data > Data Validation.
5. Select List option from the Allow drop down and then in the Source box, enter a reference to your Table column, for example:
=INDIRECT("Table1[Column1]")6. Click OK. Now, whenever you add new data below the Table, the column and drop down list will automatically update to include the new entries.
Note and tips:
- Excel Tables provide a structured range that expands and contracts as the data changes, making it ideal for lists that are expected to change frequently.
- If you need to reference your drop down list on another sheet, use
=INDIRECT("Table1[Column1]"), as direct Table references in data validation may be limited to the current sheet in some Excel versions. - This approach avoids blank values in the drop down if your list contains only non-empty entries.
Use VBA to update the drop down source range automatically
For advanced and automated scenarios, especially when working with longer lists or automating workbook maintenance tasks, you can use VBA code to automatically update the range used in your drop down list whenever new data is added. This is useful in complex solutions where multiple drop downs need to reflect evolving source lists, or when managing drop downs for multiple users.
1. Press Alt+F11 to open the VBA editor, double-click the worksheet where your data validation exists in the VBAProject.
2. Copy and paste the following code into the module.
Private Sub Worksheet_Change(ByVal Target As Range)
    Dim sourceColumn As Range
    Dim validationCell As Range
    Dim lastRow As Long
    Set sourceColumn = Me.Range("A:A") ' Change to your source column
    If Not Intersect(Target, sourceColumn) Is Nothing Then
        Application.EnableEvents = False
        lastRow = Me.Cells(Me.Rows.Count, sourceColumn.Column).End(xlUp).Row
        Set validationCell = Me.Range("D1:D100") ' Change to your validation cell
        With validationCell.Validation
            .Delete
            .Add Type:=xlValidateList, AlertStyle:=xlValidAlertStop, Operator:=xlBetween, _
                 Formula1:="=$A$1:$A$" & lastRow
        End With

        Application.EnableEvents = True
    End If
End Sub
3. Then, close the code window. Each time you add data to your source range, the drop down list will be updated automatically.
- Source column ("A:A" where your data is added)
- Validation cell/range ("D1:D100" where dropdown exists)
- The code automatically runs when changes are made to the worksheet
- It finds the last row with data and updates the validation range accordingly
- Make sure to enable macros for this to work

Unlock Excel Magic with Kutools AI
- Smart Execution: Perform cell operations, analyze data, and create charts—all driven by simple commands.
- Custom Formulas: Generate tailored formulas to streamline your workflows.
- VBA Coding: Write and implement VBA code effortlessly.
- Formula Interpretation: Understand complex formulas with ease.
- Text Translation: Break language barriers within your spreadsheets.
Related Articles:
Best Office Productivity Tools
Supercharge Your Excel Skills with Kutools for Excel, and Experience Efficiency Like Never Before. Kutools for Excel Offers Over 300 Advanced Features to Boost Productivity and Save Time. Click Here to Get The Feature You Need The Most...
Office Tab Brings Tabbed interface to Office, and Make Your Work Much Easier
- Enable tabbed editing and reading in Word, Excel, PowerPoint, Publisher, Access, Visio and Project.
- Open and create multiple documents in new tabs of the same window, rather than in new windows.
- Increases your productivity by 50%, and reduces hundreds of mouse clicks for you every day!
All Kutools add-ins. One installer
Kutools for Office suite bundles add-ins for Excel, Word, Outlook & PowerPoint plus Office Tab Pro, which is ideal for teams working across Office apps.
- All-in-one suite — Excel, Word, Outlook & PowerPoint add-ins + Office Tab Pro
- One installer, one license — set up in minutes (MSI-ready)
- Works better together — streamlined productivity across Office apps
- 30-day full-featured trial — no registration, no credit card
- Best value — save vs buying individual add-in