Create and use data entry form in Excel
Data entry can be a tedious and repetitive task, but Excel provides a powerful solution to make it faster and more organized: the data entry form. With this feature, you can simplify data input, reduce errors, and streamline workflows, especially when dealing with large datasets. In this guide, we'll show you step-by-step how to create and use a data entry form in Excel, even without prior experience.
Create and use data entry form in Excel
Quickly use the Data Form feature of Kutools for Excel
Create and use data entry form in Excel
Add the Form tool to ribbon
The Data Form feature isn’t directly visible in Excel’s default interface, so you’ll need to add it to the ribbon first. Here’s how:
- Click the small dropdown arrow of the "Quick Access Toolbar", and select "More Commands" from the pop-up menu.

- In the "Excel Options" dialog box, specify the following operations:
- Select "All Commands" from the "Choose commands from" dropdown menu.
- Scroll down the list of command until you see "Form…" and click on it.
- Click the "Add" button to add the "Form" to the list of QAT commands on the right.
- At last, click OK button.

- Now, you can see the "Form" icon is displayed at the "Quick Access Tollbar", see screenshot:


Use the Data Form
Once the Form tool is added, you can start using it for data entry and management.
- Prepare your dataset with column headers in the first row, and then create a table for the data. Select the data range and click "Insert" > "Table", in the dialog box, click "OK".

- Click anywhere within your table, then, click the "Form" button in the ribbon.
- A pop-up form will appear with fields corresponding to your column headers. Click the "New" button and type the information in the appropriate fields one by one.

- Once you’ve finished, press the "Enter" key or click the "New" button again to insert the data to the table and open a blank form for the next record.


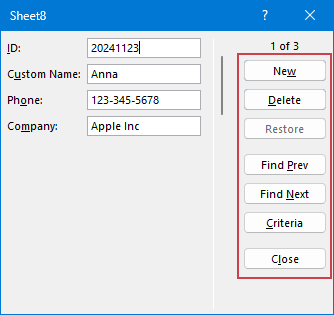
- "New": Create a new record.
- "Delete": Delete an existing record.
- "Restore": Restore the original data for an existing entry if you haven’t yet clicked "New" or pressed "Enter". This is useful when editing and needing to undo changes.
- "Find Prev": Navigate to the previous record in the dataset.
- "Find Next": Navigate to the next record in the dataset.
- "Criteria": Enable you to filter and find specific records.
- "Close": Close the form and return to the worksheet.
Quickly use the Data Form feature of Kutools for Excel
Simplify data entry in Excel with the powerful Data Form feature from Kutools for Excel! Designed for efficiency and ease of use, this tool allows you to quickly input, edit, and manage data in a structured format without the need for complex setups or formulas.
- Click a cell where you want to insert the data below. Then, click "Kutools" > "View" > "Data Form" to open the "Data Form" dialog box.
- In the "Data Form" dialog box, click "New" button, and type the information in the appropriate fields one by one.

- Once you’ve finished, click "Apply" button to insert the new record below the cell you selected. See screenshot:


- "New": Create a new record.
- "Apply": The new entered data will be inserted into the table or the changes you make in the Data Form will be synchronized to the original table. .
- "Undo cell", "Undo entire row": Restore the original data for an existing entry if you haven’t yet clicked "New" or pressed "Enter". This is useful when editing and needing to undo changes.
- "Previous one", "Next one": Click to show the data in the preview or next row
- "Previous page", "Next page": Click to show the data of the row in the previous page or next page of the current sheet.
- "Delete": Delete the current row.
- "Close": Exit or close the Data Form dialog box.
Data entry forms simplify data management, reduce errors, and boost productivity. By adding the Form tool to the ribbon, you can easily use Excel's built-in features for efficient data input. For a quicker and more intuitive option, Kutools for Excel offers an enhanced Data Form feature to streamline your workflow. Choose the method that suits you best and start managing your data effortlessly! If you're interested in exploring more Excel tips and tricks, our website offers thousands of tutorials.
Best Office Productivity Tools
Supercharge Your Excel Skills with Kutools for Excel, and Experience Efficiency Like Never Before. Kutools for Excel Offers Over 300 Advanced Features to Boost Productivity and Save Time. Click Here to Get The Feature You Need The Most...
Office Tab Brings Tabbed interface to Office, and Make Your Work Much Easier
- Enable tabbed editing and reading in Word, Excel, PowerPoint, Publisher, Access, Visio and Project.
- Open and create multiple documents in new tabs of the same window, rather than in new windows.
- Increases your productivity by 50%, and reduces hundreds of mouse clicks for you every day!
All Kutools add-ins. One installer
Kutools for Office suite bundles add-ins for Excel, Word, Outlook & PowerPoint plus Office Tab Pro, which is ideal for teams working across Office apps.
- All-in-one suite — Excel, Word, Outlook & PowerPoint add-ins + Office Tab Pro
- One installer, one license — set up in minutes (MSI-ready)
- Works better together — streamlined productivity across Office apps
- 30-day full-featured trial — no registration, no credit card
- Best value — save vs buying individual add-in