How to make top row always stay visible in Excel?
For many Excel users, it is common practice to have the data headers positioned in the first row of a worksheet. However, when working with a large data set, these headers often disappear from view as you scroll down, making it difficult to keep track of the data columns. Being able to keep the top row always visible helps improve readability and ensures that you can always identify the type of data in each column, which is particularly useful when reviewing or editing extensive spreadsheets. This article will guide you through several practical methods to make the top row always stay visible, whether in a single worksheet or across all worksheets in the active workbook. We will also explore a convenient VBA macro solution to automate the freezing process, especially when built-in tools or add-ins are not available.
Make top row always stay visible in current sheet
Make top row always stay visible in all sheets
Use VBA to freeze top row in one or all worksheets
Make top row always stay visible in current sheet
The Freeze Top Row feature in Excel is designed to help you keep the topmost row visible at all times while scrolling through your worksheet. This function is especially useful when your data includes headers or titles that need to remain in view for data recognition and ease of navigation. Please note, this function only freezes the top row of the currently active sheet—it does not apply to other worksheets in your workbook and must be activated separately for each sheet where you want this effect.
To make the top row always stay visible in the current worksheet, follow these steps:
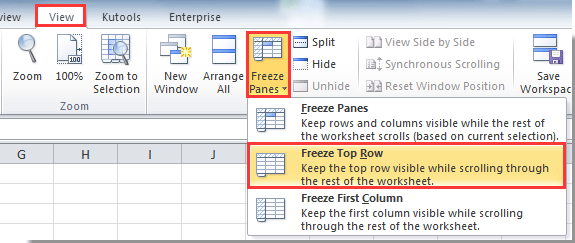
1. Navigate to the worksheet where you want to keep the top row visible. Then, go to the ribbon and click View > Freeze Panes > Freeze Top Row. See screenshot:
After completing this operation, the top row of the current worksheet will remain frozen and visible, regardless of how far you scroll down the sheet, making it easier to reference column headers at all times. If you need to remove this setting in the future, you can simply return to the View tab and select Unfreeze Panes.
Applicable scenario: Best suited when you only need to keep the headers visible on a single worksheet.
Tip: Remember to activate the desired sheet before using this function. If you switch to another worksheet, the top row will not stay visible there unless you repeat the process.
Make top row always stay visible in all sheets
In cases where your workbook contains multiple worksheets and you want the top row to remain visible in all of them, applying the freeze panes setting one by one on each sheet can become tedious and time-consuming. Excel’s standard features only allow you to freeze panes on one sheet at a time; there is no built-in function to freeze the top row on all worksheets in one go.
To address this limitation, you can use the Freeze Panes Multiple Worksheets utility in Kutools for Excel, which enables you to apply the freeze top row setting across all worksheets in your workbook with a single operation. This is highly beneficial for workbooks with numerous sheets where column headers or row titles are consistently used.
To keep the top row visible across all worksheets, follow these steps:
1. Switch to cell A2 in any worksheet, then go to Kutools Plus > Worksheet > Freeze panes multiple worksheets. See screenshot:

Immediately after this, the top row in every worksheet of your workbook will be frozen, ensuring that your headers stay visible as you navigate through any sheet.
Note: If you need to reverse this action, simply click Kutools Plus > Worksheet > Unfreeze panes multiple worksheets to remove the freeze effect from all worksheets in one step.
Applicable scenario: Ideal for workbooks with many sheets that require synchronized visibility of header information.
Advantages: Saves time and effort compared to manually freezing rows in each worksheet.
Consideration: This method requires the Kutools add-in for Excel. If you do not have Kutools installed, please refer to the VBA macro method below.
If you want to have a free trial (30-day) of this utility, please click to download it, and then go to apply the operation according above steps.
Use VBA to freeze top row in one or all worksheets
For users who prefer not to install third-party add-ins or want to automate the freezing of top rows across one or all worksheets, a VBA macro provides a convenient solution. While Excel formulas cannot control view or pane settings, and there is no additional built-in batch method, VBA is the only native way to extend this functionality efficiently across multiple sheets in your workbook.
This approach is suitable for advanced users or anyone seeking to avoid repetitive actions by automating the process through code.
Here’s how to freeze the top row using a VBA macro:
1. Press Alt + F11 to open the Visual Basic for Applications editor. In the VBA editor, click Insert > Module to add a new module.
2. Copy and paste the following VBA code into the module window:
Sub FreezeTopRowInAllWorksheets()
    Dim ws As Worksheet
    Application.ScreenUpdating = False
    For Each ws In Worksheets
        ws.Activate
        ActiveWindow.FreezePanes = False
        ws.Rows("2:2").Select
        ActiveWindow.FreezePanes = True
    Next ws
    Worksheets(1).Activate
    Application.ScreenUpdating = True
End Sub
3. To apply the freeze to all worksheets, press F5 or click the ![]() Run button to execute the code. The macro will activate each worksheet in turn, select the second row, and freeze panes above it, ensuring the top row stays visible for all sheets.
Run button to execute the code. The macro will activate each worksheet in turn, select the second row, and freeze panes above it, ensuring the top row stays visible for all sheets.
Parameter explanation: The macro processes every worksheet in the workbook, applies the freeze panes setting above row 2 (thus only the first row is frozen), and finally returns you to the first worksheet.
Caution: If any worksheet is protected or if panes are already split/frozen, ensure to unfreeze or unprotect them before running the script to avoid errors.
Practical tip: To freeze the top row only in the active sheet, use the following simpler code instead:
Sub FreezeTopRowActiveSheet()
    On Error Resume Next
    xTitleId = "KutoolsforExcel"

    ActiveWindow.FreezePanes = False
    Rows("2:2").Select
    ActiveWindow.FreezePanes = True
End Sub
Just execute it with your desired worksheet active. This is useful when you only want to apply the freeze to a single worksheet programmatically.
Applicable scenario: VBA macro methods are useful when you need to automate the freeze panes process without external add-ins, or when applying the setting across many sheets quickly.
Limitations: VBA code needs to be executed manually each time you want to apply or update the setting. Some environments with macro restrictions may require you to adjust security settings to run the code.
Troubleshooting and Suggestions: When using the Freeze Panes feature, make sure that row 1 contains your headers and there are no existing frozen panes that would interfere with the new setting. If the top row does not stay visible after following these steps, ensure you are not accidentally selecting elsewhere before freezing, and double-check your scroll position. For VBA usage, always save your work before running new macros. If you experience errors, unfreeze all panes first and ensure all worksheets are unprotected. For large workbooks, consider using either the Kutools utility for convenience or the VBA macro for flexibility and automation needs.
If you need to remove this setting in the future, you can simply return to the View tab and select Unfreeze Panes.
To summarize, Excel’s built-in features provide straightforward solutions for keeping the top row visible in a single worksheet, while Kutools and VBA macro methods enable you to extend this functionality across multiple sheets or automate the process entirely, catering to various usage scenarios and preferences.
Best Office Productivity Tools
Supercharge Your Excel Skills with Kutools for Excel, and Experience Efficiency Like Never Before. Kutools for Excel Offers Over 300 Advanced Features to Boost Productivity and Save Time. Click Here to Get The Feature You Need The Most...
Office Tab Brings Tabbed interface to Office, and Make Your Work Much Easier
- Enable tabbed editing and reading in Word, Excel, PowerPoint, Publisher, Access, Visio and Project.
- Open and create multiple documents in new tabs of the same window, rather than in new windows.
- Increases your productivity by 50%, and reduces hundreds of mouse clicks for you every day!
All Kutools add-ins. One installer
Kutools for Office suite bundles add-ins for Excel, Word, Outlook & PowerPoint plus Office Tab Pro, which is ideal for teams working across Office apps.
- All-in-one suite — Excel, Word, Outlook & PowerPoint add-ins + Office Tab Pro
- One installer, one license — set up in minutes (MSI-ready)
- Works better together — streamlined productivity across Office apps
- 30-day full-featured trial — no registration, no credit card
- Best value — save vs buying individual add-in