How to compare two worksheets in same workbook or different workbooks?
In our daily Excel work, comparing the data on two worksheets is a common requirement. Whether you are auditing financial records, tracking inventory across different periods, or simply validating changes between versions of a report, you often need to check for differences or updates between sheets. Depending on your specific needs, you might want a simple visual comparison, a detailed list of differences, or to highlight mismatches directly in the worksheet. Below, we explore several practical methods for comparing worksheets in both the same and different workbooks, along with explanations of applicable scenarios and points to keep in mind while using each approach.
Compare two worksheets in the same workbook
Compare two worksheets in two different workbooks
List all differences between two worksheets in the same workbook
Highlight differences between two worksheets in the same workbook
Compare and highlight the differences between two worksheets in different workbooks
Compare and highlight the differences between two ranges in two worksheets
Compare two worksheets using VBA code
Compare two worksheets in the same workbook
If you need to visually compare the contents of two worksheets within the same Excel workbook—for example, to check for manual mistakes in data entry or subtle differences in formatting—Excel provides a straightforward solution using the New Window utility. This approach is quick, does not require any formulas or external plugins, and is useful when you only need to glance at both sheets side by side or simultaneously scroll through them for checking.
However, this method is best for smaller datasets or when you want a general overview rather than an exact cell-by-cell comparison of differences.
1. Enable the workbook you want to compare two sheets within, and then click "View" > "New Window". See screenshot:
2. Next, go to the taskbar to display the new window of the current workbook. See screenshot:
3. Switch to the two sheets you want to compare in each window and arrange them side by side using "View" > "Arrange All" > "Vertical" or "Horizontal" as preferred. This will help you easily spot discrepancies. See screenshot: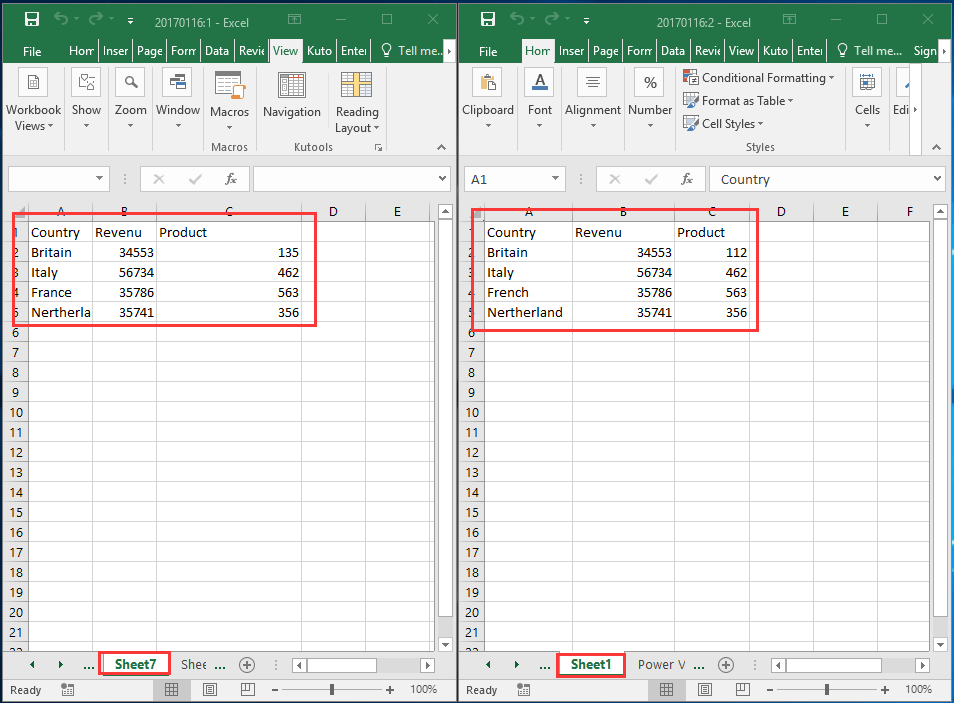
4. Now you can compare the two sheets directly. Any edits you make in one window will reflect in the other immediately, as they are views of the same file.
Tip: When using this feature, remember that any change you make in one window affects the actual workbook, so be careful to avoid accidental edits while reviewing.
This method is ideal for quick, manual comparisons or data verification. If the data is extensive or you need to generate a report of the changes, consider automated approaches discussed below.
Compare two worksheets in two different workbooks
When the worksheets to be compared are located in two separate workbooks, you can use Excel’s "View Side by Side" tool. This is useful when datasets or source files are stored independently for different periods, departments, or users. The utility displays both workbooks next to each other, making it easier to visually compare data, formulas, or formats between files.
Keep in mind that while you can view and scroll both workbooks simultaneously, this method does not highlight or report specific changes. Use this for a quick visual check, especially when monitoring summary data, layout differences, or when auditing files sent by different users.
Open the two workbooks containing the sheets you want to compare, activate one sheet, and then click "View" > "View Side by Side". See screenshot:
Then the two sheets in two workbooks have been displayed horizontally.
And then you can compare two sheets visually. Use the "Synchronous Scrolling" feature (activated from the View tab) to scroll both sheets at the same time if their data structures are similar.
Note: This approach does not mark or list differences for you; it is primarily suited for spot checks or when reviewing formatting, layouts, or key values side by side. If your sheets contain large volumes of data, consider using structured formula or add-in based methods for comprehensive analysis.
List all differences between two worksheets in the same workbook
If you want to systematically compare the contents of two worksheets and generate a list of all differences, using formulas is a practical and transparent approach. This method is especially effective when you want to precisely know where changes occurred and display those results on a new worksheet for record-keeping or further analysis.
This solution works best when both worksheets are organized similarly (i.e., the same dimensions and cell structure). It is not recommended for comparing worksheets with radically different layouts.
1. Open the workbook which contains the two sheets you want to compare and create a new sheet that will display the differences. This new sheet acts as your comparison report. See screenshot:
2. In the new sheet, select a blank cell, for instance, A1, and type this formula:
=IF(Sheet1!A1<> Sheet7!A1, "Sheet1:"&Sheet1!A1&" vs Sheet7:"&Sheet7!A1, "")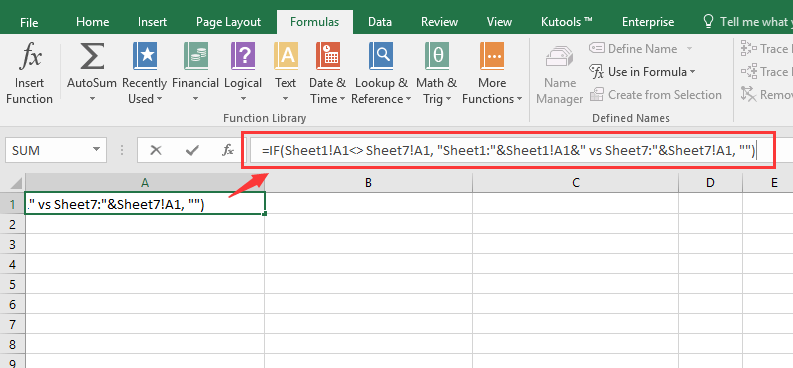
3. Press Enter to confirm the formula. Then, drag the fill handle across and down to cover the range of cells you wish to compare from both sheets. This step will mirror the comparison logic over your data area. See screenshot:
The differences between the two sheets are now clearly listed on your new worksheet for review and follow-up.
 |
 |
Parameter Notes: Ensure both compared sheets have matching ranges; otherwise, you may get errors or incomplete results. If you rename a worksheet or expand/shrink your data later, update the formula accordingly.
This approach lets you keep a persistent, automatically updating log of differences, which is very helpful for project management and ongoing auditing scenarios. To reduce errors, always double-check your formula references before filling them across large ranges.
Highlight differences between two worksheets in the same workbook
Using Conditional Formatting in Excel offers an efficient way to visually identify differences between corresponding cells in two worksheets. This technique is especially helpful when human review is required, as differences stand out due to color or formatting, allowing you to quickly scan for mismatches.
This method is suitable when the data to be compared occupies the same locations in both sheets, making it less effective if the layouts differ or data has been inserted or deleted in one of the sheets since the last comparison.
1. Select the range in one of the worksheets you want to check for differences. Navigate to "Home" > "Conditional Formatting" > "New Rule". See screenshot:
2. In the dialog box that appears, select "Use a formula to determine which cells to format" from the "Select a Rule Type" list. Enter the following formula into the "Format values where this formula is true" field and then click "Format" to choose your highlight style (such as a background color):
=A1<>Sheet7!A1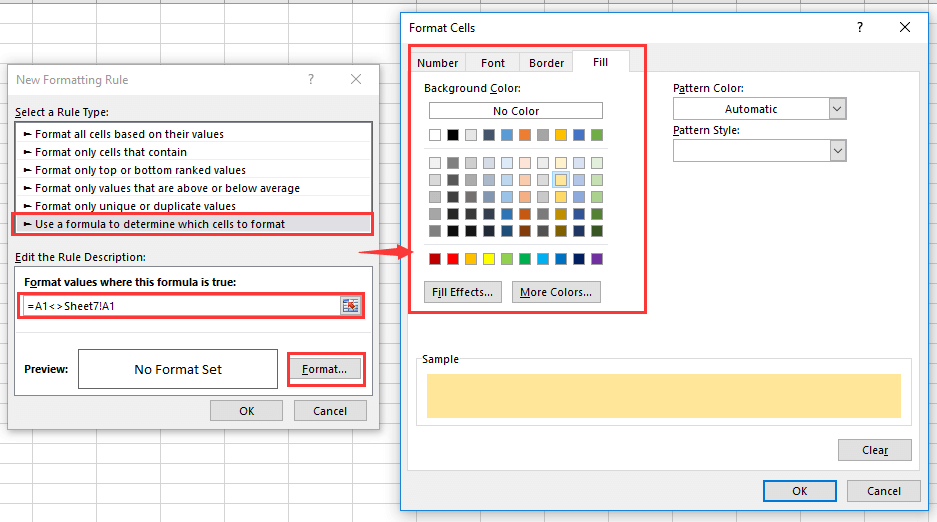
Tip: In this formula, "A1" should be the top-left cell of your selected range, and "Sheet7" is the name of the worksheet you are comparing to. Adjust these values to fit your dataset.
3. Click "OK" to apply the rule. Any cells in your selection that are different from the corresponding cells in the other sheet will now be highlighted, making them easy to spot and check.
Practical Advice: If you copy data between sheets frequently, it’s best to clear old formatting rules before reapplying new ones so you don’t end up with conflicting highlights. Also, always double-check worksheet references in the formula when copying rules or using templates across different files.
Compare and highlight the differences between two worksheets in different workbooks
For more advanced or large-scale comparison tasks in Excel—especially when comparing complex datasets or worksheets with slightly different structures between different workbooks—using the "Compare Worksheets" feature in Kutools for Excel is a reliable method. This tool streamlines the process, automatically highlights differing cells, and allows flexible re-editing based on the comparison outcome.
Attention: This feature compares worksheets in different workbooks, making it very versatile across various data management tasks.
1. In the workbook you want to compare with others. Go to "Kutools Plus" > "Worksheet" > "Compare Worksheets" > "Compare Worksheets".
2. In the "Compare Worksheets" dialog, the current workbook is set as the "Main file", in the Main worksheet list, select the worksheet you want to compare. Move to the "Lookup" section, click the "Browse" button to select the workbook containing the worksheet you want to compare with the main file, then choose the corresponding worksheet in the Lookup worksheet list. Once added, the two sheets display side by side in the window.

3. Click "Next" and specify the settings for highlighting differences. Adjust the options based on your data type (values, formulas, formatting, etc.) and click "Ok" to start comparison.

Optional: To update one worksheet based on another after the comparison, use the "Enable Compare Worksheets" feature via "Kutools Plus" > "Worksheet" > "Compare Worksheets" > "Enable Compare Worksheets".
After you have matched the relevant cells in both sheets, the highlighting will automatically be removed for those cells. This immediate feedback mechanism makes corrections quick and accurate.
Practical Note: Before performing the comparison, ensure both sheets are up-to-date and free of unnecessary formatting to speed up the process and get the clearest results. Kutools may take longer to process very large datasets—wait for confirmation dialogs before closing the tool.
Compare and highlight the differences between two ranges in two worksheets
In some situations, you may need to compare only specific parts of two worksheets, such as key product lists, status logs, or summary tables. The "Select Same & Different Cells" feature in Kutools for Excel lets you quickly identify and highlight unique or different values within specified ranges—no matter their locations. This method is efficient when you only need targeted comparison or want to focus on discrepancies within a subset of your data.
1. Click "Kutools" > "Select" > "Select Same & Different Cells". See screenshot:
2. In the pop-up dialog, click the "Browse" buttons in "Find values in" and "According to" boxes to select your two target ranges. Choose "Single cell" and "Different values" options, then set your preferred background and font colors for highlights. See screenshot:
3. Click "Ok". A dialog will inform you how many different cells have been found; click "OK" to close the notification. The differences between ranges will be both selected and visually highlighted for review.
Tip: This method works best when comparing equally sized ranges or matched columns/lists. If the ranges include empty cells, ensure interpretation of blanks is consistent with your comparison goals.
Kutools for Excel - Supercharge Excel with over 300 essential tools, making your work faster and easier, and take advantage of AI features for smarter data processing and productivity. Get It Now
Compare two worksheets using VBA code
If you need to compare large data ranges or want to automate repeat comparison tasks—such as part of a monthly closing process or for consistent quality control within your team—a VBA macro provides a powerful, customizable solution.
VBA makes it possible to efficiently scan entire worksheets, highlight or record differences, and generate reports with minimal repeated effort. When designing or running code, back up your workbooks first to avoid accidental data modifications.
1. Open both worksheets you wish to compare. Click Developer Tools > Visual Basic, then in the VBA editor window, choose Insert > Module and paste in the following code:
Sub CompareSheets()
    Dim ws1 As Worksheet, ws2 As Worksheet
    Dim r1 As Range, r2 As Range, cell1 As Range, cell2 As Range
    Dim rDiff As Range

    On Error Resume Next

    Set ws1 = Application.InputBox("First worksheet to compare", "KutoolsforExcel", Type:=8).Parent
    Set ws2 = Application.InputBox("Second worksheet to compare", "KutoolsforExcel", Type:=8).Parent
    Set r1 = Application.InputBox("Select range in the first worksheet", "KutoolsforExcel", Type:=8)
    Set r2 = Application.InputBox("Select range in the second worksheet", "KutoolsforExcel", Type:=8)

    If r1.Count <> r2.Count Then
        MsgBox "The ranges are of different sizes.", vbExclamation
        Exit Sub
    End If

    For Each cell1 In r1
        Set cell2 = r2.Cells(cell1.Row - r1.Row + 1, cell1.Column - r1.Column + 1)

        If cell1.Value <> cell2.Value Then
            cell1.Interior.Color = vbYellow
            cell2.Interior.Color = vbYellow

            If rDiff Is Nothing Then
                Set rDiff = cell1
            Else
                Set rDiff = Union(rDiff, cell1)
            End If
        End If
    Next

    If rDiff Is Nothing Then
        MsgBox "No differences found.", vbInformation
    Else
        MsgBox "Differences highlighted in yellow.", vbInformation
    End If
End Sub
2 Click the ![]() button to run the code. Select the target worksheets and ranges as prompted. When finished, differing cells across the specified ranges of both sheets will be highlighted in yellow for easy review.
button to run the code. Select the target worksheets and ranges as prompted. When finished, differing cells across the specified ranges of both sheets will be highlighted in yellow for easy review.
Troubleshooting: If you encounter errors, ensure both ranges are of identical size and both worksheets are present in the currently opened workbooks. Save your files before running macros for data security.
When choosing the right worksheet comparison approach, consider the complexity of your data, the frequency of comparisons, and whether you need a quick review or a repeatable reporting procedure. Manual and visual techniques work well for small, ad hoc checks, while formulas, add-ins, or VBA code are better suited for structured, repeatable, or larger-scale difference analysis. If errors appear (such as N/A or #REF!), double-check sheet and range references. Clear highlights and previous results before each new comparison to keep your analysis accurate. Using a combination of built-in features, formulas, and tools like Kutools provides a flexible toolkit for effectively managing worksheet comparison tasks in Excel.
Demo: Compare Two Ranges in Two Worksheets Using Kutools For Excel
Best Office Productivity Tools
Supercharge Your Excel Skills with Kutools for Excel, and Experience Efficiency Like Never Before. Kutools for Excel Offers Over 300 Advanced Features to Boost Productivity and Save Time. Click Here to Get The Feature You Need The Most...
Office Tab Brings Tabbed interface to Office, and Make Your Work Much Easier
- Enable tabbed editing and reading in Word, Excel, PowerPoint, Publisher, Access, Visio and Project.
- Open and create multiple documents in new tabs of the same window, rather than in new windows.
- Increases your productivity by 50%, and reduces hundreds of mouse clicks for you every day!
All Kutools add-ins. One installer
Kutools for Office suite bundles add-ins for Excel, Word, Outlook & PowerPoint plus Office Tab Pro, which is ideal for teams working across Office apps.
- All-in-one suite — Excel, Word, Outlook & PowerPoint add-ins + Office Tab Pro
- One installer, one license — set up in minutes (MSI-ready)
- Works better together — streamlined productivity across Office apps
- 30-day full-featured trial — no registration, no credit card
- Best value — save vs buying individual add-in