How to create a pop up window for data entry in Excel
When working with large worksheets in Excel, entering or editing data directly in cells can quickly become inconvenient. This is especially true when a table contains many columns, long text fields, or records that need to be reviewed one by one. Scrolling horizontally to locate the correct column or expanding row heights just to view full content can slow down the entire workflow.
To make data entry easier, in this tutorial, you will learn several practical ways to create a pop-up window for multiple data entry in Excel.
Create a data entry form with Excel Form feature
Excel actually includes a hidden built-in Form feature that allows users to enter and edit records row by row through a simple dialog window. This method is useful for basic tables and does not require VBA or additional setup.
However, the feature is hidden by default, so you need to add it to the Ribbon manually before using it.
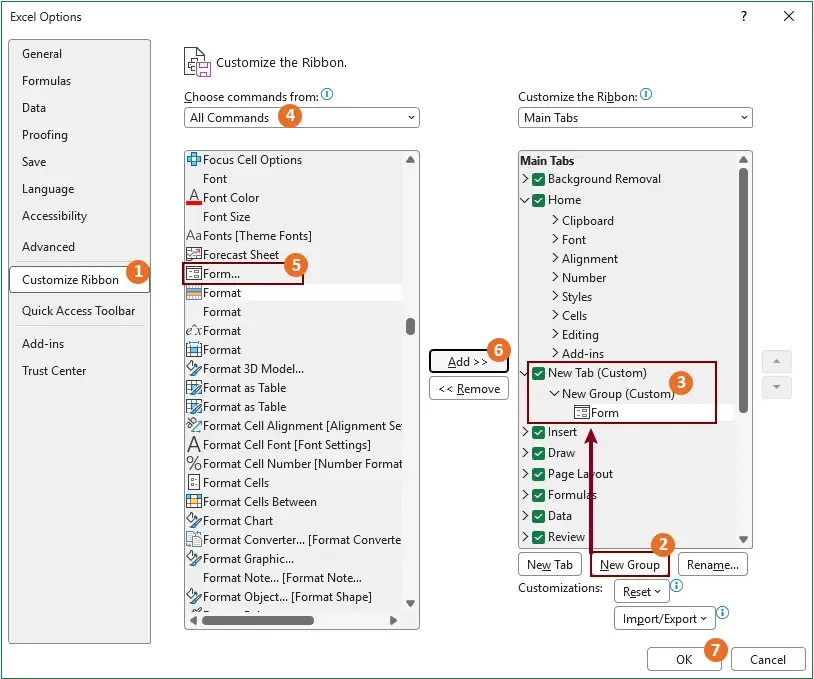
Step 1: Add the Form command to the Ribbon
- Click File > Options.
- In the Excel Options window:
- Click Customize Ribbon in the left pane;
- On the right side of the window, click New Tab to create a custom tab;
- Select New Group under the newly created tab;
- Select All Commands from the “Choose commands from” dropdown;
- Scroll down and select Form from the command list;
- Click Add to add the Form command to the new group;
- Click OK to save the changes.

After that, the Form command will appear on the Ribbon.

Step 2: Open the data entry form
- Make sure your data range contains headers.
- Click any cell inside the table.
- Click the newly added Form command on the Ribbon.
Excel will immediately open a pop-up data entry window showing all column headers as input fields.

Step 3: Enter or edit records
After opening the Form window, Excel will display the data from the first row of the current table by default.
You can now easily manage records directly inside the pop-up form window instead of editing cells one by one in the worksheet.
- Modify existing cell values directly in the input fields;
- Click Find Prev or Find Next to browse records from the previous or next row;
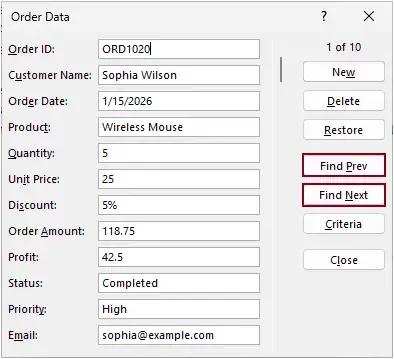
- Click the Delete button if you need to remove the current record;
- Click New to create a new record, then fill in the corresponding fields;
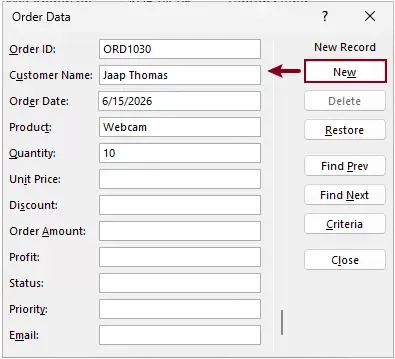


Once you finish entering or editing data, simply click Close, and all changes will automatically update in the worksheet.
Create a professional data entry pop up window with Kutools for Excel
If you frequently work with large datasets, multiple columns, or long records, the built-in Form feature can quickly feel restrictive. You may need a better interface for reviewing records, editing data field by field, and quickly creating new entries without constantly scrolling across the worksheet.
In this case, Advanced Data Form in Kutools for Excel provides a much more flexible and modern solution.
Unlike Excel’s hidden Form feature, Kutools automatically displays all column headers in a clean side-by-side layout and offers additional navigation and editing controls that make data entry significantly easier.
Kutools for Excel - Packed with over 300 essential tools for Excel. Make Excel tasks faster, easier, and more efficient. Download now!
Step 1: Open the Advanced Data Form
Select Kutools > View > Advanced Data Form.

The Advanced Data Form window will immediately appear.

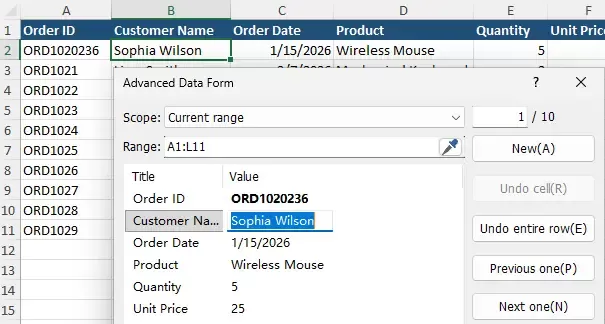
Step 2: Specify the data range
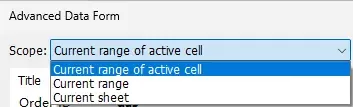
Before editing or adding records, first choose the scope you want to work with from the Scope dropdown list.
- Current range of active cell: Use the current table around the active cell;
- Current range: Manually select a custom range;
- Current sheet: Use the entire worksheet.

Step 3: Edit or add new records
All column headers in the specified scope will be displayed as individual fields.
You can now:
- Modify the record: Modify existing values in the fields then click outside the field to update the cell immediately;
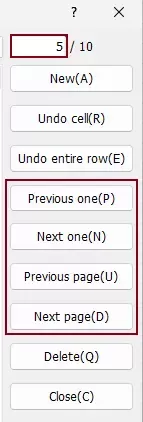
- Navigate to rows:
Enter a row number directly to quickly jump to a specific record.Or use the navigation buttons to move to the previous or next row or page;
- Add new records: Click the New button will insert a new row below the current record.
Then fill in the corresponding fields, and the data will automatically be added to the worksheet.
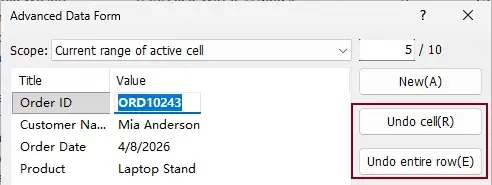
- If needed, you can also:
- Click Undo cell to undo changes in the current field;
- Click Undo entire row to restore the entire current row.


Kutools for Excel - Supercharge Excel with over 300 essential tools, making your work faster and easier, and take advantage of AI features for smarter data processing and productivity. Get It Now
Why use Advanced Data Form instead of Excel's built-in Form?
Compared with Excel's built-in Form feature, Advanced Data Form in Kutools for Excel provides several additional tools that make large-table management much easier.
For example, you can:
- Specify a custom data range;
- Quickly jump to a specific row by entering the row number directly;
- Undo changes for a single cell or the entire current row;
- Navigate records more efficiently in large datasets.
These extra options are especially useful when working with complex worksheets containing many columns or hundreds of records.
Create a custom pop up data entry form with VBA UserForm
If you need a fully customized data entry system, another possible solution is using VBA UserForms.
With VBA, you can create your own pop-up form with labels, text boxes, buttons, dropdown lists, and other controls. This method is commonly used in small internal management systems.
However, compared with the previous methods, VBA requires programming knowledge and usually takes more time to build and maintain.
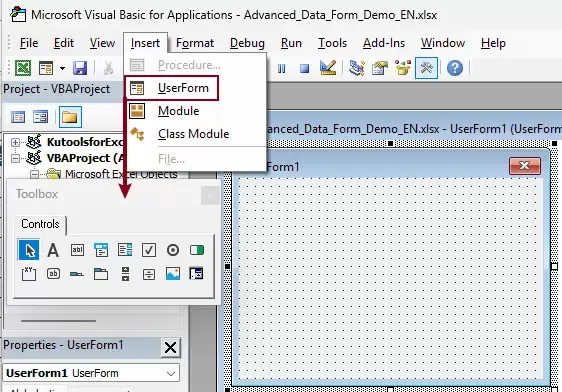
Step 1: Open the VBA Editor
- Press Alt + F11 to open the VBA Editor.
- Then click Insert > UserForm to create a new UserForm.

Step 2: Add controls to the UserForm
From the Toolbox, drag and drop the required controls onto the UserForm, such as Labels, TextBoxes, and a CommandButton.
The number of Labels and TextBoxes should match the number of columns you want to enter into the worksheet. For example, if your table contains 3 columns, you can add:
- 3 Labels
- 3 TextBoxes
- 1 CommandButton
You can drag and resize the controls manually to arrange them neatly on the form.

Step 3: Rename the controls
Select the Labels or the CommandButton, then change their names in the Caption field of the Properties window.

Step 4: Add the VBA code
Double-click the CommandButton and paste the following VBA code:
Private Sub CommandButton1_Click()

    Dim ws As Worksheet
    Dim nextRow As Long

    Set ws = ThisWorkbook.Sheets("Sheet1")

    nextRow = ws.Cells(ws.Rows.Count, 1).End(xlUp).Row + 1

    ws.Cells(nextRow, 1).Value = TextBox1.Value
    ws.Cells(nextRow, 2).Value = TextBox2.Value
    ws.Cells(nextRow, 3).Value = TextBox3.Value

    MsgBox "Record added successfully!"

End SubStep 5: Run the UserForm
Press F5 to run the UserForm.
A pop-up form will appear. After entering the data and clicking the button, Excel will automatically add the record to the next row of the worksheet.

Conclusion
Creating a pop-up window for multiple data entry can make Excel much easier to use, especially when working with large tables or records containing many fields.
- Excel's built-in Form feature is suitable for simple basic data entry;
- VBA UserForms provide full customization but require coding;
- Kutools for Excel's Advanced Data Form offers the best balance between simplicity and powerful functionality.
With its clean interface, convenient navigation buttons, and ability to quickly view and edit records, Advanced Data Form is often the fastest and most practical solution for daily Excel data management.
Best Office Productivity Tools
Supercharge Your Excel Skills with Kutools for Excel, and Experience Efficiency Like Never Before. Kutools for Excel Offers Over 300 Advanced Features to Boost Productivity and Save Time. Click Here to Get The Feature You Need The Most...
Office Tab Brings Tabbed interface to Office, and Make Your Work Much Easier
- Enable tabbed editing and reading in Word, Excel, PowerPoint, Publisher, Access, Visio and Project.
- Open and create multiple documents in new tabs of the same window, rather than in new windows.
- Increases your productivity by 50%, and reduces hundreds of mouse clicks for you every day!
All Kutools add-ins. One installer
Kutools for Office suite bundles add-ins for Excel, Word, Outlook & PowerPoint plus Office Tab Pro, which is ideal for teams working across Office apps.
- All-in-one suite — Excel, Word, Outlook & PowerPoint add-ins + Office Tab Pro
- One installer, one license — set up in minutes (MSI-ready)
- Works better together — streamlined productivity across Office apps
- 30-day full-featured trial — no registration, no credit card
- Best value — save vs buying individual add-in
Table of contents
- Create a data entry form in Excel
- Using Excel built-in form
- Using Kutools for easier data entry
- Using VBA userform
- The Best Office Productivity Tools
Kutools for Excel
Brings 300+ powerful features to streamline your Excel tasks.
- ⬇️ Free Download
- 🛒 Purchase Now
- 📘 Feature Tutorials
- 🎁 30-Day Free Trial