
Kutools for Office — One Suite. Five Tools. Get More Done.

How to print labels for mailing list from Excel?

Author Xiaoyang Last modified

Normally, we can organize a mailing list in Excel quickly and easily, but it’s not so convenient when it comes to printing the labels. Each row in the worksheet must be transferred to one label, as shown in the screenshots below. In this case, the Mail Merge feature in Word document can help you to create labels from Excel, which you can then print or save as needed.

A screenshot of a sample mailing list in Excel with columns for name, address, city, state, and zip code
Arrow
A screenshot of labels created from an Excel mailing list in a Word document

Create and print labels in Word from an Excel worksheet with Mail Merge feature

1. Prepare the data information of your printing mailing labels, such as First name, Last name, Address, City, State, Zip Code as below screenshot shown:

A screenshot of a sample mailing list in Excel with columns for name, address, city, state, and zip code

2. Save and close the workbook, then launch a Word document, and click Mailings > Start Mail Merge > Labels, see screenshot:

A screenshot of the Start Mail Merge dropdown under the Mailings tab in Word, with Labels selected

3. In the opened Label Options dialog box, set the Label information and Product number as you need:

  • Label information: Choose supplier of label sheets;
  • Product number: Select product number listed on the package of label sheets.
  • (In this example, I will choose Microsoft and 1/4 Letter separately.)

A screenshot of the Label Options dialog box in Word, with label supplier and product number settings

4. Then, click OK button to close the dialog box. Next, please click Mailings > Select Recipients > Use an Existing List, see screenshot:

A screenshot of the Select Recipients dropdown under the Mailings tab in Word, with Use an Existing List selected

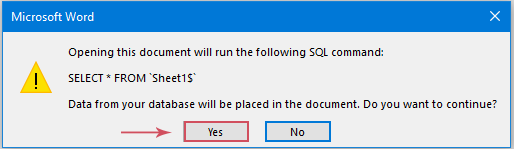
5. In the opened Select Data Source window, choose the Excel file you saved earlier, and click Open button, see screenshot:

A screenshot of the Select Data Source window in Word, with an Excel file selected for use

6. And in the following Select Table dialog box, select the sheet containing the mailing list, see screenshot:

A screenshot of the Select Table dialog box in Word, selecting the sheet with mailing list data

7. Then, click OK to close the dialog box, and the Word document will look like the screenshot below:

A screenshot showing an empty Word label template ready for address block insertion

8. Make sure the cursor is on the upper-right corner of the document. And then, go on clicking Address Block under the Mailings tab, see screenshot:

A screenshot of the Address Block option under the Mailings tab in Word

9. In the popped out Insert Address Block dialog box, select the desired options, check the result under the Preview section, see screenshot:

A screenshot of the Insert Address Block dialog box in Word with address formatting options

Tips: This option will select all your columns and create address for you automatically. If some columns are missing, please click Match Fields button to choose the corresponding filed you need.

10. Go ahead and click the OK button, and the《AddressBlock》will appear in your first label. Then, click Update Labels from the Mailings tab, see screenshot:

A screenshot of the Update Labels option under the Mailings tab in Word, to replicate the address block to all labels

11. In this step, perform the mail merge by clicking Finish & Merge > Edit Individual Documents under the Mailings tab, see screenshot:

A screenshot of the Finish & Merge dropdown under the Mailings tab in Word, with Edit Individual Documents selected

12. And the Merge to New Document dialog box will appear. Select All from the Merge records, and then click the OK button. See screenshot:

A screenshot of the Merge to New Document dialog box in Word with the All option selected

13. Now, the mailing list from Excel will be merged into the labels in a new Word file as below screenshot shown:

A screenshot of completed mailing labels in Word created from an Excel mailing list using Mail Merge

14. At last, you can change the formatting of the label, such as the border, font color, font size, etc. to your need for printing.

Tips: You can save the Word document that contains the label fields for feature use. The saved Word document is linked to the Excel workbook. After changing the mailing list data in Excel, the next time you open the Word document, a prompt message will pop out, click Yes to update the labels. Then repeat the step 11 and 12 above to generate a new mail merged document.
A screenshot of a prompt message in Word asking to update labels linked to an Excel mailing list

Best Office Productivity Tools

🤖 Kutools AI Aide: Revolutionize data analysis based on: Intelligent Execution   |  Generate Code  |  Create Custom Formulas  |  Analyze Data and Generate Charts  |  Invoke Kutools Functions
Popular Features: Find, Highlight or Identify Duplicates   |  Delete Blank Rows   |  Combine Columns or Cells without Losing Data   |   Round without Formula ...
Super Lookup: Multiple Criteria VLookup    Multiple Value VLookup  |   VLookup Across Multiple Sheets   |   Fuzzy Lookup ....
Advanced Drop-down List: Quickly Create Drop Down List   |  Dependent Drop Down List   |  Multi-select Drop Down List ....
Column Manager: Add a Specific Number of Columns  |  Move Columns  |  Toggle Visibility Status of Hidden Columns  |  Compare Ranges & Columns ...
Featured Features: Grid Focus   |  Design View   |   Big Formula Bar    Workbook & Sheet Manager   |  Resource Library (Auto Text)   |  Date Picker   |  Combine Worksheets   |  Encrypt/Decrypt Cells    Send Emails by List   |  Super Filter   |   Special Filter (filter bold/italic/strikethrough...) ...
Top 15 Toolsets12 Text Tools (Add Text, Remove Characters, ...)   |   50+ Chart Types (Gantt Chart, ...)   |   40+ Practical Formulas (Calculate age based on birthday, ...)   |   19 Insertion Tools (Insert QR Code, Insert Picture from Path, ...)   |   12 Conversion Tools (Numbers to Words, Currency Conversion, ...)   |   7 Merge & Split Tools (Advanced Combine Rows, Split Cells, ...)   |   ... and more
Use Kutools in your preferred language – supports English, Spanish, German, French, Chinese, and 40+ others!

Supercharge Your Excel Skills with Kutools for Excel, and Experience Efficiency Like Never Before. Kutools for Excel Offers Over 300 Advanced Features to Boost Productivity and Save Time.  Click Here to Get The Feature You Need The Most...


Office Tab Brings Tabbed interface to Office, and Make Your Work Much Easier

  • Enable tabbed editing and reading in Word, Excel, PowerPoint, Publisher, Access, Visio and Project.
  • Open and create multiple documents in new tabs of the same window, rather than in new windows.
  • Increases your productivity by 50%, and reduces hundreds of mouse clicks for you every day!

All Kutools add-ins. One installer

Kutools for Office suite bundles add-ins for Excel, Word, Outlook & PowerPoint plus Office Tab Pro, which is ideal for teams working across Office apps.

Excel Word Outlook Tabs PowerPoint
  • All-in-one suite — Excel, Word, Outlook & PowerPoint add-ins + Office Tab Pro
  • One installer, one license — set up in minutes (MSI-ready)
  • Works better together — streamlined productivity across Office apps
  • 30-day full-featured trial — no registration, no credit card
  • Best value — save vs buying individual add-in