How to Insert Rows in Excel (Step-by-Step Guide)
In Excel, inserting rows is a basic but essential task when you need to expand a dataset, add missing records, or adjust the structure of a worksheet. Whether you are maintaining a simple list or updating a large table, knowing how to insert rows efficiently helps keep your data organized and your workflow uninterrupted.
Although the task itself is straightforward, the method you use can vary depending on what you need to do. For example, you may want to insert a single row, add multiple rows at once, place rows below a specific position, or work within an Excel table without affecting surrounding data. Using the right approach can save time and make worksheet editing more accurate and efficient.
Add a row in Excel
If you only need to insert one blank row, Excel gives you several simple ways to do it. The new row is inserted above the row you select.
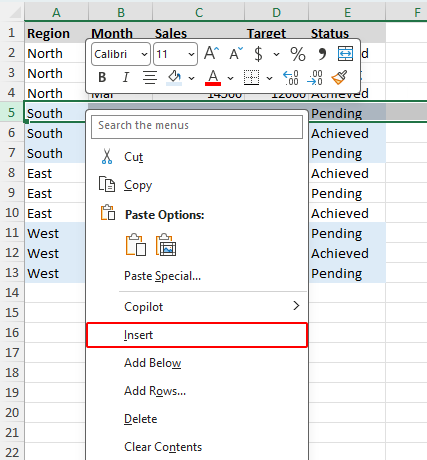
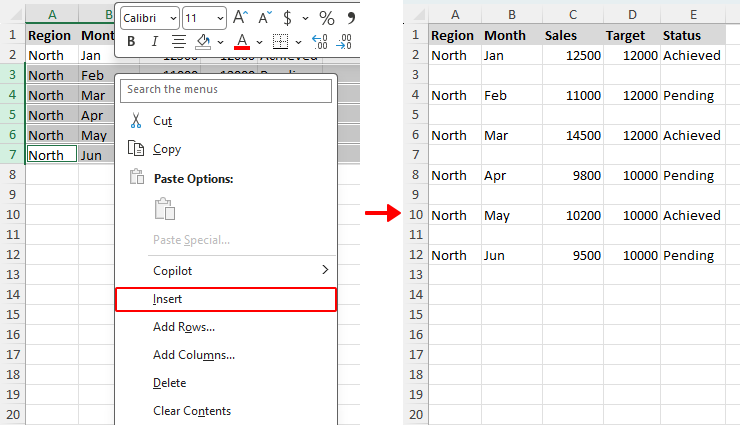
- Select the row underneath the position where you want the new row to appear. You can do this by clicking the row number on the left.
- Insert the row by using one of these methods:
- Right-click the selected row and choose Insert.
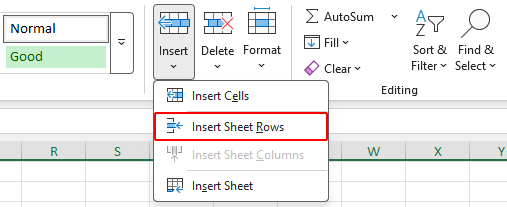
- Go to the Home tab, click Insert, and then choose Insert Sheet Rows.
- Or press Alt + I (insert), then press R (row).
- Right-click the selected row and choose Insert.


Excel will place a new blank row above the row you selected.

Note:
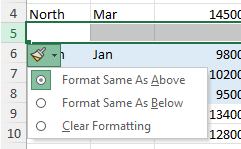
After a row is inserted, Excel may automatically apply formatting from the row above. If you want to change how the new row is formatted, click the Insert Options button that appears next to the inserted row and select the formatting option you prefer.
Insert multiple rows at once in Excel
If you want to insert more than one blank row, you can do that in a single action instead of repeating the insert command again and again.
Before you start, keep these two points in mind:
- The number of rows you select decides how many blank rows Excel inserts.
- Excel always adds the new rows above the selected rows.
Here’s how to do it:
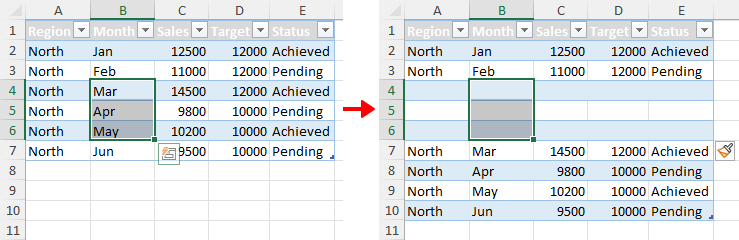
- Select the same number of existing rows as the number of blank rows you want to add. For example, if you want to insert 3 new rows, first select 3 rows.
- Use any one of the following methods: (The screenshot demonstrates the first method)
- Right-click any selected row and choose Insert.
- Open the Home tab, click Insert, and select Insert Sheet Rows.
- Press Alt + I (insert), then press R (row).
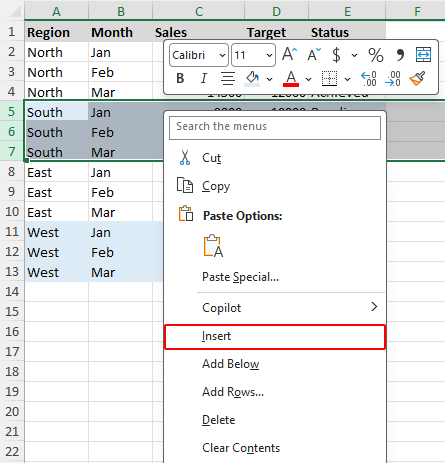

The same number of blank rows will be inserted above the rows you selected.
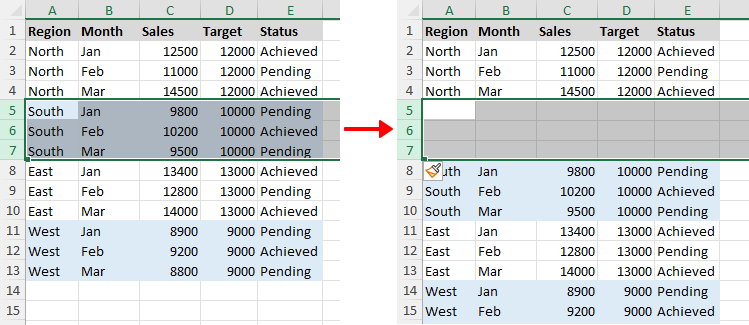
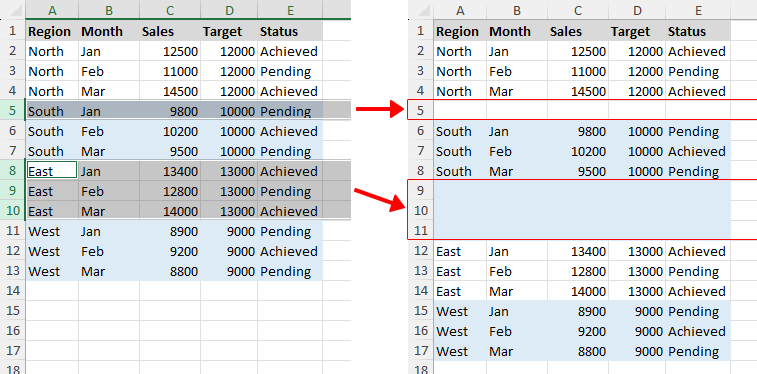
Insert a specific number of rows with Kutools for Excel
With Excel’s built-in tools, you must first select the same number of rows you want to insert, which can be inconvenient especially when the number is large. Kutools for Excel simplifies this process by letting you specify exactly how many rows to insert in a dialog box. It also gives you the option to add rows either above or below the current selection, which is more flexible than Excel’s default insert behavior.
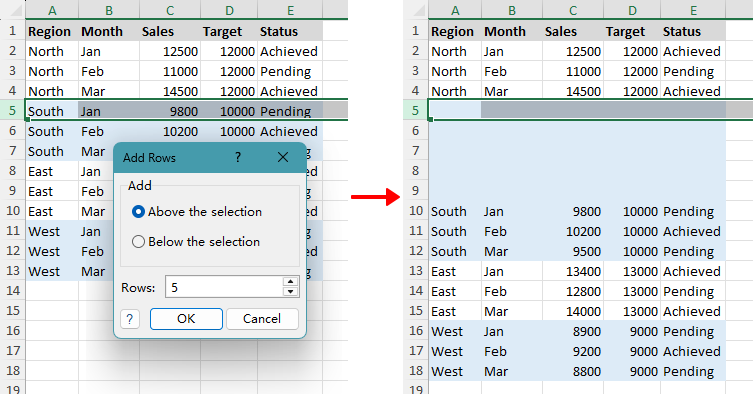
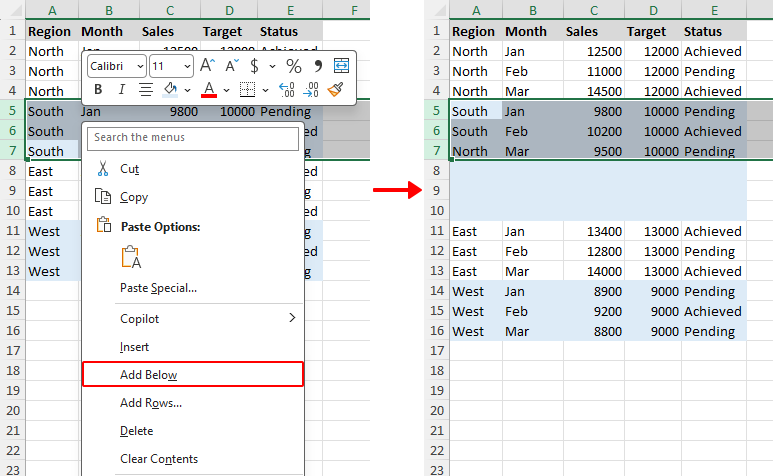
- After downloading Kutools for Excel, select the row where you want to insert new rows.
- Right-click the selected row, and choose Add Rows from the context menu.
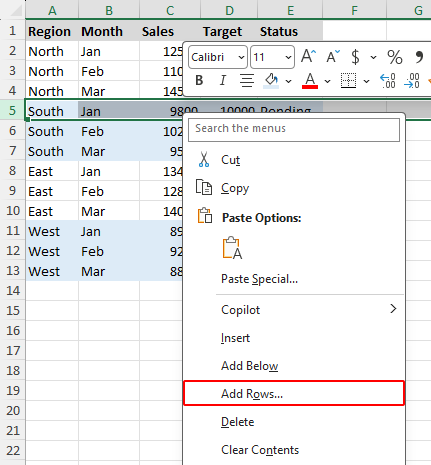
- In the pop-up dialog box, choose whether to insert rows above or below the selection, specify how many rows to add, and click OK.


Pros
- You can insert many rows without selecting the same number of existing rows first.
- You can specify the exact number of rows to add in a dialog box.
- You can choose to insert rows above or below the current selection.
- It is faster and more convenient when inserting a large number of rows, such as 100.
Note:
The Add Rows option in the right-click menu is available only after you install Kutools for Excel.
How to insert rows below
By default, Excel inserts new rows above the selected row. To insert one or multiple blank rows below a specific row instead, you can use one of the following methods.
Insert rows below using the fill handle
This method allows you to insert one or more blank rows directly below the selected row by dragging the fill handle while holding Shift.
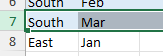
- Select the row under which you want to insert blank rows.
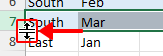
- You will see a small green square, called the fill handle, at the bottom-left corner of the selected row.
- Hold down Shift and move the pointer over the fill handle until it changes to a double-line two-way arrow.
>>> 
- While still holding Shift, drag downward to insert the number of blank rows you need, then release the mouse.


Insert rows below using Kutools' Add Below command
If you want to insert rows directly below the selected row, Kutools for Excel provides the Add Below command in the right-click menu. You can use it to insert either one row or multiple rows below the selection.
Kutools for Excel - Packed with over 300 essential tools for Excel. Make Excel tasks faster, easier, and more efficient. Download now!
- To insert one row below, right-click the row number of the target row, then choose Add Below.
- To insert multiple rows below, select the same number of rows as the number of rows you want to add, then right-click the selection and choose Add Below.

Note:
The Add Below option in the right-click menu is available only after you install Kutools for Excel.
Insert many rows below using Kutools' Add Rows dialog box
Kutools for Excel lets you quickly insert a large number of rows below the selected position by entering the exact number in the Add Rows dialog box, which is especially convenient when you need to insert a very large number of rows, such as 300.
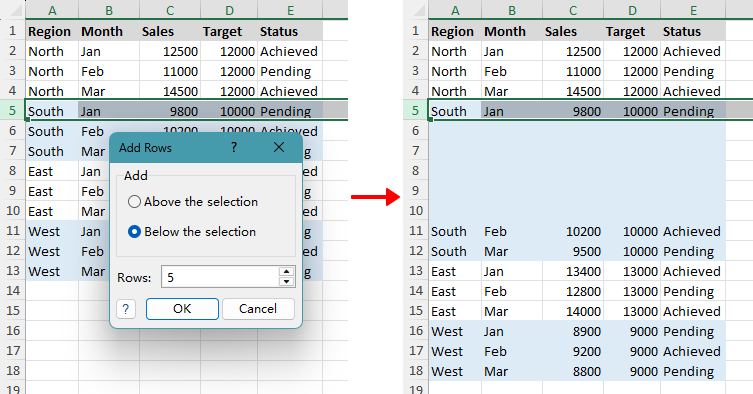
- After downloading Kutools for Excel, select the row where you want to insert new rows below.
- Right-click the selected row, and choose Add Rows from the context menu.
- In the pop-up dialog box, choose Below the selection, specify how many rows to add, and click OK.

Note:
The Add Rows option in the right-click menu is available only after you install Kutools for Excel.
Add a row without disturbing data in other columns
If you want to insert blank rows without shifting existing data in other columns, you can use the fill handle with the Shift key. This method inserts rows only within the selected range.
- Select the cells under which you want to insert blank rows.
- Hold down Shift and move the pointer over the fill handle (the small square at the bottom-right corner) until it changes to a double-line two-way arrow.
- While still holding Shift, drag downward to insert the number of blank rows you need, then release the mouse.
The new rows is inserted within the selected range without affecting data in other columns.
Insert a row every other row
Inserting a blank row every other row can help make data easier to read and leave space for notes or additional entries. This is useful when you want a cleaner layout or need to prepare a worksheet for further editing. You can do this manually or with Kutools for Excel.
Manually add blank rows at intervals with the Ctrl key
If the dataset is small, you can manually select the rows where you want blank rows to be inserted, and then insert them all at once.
- Click the row number of the first row where you want to insert a blank row.
- Hold down Ctrl and click the row numbers one by one to select the additional rows where you want blank rows added.
- Use any one of the following methods: (The screenshot demonstrates the first method)
- Right-click any selected row and choose Insert.
- Open the Home tab, click Insert, and select Insert Sheet Rows.
- Press Alt + I (insert), then press R (row).
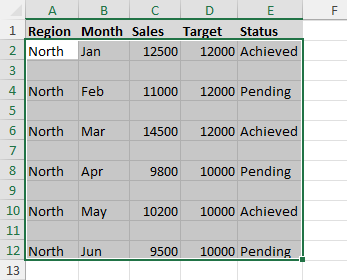
A blank row is inserted above each selected row, creating a blank row between every two existing rows.
Quickly insert blank rows at intervals with Kutools for Excel
If you want to insert blank rows automatically at regular intervals, Kutools for Excel offers a much faster solution. Instead of selecting rows manually, you can set the interval and the number of blank rows to insert in one dialog box.
- After installing Kutools for Excel, go to Kutools > Insert > Insert Blank Rows & Columns.
- In the Insert Blank Rows & Columns dialog box:
- Select the range where you want to insert blank rows.
- Choose Blank Rows under Insert type.
- Specify the interval and the number of rows to insert. For example, to insert 1 blank row after every row, enter 1 in the Interval of box and 1 in the Rows box.
- Click OK.
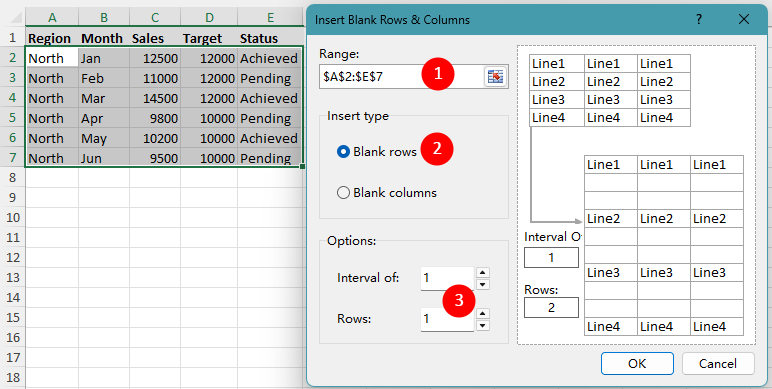
Kutools will then insert blank rows through the selected range based on the interval you specified.
Add rows inside an Excel table
If your data is formatted as an Excel table, inserting rows works a little differently from inserting rows in a normal range. You can quickly add one or more rows while keeping the table structure, formatting, and formulas consistent.
Notes:
- Unlike a normal range, an Excel table lets you insert rows only within that table, without affecting data beside it.
- If you only need one more row at the bottom of the table, pressing Tab in the last cell (the bottom-right cell) is often the quickest method.
- Click any cell in the row above which you want to insert a new row.
- Right-click the selected cell, and choose Insert > Table Rows Above.
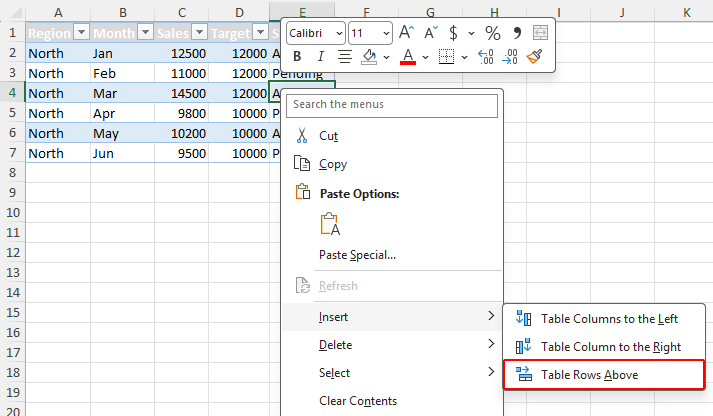

- If you select a cell in the last row of a table, Excel offers two insert options:
- Table Rows Above to add a row above the selected row.
- Table Rows Below to add a row below the selected row.
- To insert multiple rows in a table, first select cells across the same number of existing rows as the number of rows you want to add. For example, to insert 3 new rows starting at row 4, first select cells in rows 4, 5, and 6, then choose the insert option.

Frequently Asked Questions
How do I select an entire row in Excel?
Move the pointer over the row number on the left side of the worksheet until it changes to a right-pointing arrow, then click the row number to select the entire row. Once selected, you can insert, delete, or format the row.
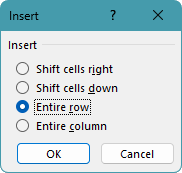
Can I select a cell instead of a row to insert a row?
Yes. You can right-click a cell and choose Insert. In the pop-up Insert dialog box, select Entire row and click OK. Excel will then insert a new row above the cell’s row.
Why can’t I see the Add Rows or Add Below option in the right-click menu?
The Add Rows and Add Below commands come from Kutools for Excel, not from Excel itself. To make them appear in the right-click menu, install and enable Kutools for Excel.
How do I insert rows in different places instead of one continuous block?
To insert rows in different places, select the row numbers one by one while holding Ctrl. Then right-click any selected row number and choose Insert. Excel will insert a new row(s) above each selected row(s).
Why are adjacent selected rows not inserted as one block?
This usually happens when the rows were selected one by one while holding Ctrl (see Manually add blank rows at intervals with the Ctrl key). Even if those rows are next to each other, Excel still treats them as separate selections. As a result, it inserts a new row above each selected row separately rather than adding all the new rows as one continuous block.
To insert rows as a continuous block, select the rows by dragging across the row numbers, or by clicking the first row, holding Shift, and clicking the last row.
Why can’t I insert rows in Excel?
Excel may prevent row insertion if the worksheet is protected, the cells contain merged areas spanning multiple rows, or the sheet has reached its row limit. Check whether the sheet is protected or if merged cells are blocking the insertion.
Conclusion
If you only need to insert a row occasionally, Excel’s built-in methods such as the right-click menu, the Home tab, and the keyboard shortcut are usually all you need. They are quick, simple, and work well for most everyday tasks.
If you often need to add several rows, insert rows below, or place blank rows at intervals, learning the multi-row methods can save time and reduce repetitive work. For users who handle these tasks regularly, Kutools for Excel can make the process much more convenient.
And if your data is stored in an Excel table, using table-specific row insertion methods helps keep formulas, formatting, and structure consistent as your dataset grows.
I hope you found this tutorial helpful. If you’d like to explore more Excel tips and practical solutions, please click here to browse our full collection of Excel tutorials.
The Best Office Productivity Tools
Kutools for Excel - Helps You To Stand Out From Crowd
Kutools for Excel Boasts Over 300 Features, Ensuring That What You Need is Just A Click Away...
Office Tab - Enable Tabbed Reading and Editing in Microsoft Office (include Excel)
- One second to switch between dozens of open documents!
- Reduce hundreds of mouse clicks for you every day, say goodbye to mouse hand.
- Increases your productivity by 50% when viewing and editing multiple documents.
- Brings Efficient Tabs to Office (include Excel), Just Like Chrome, Edge and Firefox.
Table of Contents
- Add a row in Excel
- Insert multiple rows at once
- Insert a set number of rows with Kutools
- Insert rows below in Excel
- Using the fill handle
- Using Kutools' Add Below command
- Using Kutools' Add Rows dialog box
- Add a row without disturbing others
- Insert a row every other row
- Manually with Ctrl key
- Automatically with Kutools for Excel
- Add rows inside an Excel table
- Frequently Asked Questions
- The Best Office Productivity Tools
Kutools for Excel
Brings 300+ advanced features to Excel
- 🧩 Overview
- 📥 Free Download
- 🎁 30-Day Free Trial available