How to add and change document author (document properties) in Excel
In Excel, the default author of a workbook is automatically set to the username of the individual who initially created the file. Usually, only one name appears as the author. However, workbooks are often developed collaboratively or require documentation for multiple contributors. In these cases, it's necessary to update the author field or add additional authors to the workbook's properties for better identification, accountability, and recordkeeping. Managing document properties appropriately ensures transparency when sharing files and helps clarify authorship in professional settings.
- Quickly add authors for workbook
- Add or change document properties and author in Excel
- Alternative solution: Update document properties using Windows File Explorer
- Alternative solution: Use Excel VBA to update author property
Quickly add authors for workbook
If you simply want to add new authors to the current workbook for reference, Excel allows you to easily perform this action using the following steps:
1. Open your Excel workbook and click on the File tab, then select Info from the menu.
2. On the right side under the Related People section, you will see a box displayed beneath the initial author’s name. To add another author, click in the box and type their name, then press Enter to confirm. 
While this solution is straightforward and perfect for quickly updating the author list for documentation purposes, it might not allow for extensive customization of other document properties. Be aware that these changes are mainly for display and organizational clarity and may not update the author's permissions or actual editing history of the workbook.
If for any reason the "Related People" box does not appear or you encounter access issues, ensure your workbook is saved locally (not in a restricted or networked location) and that you have sufficient permissions to edit the file’s document properties.
Add or change document properties and author in Excel
If you need to both add or change the author and update other document properties—such as title, subject, keywords, or category—Excel provides a couple of reliable methods for these tasks. These approaches not only allow the revision of the author field, but also enable detailed documentation for the workbook, which is particularly valuable in administrative, auditing, and collaborative contexts. Below are two recommended solutions:
Add or change document properties and author in Document Pane
1. In Excel 2010 or 2013, click the File tab, then select Info. Next, click the Properties button and choose Show Document Panel from the dropdown menu. This will display the document property fields at the top of your active worksheet where you can enter or modify details.
2. The Document Properties Panel will now appear above the worksheet area. Within this pane, you can conveniently edit the Author field to add or update names as required. Other metadata, such as title, categories, status, and subject, can also be changed in this location. As with author edits, press Enter after updating each field to save your changes. 
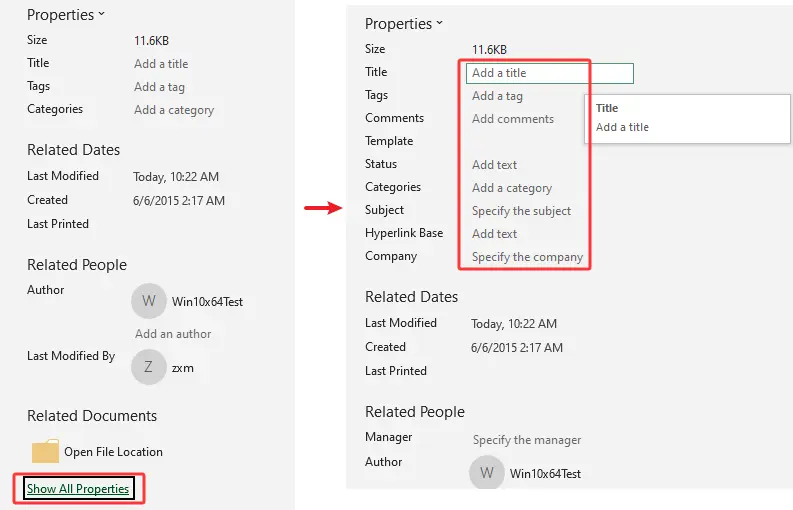
Note: If you are using a newer version of Excel (such as Office 365, Excel 2019, or later), the “Show Document Pane” option will not appear in the Properties dropdown menu. After navigating to the Info section, click “Show All Properties” to display all document fields, then add the desired fields.
Tip: For multi-author scenarios, consider using a consistent naming convention, such as separating names with a semicolon or comma, to maintain clarity and order. Customizing additional properties can support searching and sorting workbooks later, especially when managing documents at scale.
Add or change document properties and author in Advanced Properties dialog box
1. In Excel, go to File > Info, click Properties, then select Advanced Properties.
2. In the Document Properties dialog box, under the Summary tab, you will find fields for Author, Manager, Company, and other descriptive metadata. Enter revised information as needed, then click OK to save your changes. 
Precautions: When modifying file properties, make sure the workbook is not set to "Read Only" and that you have appropriate permissions to make edits. Changes to document properties do not affect workbook content, but they enhance document management and help with regulatory or recordkeeping requirements.
Pros and Cons Analysis:
- The Document Pane solution is quick for immediate edits and highly visible, but not all metadata is accessible from this view.
- The Advanced Properties dialog offers more comprehensive control, and is especially useful when setting multiple or custom document properties, although navigation requires more steps.
If you encounter difficulty saving author changes or other properties, ensure the file format is compatible (such as .xlsx rather than older .xls formats) and that no password protection is in place. In rare cases, you may need to close and reopen your workbook to see the updated property values displayed.
Alternative solution: Update document properties using Windows File Explorer
Instead of editing directly within Excel, you can sometimes update certain document properties from outside the application. In Windows File Explorer, right-click the Excel file, choose Properties, then go to the Details tab. Here, you can modify some metadata fields—including author and title—without opening the workbook. Note, however, that this method provides limited access to all document fields and may not support batch editing for multiple files. It can be handy when you do not have Excel installed or cannot access the workbook directly.
Alternative solution: Use Excel VBA to update author property
For advanced needs or automating updates across multiple files, you can use VBA (Visual Basic for Applications) to modify document properties including the author. This is beneficial if you have numerous workbooks requiring uniform author information.
To use VBA:
- Open Excel, go to Developer Tools > Visual Basic.
- In the opened Microsoft Visual Basic for Applications window, click Insert > Module and enter the following code:
Sub SetAuthorProperty()
    On Error Resume Next
    ActiveWorkbook.BuiltinDocumentProperties("Author") = "Your Name"
    xTitleId = "KutoolsforExcel"
End Sub
After entering the code, click the ![]() button to run. The specified author name will update for the current workbook automatically. Remember to replace "Your Name" with the desired author name.
button to run. The specified author name will update for the current workbook automatically. Remember to replace "Your Name" with the desired author name.
Tip: VBA changes are instantaneous and useful for batch file processing, but always ensure macros are enabled and save your work before executing scripts.
In summary, Excel provides several flexible tools for managing authorship and document metadata. Select the method that fits your scenario—whether for single files, collaborative projects, sharing via email, or auditing documentation history. Regularly updating properties helps clarify document ownership, supports workflow transparency, and can prevent confusion when files change hands.
Demo: add and change document author (document properties) in Excel
Best Office Productivity Tools
Supercharge Your Excel Skills with Kutools for Excel, and Experience Efficiency Like Never Before. Kutools for Excel Offers Over 300 Advanced Features to Boost Productivity and Save Time. Click Here to Get The Feature You Need The Most...
Office Tab Brings Tabbed interface to Office, and Make Your Work Much Easier
- Enable tabbed editing and reading in Word, Excel, PowerPoint, Publisher, Access, Visio and Project.
- Open and create multiple documents in new tabs of the same window, rather than in new windows.
- Increases your productivity by 50%, and reduces hundreds of mouse clicks for you every day!
All Kutools add-ins. One installer
Kutools for Office suite bundles add-ins for Excel, Word, Outlook & PowerPoint plus Office Tab Pro, which is ideal for teams working across Office apps.
- All-in-one suite — Excel, Word, Outlook & PowerPoint add-ins + Office Tab Pro
- One installer, one license — set up in minutes (MSI-ready)
- Works better together — streamlined productivity across Office apps
- 30-day full-featured trial — no registration, no credit card
- Best value — save vs buying individual add-in