How to change the default time for delay delivery in Outlook?
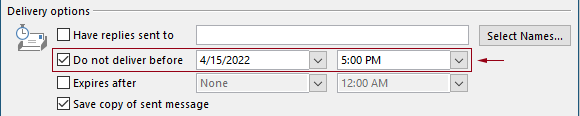
When composing and sending emails in Outlook, it's common to use the "Delay Delivery" feature to control when your messages are actually sent. By default, Outlook sets the "Do not deliver before" time (shown in the screenshot below) to 5:00 PM. This default behavior can pose problems in practical scenarios - unless you manually adjust this preset time each time you use the function, your email might not be sent until 5:00 PM the next day, which is often not compatible with your work schedule or communication needs.
Fortunately, Outlook provides ways to automate or customize this default delay delivery time. Adjusting it can better align with your preferred work hours and help you manage recipients’ expectations. In this tutorial, you will learn how to use VBA code to automatically set a custom default delivery time for all your delayed emails, eliminating the need for repetitive manual tweaks every time you use the delay feature.
Change the default time for delay delivery in Outlook with VBA code
It is not possible to directly change Outlook's internal default delay delivery time through Outlook options or settings. However, you can employ a VBA solution to automatically set your preferred delay delivery time and conditions every time you send an email. This flexible method lets you define exactly when the delay feature is applied and what the scheduled send time should be, streamlining your workflow and ensuring consistency.
With the VBA code below:
- Delay delivery time: Lets you specify the preferred time when delayed emails should be sent (for example, 07:30 AM).
- Delay delivery activation time: Defines the period after which any sent email is automatically delayed (for example, after 5:30 PM).
For instance, if you set your delay delivery time to 07:30 AM and configure the system to enable this option automatically after 5:30 PM, any email you send between 07:30 AM and5:30 PM will be dispatched without delay. Conversely, if you send an email after 5:30 PM but before 07:30 AM the next day, Outlook will automatically hold and send it at 07:30 AM on the following working day.
This setup is ideal for anyone who wants outgoing messages to appear as if they were sent during standard business hours, regardless of when the emails are actually written. It helps ensure a professional image and minimizes disruptions outside working periods for message recipients.
Before using this code, consider these points:
- Outlook must be running at the scheduled send time to complete delivery. Scheduled emails will remain in the Outbox until Outlook is open and connected.
- If your system or Outlook is set to a different timezone than your intended recipients, be sure to adjust the times accordingly to avoid confusion.
Follow these steps to implement the solution:
1. Open your Outlook desktop application, then press Alt + F11 simultaneously to launch the Microsoft Visual Basic for Applications editor.
2. In the VBA window, expand Project1, then double-click Microsoft Outlook Objects > ThisOutlookSession. This will bring up the code window for application-wide event handling.
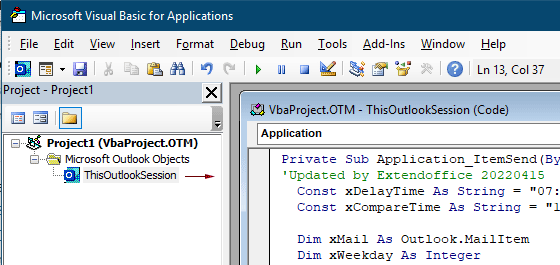
VBA code: change the default time for delay delivery in Outlook
Private Sub Application_ItemSend(ByVal Item As Object, Cancel As Boolean)
'Updated by Extendoffice & EWP 20230602
  Const xDelayTime As String = "07:30:00"  'The delay delivery time of emails
  Const xCompareTime As String = "17:30:00" 'The time to enable the delay delivery option
  Dim xMail As Outlook.MailItem
  Dim xWeekday As Integer
  Dim xNowTime As String
  Dim xIsDelay As Boolean
  Dim xRet1 As Integer
  Dim xRet2 As Integer
  On Error GoTo xError
  If (Item.Class <> olMail) Then Exit Sub
  Set xMail = Item
  xWeekday = Weekday(Date, vbMonday)
  xNowTime = Format(Now, "hh:nn:ss")
  xIsDelay = False
  xRet1 = StrComp(xNowTime, xDelayTime)
  xRet2 = StrComp(xNowTime, xCompareTime)
  If xRet1 = xRet2 Then
    xIsDelay = True
  End If
  If (xRet1 = -1) And (xRet2 = -1) Then
    xMail.DeferredDeliveryTime = Date & " " & xDelayTime
  Else
    If ((xWeekday = 5) And xIsDelay) Or (xWeekday = 6) Or (xWeekday = 7) Then
      xMail.DeferredDeliveryTime = (Date + (5 - xWeekday + 3)) & " " & xDelayTime
    ElseIf xIsDelay Then
      xMail.DeferredDeliveryTime = (Date + 1) & " " & xDelayTime
    End If
  End If
Exit Sub
xError:
  MsgBox "ItemSend: " & Err.Description, , "Kutools for Outlook"
End SubNotes:
Const xDelayTime As String = "07:30:00"Const xCompareTime As String = "17:30:00"3. Once you've entered the code, save your changes and exit the VBA window by pressing Alt + Q.
With this VBA script active, any email sent within your specified standard hours (for example, between 07:30 AM and 5:30 PM) will be dispatched immediately. Outside these hours, emails will be automatically held and released at 07:30 AM next business day, providing a consistent sending schedule without manual intervention.
Additional tips and troubleshooting:
- If you encounter issues where delayed emails remain in your Outbox and are not sent at the scheduled time, verify Outlook is running and has a stable network connection at that time. Outbox delivery requires Outlook to be open and connected.
- After updating or replacing your Outlook profile, or if you move to a new computer, you will need to reapply this script as VBA project settings do not automatically transfer.
- If you want to temporarily disable this automation, simply comment out or remove the code from ThisOutlookSession.
Alternative solutions
If you prefer a faster, no-code solution for scheduling emails, Kutools for Outlook offers an easy-to-use Schedule Email feature that lets you set automatic send times, delay delivery, or schedule recurring messages with just a few clicks. Learn more here: https://www.extendoffice.com/product/kutools-for-outlook/outlook-schedule-email.html

Related articles
Change Default Reminder Time Of All-Day Events In Outlook
Normally, the default reminder time of all-day event is18 hours in Outlook2007/2010 and0.5 day in Outlook2013. Sometimes, the default reminder time of all-day event may not agree with your work schedule. Here we will introduce the way to change the default reminder time of all-day events in Microsoft Outlook.
Change The Default Follow Up Time In Outlook
As we know, when we add a follow up reminder for an email in Outlook, the default follow up time is4:30 PM (or other time depending on your working hours). However, you may want to change the default follow up time, and let it remind you at the beginning of working hours, such as9:00 AM. In this article, I will show you how to change the default follow up time in Outlook.
Change Default Archive Location In Outlook
By default, Outlook has default location for the archive files. Besides the default location, you can set your own archive location for your archive files. In this tutorial, we will show you how to change default archive location in Outlook in details.
Change Default Attachment Saving Location In Outlook
Have you fed up with finding the attachment location you have specified every time when launching Outlook? In this tutorial, we will show you how to change the default attachment location. After that, the specified attachment saving folder will be opened automatically every time you save the attachments even though you restarting the Outlook.
Change The All-Day Event Default To Busy In Outlook
By default, Outlook sets the status of appointments and meetings to “Busy”, but all-day events to “Free” (see screenshot below). You need to manually change the Show As status to Busy each time you create an all-day event. To change the default show as status of all-day events to Busy, the article provides you with two methods.
Best Office Productivity Tools
Experience the all-new Kutools for Outlook with 100+ incredible features! Click to download now!
📧 Email Automation: Auto Reply (Available for POP and IMAP) / Schedule Send Emails / Auto CC/BCC by Rules When Sending Email / Auto Forward (Advanced Rules) / Auto Add Greeting / Automatically Split Multi-Recipient Emails into Individual Messages ...
📨 Email Management: Recall Emails / Block Scam Emails by Subjects and Others / Delete Duplicate Emails / Advanced Search / Consolidate Folders ...
📁 Attachments Pro: Batch Save / Batch Detach / Batch Compress / Auto Save / Auto Detach / Auto Compress ...
🌟 Interface Magic: 😊More Pretty and Cool Emojis / Remind you when important emails come / Minimize Outlook Instead of Closing ...
👍 One-click Wonders: Reply All with Attachments / Anti-Phishing Emails / 🕘Show Sender's Time Zone ...
👩🏼🤝👩🏻 Contacts & Calendar: Batch Add Contacts From Selected Emails / Split a Contact Group to Individual Groups / Remove Birthday Reminders ...
Use Kutools in your preferred language – supports English, Spanish, German, French, Chinese, and 40+ others!


🚀 One-Click Download — Get All Office Add-ins
Strongly Recommended: Kutools for Office (5-in-1)
One click to download five installers at once — Kutools for Excel, Outlook, Word, PowerPoint and Office Tab Pro. Click to download now!
- ✅ One-click convenience: Download all five setup packages in a single action.
- 🚀 Ready for any Office task: Install the add-ins you need, when you need them.
- 🧰 Included: Kutools for Excel / Kutools for Outlook / Kutools for Word / Office Tab Pro / Kutools for PowerPoint