Using Bcc in Outlook: add, automate, view, and more
Understanding the Bcc (blind carbon copy) feature in email communication is vital for maintaining privacy and professionalism.
When you add an email address to the Bcc field, that recipient receives the email without their email address being visible to other recipients. This is especially important for sending messages to large groups, as it keeps individual email addresses hidden. Unlike the Cc (carbon copy) field, where all recipients can see each other's addresses, Bcc ensures complete privacy.
This tutorial will guide you through the essentials of using Bcc in Outlook, including how to show or hide the Bcc line, automate Bcc in your emails, view Bcc recipients, and more across various platforms.
Video: Using Bcc in Outlook
Add Bcc in Outlook
In this section, we'll explore how to effectively add Bcc recipients in Outlook. Each platform has its specific steps for adding Bcc, and we'll guide you through these processes to ensure your emails reach all intended recipients discreetly.
Add Bcc in Outlook on Windows desktop
To activate the Bcc field in Outlook for Windows, the process differs based on how you're composing your email. If you're working in a separate Message window, the process is slightly different compared to composing directly in the Reading Pane.
- If you are composing an email in a separate Message window (typically when creating a new message):
- Select Options > Bcc.
- Enter the email addresses in the Bcc field. Tip: You can add multiple recipients separated by semicolons.

- If you are composing a message in the Reading Pane (typically when replying to or forwarding a message):
- Select Bcc on the Message tab of the ribbon.
- Enter the email addresses in the Bcc field. Tip: You can add multiple recipients separated by semicolons.


Notes:
- The Bcc button's background color indicates its status. A dark background signifies that the Bcc field is active (turned on), while a light background indicates it is inactive (turned off).

- Once activated, the Bcc field will continue to appear in every message you compose, until you decide to turn it off by clicking on the Bcc button again.
- To temporarily use the Bcc field for just one email, you can select the To box while composing the message, and then either:
- Enter the desired Bcc recipients directly into the Bcc field.
- Choose one or multiple contacts from your address list and click the Bcc button to add them as Bcc recipients quickly.


(AD) Automatically add Bcc with Kutools for Outlook
Ever wished you could automatically add Bcc to every email you send? Kutools for Outlook makes this possible – a feature you won't find in standard Outlook settings! Forget the hassle of manually adding Bcc to each email. With Kutools, every email you send will automatically include Bcc recipients of your choice! View the detailed instruction: Auto add Bcc to all or specific emails with Kutools.

Besides Auto Bcc, Kutools for Outlook offers an array of automated features for Outlook, including Auto Reply and Auto Forward, enhancing your email management with even more efficiency. Try them all in a 30-day free trial with no feature restrictions now!
Add Bcc in Outlook on Mac desktop
To turn on the Bcc box in Outlook for Mac, proceed as follows.
- In the opened message window, select Options > BCC.
- Enter the email addresses in the Bcc field. Tip: You can add multiple recipients separated by semicolons.


Notes:
- The Bcc button's background color indicates its status. A dark background signifies that the Bcc field is active (turned on), while a light background indicates it is inactive (turned off).

- Once activated, the Bcc field will continue to appear in every new message you compose, until you decide to turn it off by clicking on the Bcc button again.
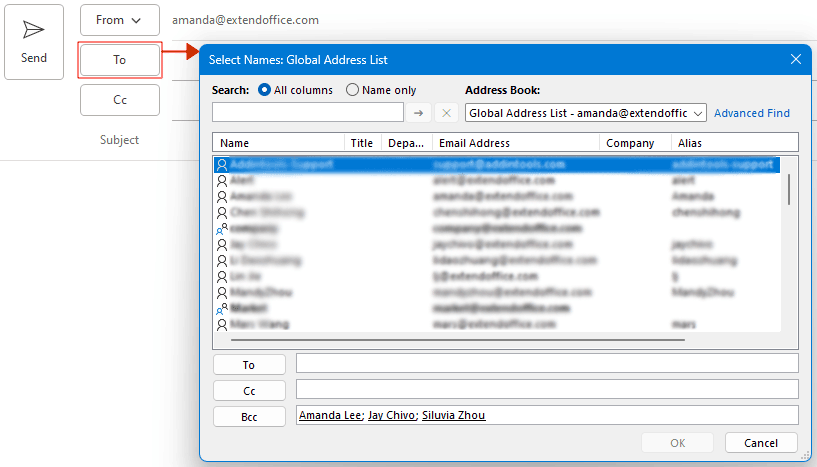
- To temporarily use the Bcc field for just one email, you can select the address book icon
 at the right end of the To box, and then search for and select the desired Bcc recipients and click the Bcc button as shown below.

 at the right end of the
Add Bcc in Outlook on the Web
For users of Outlook on the web, displaying the Bcc field in a message is straightforward: Simply clicking the Bcc button located at the right end of the To line reveals the Bcc field.
If you prefer to keep the Bcc field always visible for adding Bcc recipients in every message you compose, follow these steps:
- In the Mailview, click on the Settings icon
 in the top-right corner.
 - In the Settings window that appears as shown below, select Mail > Compose and reply. Tick the checkbox next to Always show Bcc, and click Save.

 in the top-right corner.
Add Bcc in Outlook on Android and iOS
Whether you're using the Outlook application on an Android device or an iOS device (such as an iPhone or iPad), please follow these steps to add Bcc recipients:
- Click the arrow next to the To: line. This action will reveal additional fields, including the Bcc field.
- Enter the email addresses in the Bcc field.


Auto Bcc in Outlook (on Windows desktop)
Auto Bcc in Outlook is a versatile tool that enhances email efficiency and organization. It's essential for supervisory oversight, team coordination, compliance with record-keeping requirements, and effective client management. Additionally, automatically Bcc'ing oneself is an effective way to keep track of sent emails, manage follow-ups, and ensure privacy.
To help you fully leverage this feature, the following section will provide detailed, step-by-step instructions for setting up Auto Bcc in Outlook.
Automatically add Bcc to all or specific emails with Kutools
Outlook, by default, doesn't offer a built-in feature to automatically Bcc all or specific emails. However, this limitation can be overcome with the use of Kutools for Outlook – a powerful add-in that enhances Outlook's capabilities. In this section, we'll explore how Kutools enables you to set rules for automatically Bcc'ing yourself or others on all emails or only those that meet certain criteria, offering a level of customization and automation that isn't natively available in Outlook.
Say goodbye to Outlook inefficiency! Kutools for Outlook makes batch email processing easier - now with a 30-day free trial! Download Kutools for Outlook Now!!
Once you have Kutools for Outlook installed, please do as follows:
- On Kutools tab, select the CC / BCC button.
 Tip: If you’ve already enabled the Auto CC / BCC feature, select the down arrow next to the button and choose Rule Manager.
 - In the Auto CC / BCC Manager dialog box, click the New button to create a rule.

- In the Rules Wizard window that appears, define the criteria for emails to which you want to automatically add a BCC recipient. For instance, if you wish to automatically add a Bcc recipient on emails with "Important" in the subject line, follow these steps:
- Select the subject contains specific words option in the Step 1 box.
- Click the underlined value in the Step 2 box to specify the trigger words (e.g., "Important") in the subject line.
- Click Next.
Tip: If you wish to automatically add a Bcc recipient to all outgoing emails, choose no options and click Next.

- In the following Rules Wizard, you have the option to specify any exceptions to the rule. If you don't need any exceptions, simply click Next.

- In the last Rules Wizard, do as follows:
- Name the rule and add a remark as needed.
- Select the Recipient button to add the desired Bcc recipients you want to automatically add to your outgoing messages.
Tip: In the pop-up Select Names dialog, you can add Bcc recipient by either of the methods below:
- Enter the desired Bcc recipients directly into the Bcc field. Tip: If there are multiple recipients, separate them by semicolons.
- Choose one or multiple contacts from your address list and click the Bcc button to quickly add them as Bcc recipients.
- Click Ok.

- Now we are back to the Auto CC / BCC Manager dialog, and the rule we created is already enabled (checked). Click OK to save the changes.


Result
Now, whenever I send an email with the keyword "Important" in the subject line, the predefined Bcc recipients will be automatically added to the Bcc field.
Notes:
- The background color of the CC / Bcc button turning dark indicates that the feature is turned on, and when you click the arrow next to it, you'll notice a checkmark appearing before Enable Auto CC / BCC.

- Want to access the Auto CC / BCC feature? Download Kutools for Outlook now! Beyond this, Kutools boasts a myriad of 100+ other features and offers a 30-day free trial. Don't wait, give it a try today!

Add Bcc to specific emails using Quick Steps (shortcut keys)
While Outlook does not directly provide a way to automatically add Bcc recipients to outgoing messages, the Quick Steps feature offers an indirect method. This handy tool allows you to quickly add Bcc recipients to your emails with just a click or even through shortcut keys. To take advantage of this functionality, please do as follows:
- On the Hometab, in the Quick Steps box, select Create New.

- In the Edit Quick Step dialog box, please configure the new action:
- Give this action a name.
- Under Actions, select New Message from the Choose an Action drop-down menu.
- Click Show Options and select Add Bcc. Then enter the email addresses of those you wish to Bcc, setting them as predefined Bcc recipients.
Tip:
- If there are multiple recipients, separate them by semicolons.
- You can click on the Bcc button to select and add recipients from your address book.
- Specify a shortcut key for this action.
- Click Finish.

- In your Outlook, select the action you've set up in the Quick Steps box, or use the shortcut keys you've assigned to it. Doing so will automatically create a new email with the Bcc recipient already included.


Notes:
- This action sets up a new message and automatically includes the predetermined Bcc recipients. However, if you need to reply to or forward a message while also adding these Bcc recipients, you'll need to create a separate Quick Step action. For this, choose the desired action from the Choose an Action drop-down list when configuring the new Quick Step.

- It's important to remember that this method is not a truly automatic solution for adding Bcc recipients. It requires a manual trigger - either a click or a shortcut key - for each email. For those seeking a fully automated process, please use the above method: Automatically add Bcc to all or specific emails with Kutools.

View Bcc recipients
In Outlook, if you're unsure whether you've Bcc'd someone in a message you sent, there's an easy way to check:
Simply go to your Sent Items folder and open the email in question. The names or addresses of any Bcc recipients will be visible in the header section of the message.

Note: When it comes to emails you receive, viewing Bcc recipients is not possible, whether you are a main recipient (listed in the Toor Ccfield) or a Bcc recipient. This holds true even if you click Reply All. The Bcc information is only accessible to the sender of the message, ensuring the privacy of those recipients.
Remind when replying all to a message you were Bcc'd
Being reminded when replying to all on a message where you were Bcc'd is vital for upholding confidentiality and professional conduct. This precaution prevents accidentally revealing your covert presence in the conversation, thereby avoiding misunderstandings or breaches in the communication strategy. Such reminders are particularly crucial in professional or sensitive contexts, where respecting the sender's intent and avoiding unintended information disclosure are key to preserving the integrity of private communications.
While Outlook does not natively offer such reminders, Kutools for Outlook provides a practical workaround. It features a toggle option that, when activated with a single click, enables reminders, thus helping you maintain discretion and prevent any inadvertent breaches of email etiquette.
Say goodbye to Outlook inefficiency! Kutools for Outlook makes batch email processing easier - now with a 30-day free trial! Download Kutools for Outlook Now!!
Once you have Kutools for Outlook installed, please do as follows:
- On Kutools tab, select Options.
- In the Options dialog, navigate to the Reply tab, and tick the Warning me when “Reply all” to a message that have me in Bcc option.
- Click OK.


Notes: Looking to use this feature? Get Kutools for Outlook today! With over 100 additional features, Kutools also provides a 30-day free trial. Try it out now and see the difference!
Best practices and considerations for using Bcc
Bcc is ideal for business emails addressed to multiple recipients who are unfamiliar with each other. It streamlines the To field by avoiding a long list of addresses and minimizes the risk of mass Reply All responses, which can lead to unintentional spamming. Additionally, Bcc'ing yourself is an efficient way to keep a consolidated record of sent emails.
Before adding a recipient to the Bcc field, you should:
- Anticipate Email Reception: Ensure they anticipate your email. This is crucial because Bcc use is common among spammers, leading many email filters to mark such messages as junk. Advise recipients to mark you as a safe sender in their Outlook settings to avoid your emails being directed to the Junk folder.
- Consider Sorting Impact: Remember that using Bcc can affect how recipients sort your messages. Since most sorting rules in email systems are configured based on the To box or Cc box, messages sent with Bcc recipients might not align with these established sorting rules.
- Respect Provider Limits: Be aware of the limits set by your email service provider on the number of recipients (To, Cc, Bcc). Exceeding these limits can lead to delivery issues or flagging your email as spam.
By adhering to these guidelines, you can utilize the Bcc feature effectively and ethically, ensuring that your emails are received positively and achieve their intended objectives.
Frequently asked questions about Outlook Bcc
This section addresses frequently asked questions about the Blind Carbon Copy (BCC) feature in Microsoft Outlook.
Can primary recipients see Bcc recipients in Outlook?
No, the main recipients in the To or Cc field of the email cannot see who has been added in the Bcc field.
Will Bcc recipients see each other’s email addresses?
No, Bcc recipients cannot see each other's email addresses.
Can I be notified if someone replies to all in an email where I am Bcc'd?
Generally, you will not receive Reply All responses to an email where you are a Bcc recipient, as your email address is not visible to other recipients.
What happens if a Bcc recipient replies to all?
When a Bcc recipient clicks Reply All, their response will be sent to the original sender and any recipients listed in the To or Cc fields of the original email. However, other Bcc recipients will not receive this reply. To avoid accidentally replying to all as a Bcc recipient, you can set up a warning in Outlook by following this instruction: Remind when replying all to a message you were Bcc'd.
Can I only send to Bcc without a main recipient?
Yes. In Outlook, it's technically possible to send an email with recipients only in the Bcc field, leaving the To and Cc fields empty. However, be aware that this practice may trigger spam filters since it's considered atypical email behavior. Some email servers might even automatically reject such emails, perceiving them as potential spam or phishing attempts.
How can I automatically Bcc myself or others in Outlook?
Outlook doesn’t have a native feature for this, but you can use rules or third-party add-ins like Kutools for Outlook to set up automatic Bcc: Automatically add Bcc to all or specific emails with Kutools.
Is there a limit to the number of Bcc recipients in Outlook?
Yes, there is usually a limit, but it varies depending on the email server and Outlook settings. Common limits range from 50 to 500 recipients.
Above is all the relevant content related to Outlook Blind Carbon Copy (BCC). I hope you find the tutorial helpful. If you're looking to explore more Outlook tips and tricks, please click here to access our extensive collection of over thousands of tutorials.
Best Office Productivity Tools
Experience the all-new Kutools for Outlook with 100+ incredible features! Click to download now!
📧 Email Automation: Auto Reply (Available for POP and IMAP) / Schedule Send Emails / Auto CC/BCC by Rules When Sending Email / Auto Forward (Advanced Rules) / Auto Add Greeting / Automatically Split Multi-Recipient Emails into Individual Messages ...
📨 Email Management: Recall Emails / Block Scam Emails by Subjects and Others / Delete Duplicate Emails / Advanced Search / Consolidate Folders ...
📁 Attachments Pro: Batch Save / Batch Detach / Batch Compress / Auto Save / Auto Detach / Auto Compress ...
🌟 Interface Magic: 😊More Pretty and Cool Emojis / Remind you when important emails come / Minimize Outlook Instead of Closing ...
👍 One-click Wonders: Reply All with Attachments / Anti-Phishing Emails / 🕘Show Sender's Time Zone ...
👩🏼🤝👩🏻 Contacts & Calendar: Batch Add Contacts From Selected Emails / Split a Contact Group to Individual Groups / Remove Birthday Reminders ...
Use Kutools in your preferred language – supports English, Spanish, German, French, Chinese, and 40+ others!


🚀 One-Click Download — Get All Office Add-ins
Strongly Recommended: Kutools for Office (5-in-1)
One click to download five installers at once — Kutools for Excel, Outlook, Word, PowerPoint and Office Tab Pro. Click to download now!
- ✅ One-click convenience: Download all five setup packages in a single action.
- 🚀 Ready for any Office task: Install the add-ins you need, when you need them.
- 🧰 Included: Kutools for Excel / Kutools for Outlook / Kutools for Word / Office Tab Pro / Kutools for PowerPoint
Table of contents
- Video: Using Bcc in Outlook
- Add Bcc in Outlook
- On Windows desktop
- On Mac desktop
- On the Web
- On Android and iOS
- Auto Bcc in Outlook (on Windows desktop)
- Auto add Bcc to all or specific emails with Kutools
- Add Bcc to specific emails using Quick Steps (shortcut keys)
- View Bcc recipients
- Remind when replying all to a message you were Bcc'd
- Best practices and considerations
- Frequently asked questions
- Related articles
- Elevate Your Outlook Workflow
- Comments