How to quickly delete all named ranges in Excel?
When working in Excel, named ranges are commonly used to simplify references in formulas, ease navigation and make your workbook more readable. However, as your project evolves, you may accumulate a large number of named ranges that are no longer needed, potentially causing confusion or clutter in your workbook. Faced with such a scenario, you might want to remove all named ranges at once rather than deleting them one by one manually. Let's look at effective methods to achieve this efficiently in Excel.
Delete all named ranges by going to the Name Manager
The Name Manager is a built-in tool in Excel specifically designed for handling named ranges. Within this dialog, you can easily create, edit, or remove named ranges to fit your needs. This method is ideal for users who are comfortable with Excel’s graphical interface and prefer to review named ranges before deleting them. Follow these instructions to quickly delete multiple or all named ranges from your workbook:
1. Open the Name Manager by clicking on Formulas > Name Manager in the Excel Ribbon. This will display a list of all named ranges currently in your workbook.
2. In the Name Manager dialog box, you can select named ranges in bulk. To do this, press and hold the Shift key to select a series of names, or use the Ctrl key to select individual named ranges as needed.
3. After making your selection, click the Delete button at the top of the dialog box. Excel will show a confirmation prompt to ensure that you want to delete the selected names. Take a moment here to double-check that you do not need any of the names about to be deleted. 
4. Click OK in the prompt box to confirm your choice. All selected named ranges will be deleted immediately, removing them from the current workbook.
 |  |  |
Points to keep in mind:
- Deleting named ranges that are used in formulas will cause those formulas to return errors. Before deleting, consider replacing named ranges with cell references if the formulas depend on them.
- If you only want to delete specific named ranges, carefully select only those instead of deleting all, as this action cannot be undone.
- Name Manager works well for a moderate number of names. If your workbook contains hundreds of named ranges, the process may take time because selections and confirmations must be handled manually.
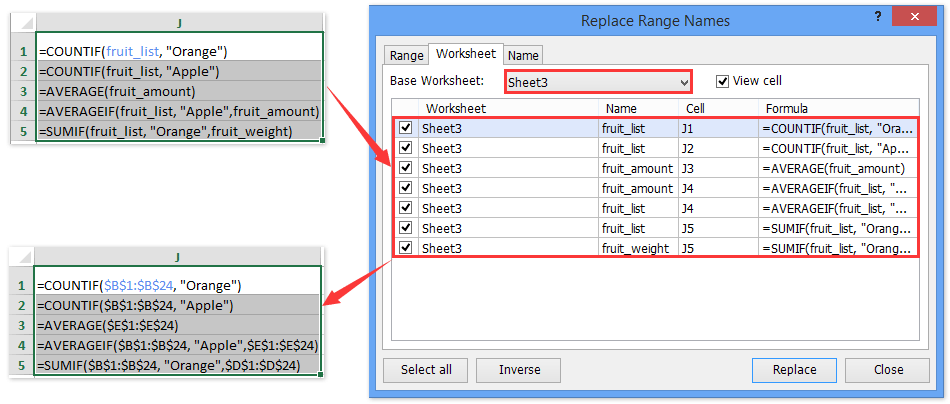
Find and replace all named ranges with corresponding cell references in formulas
The Replace Range Names feature in Kutools for Excel offers a reliable solution when you must update your workbook’s formulas before deleting any named ranges. This utility can scan a selected range, a specific worksheet, or even your entire workbook to identify all formulas using named ranges. Its primary function is to automatically substitute those named ranges with their respective cell references, ensuring your formulas continue to work correctly after removal. This is particularly valuable when your workbook relies on named ranges in formulas and you want to avoid broken references or calculation errors.
Kutools for Excel - Supercharge Excel with over 300 essential tools, making your work faster and easier, and take advantage of AI features for smarter data processing and productivity. Get It Now
Delete all named ranges with VBA code
If you are comfortable working with macros, using VBA code is a practical and efficient solution to delete all named ranges from a workbook in an automated fashion. This method is especially suitable for large workbooks with many named ranges or when you want to repeat the deletion process regularly across multiple files.
1. To begin, press ALT + F11 to open the Microsoft Visual Basic for Applications window.
2. In the VBA editor, click Insert > Module to add a new module, then paste the code snippet below into the Module Window.
VBA code: Delete all named ranges in Excel
Sub DeleteNames()
'Update 20140314
Dim xName As Name
For Each xName In Application.ActiveWorkbook.Names
    xName.Delete
Next
End Sub
3. To run the code, press F5 while the cursor is inside the module, or click the Run button. The code will immediately remove all named ranges from the current workbook.
Additional tips:
- Always save your workbook before running VBA, as changes made by macros cannot be undone.
- If your workbook contains protected sheets, or if named ranges are used in formulas, carefully check the impact after deletion as formulas referring to deleted names will show errors.
- To restrict deletion to named ranges on a specific worksheet, further customization of the VBA code is possible.
- If you encounter a “runtime error,” ensure that macros are enabled, and try closing and reopening Excel before re-running the macro.
Pros and cons:
- The VBA method is highly efficient for bulk deletion and repeatable tasks.
- Unlike Name Manager, you lose the ability to review and selectively delete names unless you modify the code.
- This approach is most helpful for advanced users or those performing cleanup on large or complex workbooks.
If you are unfamiliar with macros, consider visiting the official Microsoft support page for additional guidance on named ranges and VBA.
Related articles:
How to hide / unhide all named ranges in Excel?
How to list named ranges in Excel?
How to create dynamic named range in Excel?
Best Office Productivity Tools
Supercharge Your Excel Skills with Kutools for Excel, and Experience Efficiency Like Never Before. Kutools for Excel Offers Over 300 Advanced Features to Boost Productivity and Save Time. Click Here to Get The Feature You Need The Most...
Office Tab Brings Tabbed interface to Office, and Make Your Work Much Easier
- Enable tabbed editing and reading in Word, Excel, PowerPoint, Publisher, Access, Visio and Project.
- Open and create multiple documents in new tabs of the same window, rather than in new windows.
- Increases your productivity by 50%, and reduces hundreds of mouse clicks for you every day!
All Kutools add-ins. One installer
Kutools for Office suite bundles add-ins for Excel, Word, Outlook & PowerPoint plus Office Tab Pro, which is ideal for teams working across Office apps.
- All-in-one suite — Excel, Word, Outlook & PowerPoint add-ins + Office Tab Pro
- One installer, one license — set up in minutes (MSI-ready)
- Works better together — streamlined productivity across Office apps
- 30-day full-featured trial — no registration, no credit card
- Best value — save vs buying individual add-in