Hide formulas in Excel (A complete guide)
Excel formulas are powerful tools for conducting calculations and data analysis. When a formula resides within an Excel cell, users can access it using two distinct methods: by double-clicking the cell to enter edit mode or by selecting the cell to reveal the formula in the formula bar.
However, if you attempt to protect your worksheet, possibly due to concerns related to confidentiality, security, or other considerations, you'll discover that your formulas can still be accessed using the aforementioned two methods.
Should you wish to conceal these formulas to prevent users from viewing them, this guide is designed to assist you. In this comprehensive walkthrough, we will lead you through the steps to hide formulas in Excel so that they remain invisible, allowing you to retain the functionality of your formulas while keeping them discreet.
 |
Video: Hide formulas in Excel
Easily hide formulas in Excel
Here are the steps to prevent users from viewing formulas when they select a formula cell. It's important to note that protecting the worksheet is necessary to hide the formulas, and as a result, no changes are allowed after the worksheet is protected.
Step 1: Select cells containing formulas you want to hide
- To hide specific formulas, select the cells containing these formulas. Tip: If the formulas are in non-adjacent cells or ranges, hold "Ctrl" and select each.
- To hide all formulas in the current worksheet, navigate to the "Home" tab and, within the "Editing" group, click on "Find & Select" > "Formulas" to select all cells with formulas.


Step 2: Enable the Hidden property for the cells with formulas
- Right click on any of the selected cells and choose "Format Cells" from the context menu to open the "Format Cells" dialog.
Tip: Alternatively, you can use the shortcut keys "Ctrl" + "1".
- In the "Format Cells" dialog, on the "Protection" tab, check the "Hidden" option and click "OK".

Note: As indicated in the hint within this dialog box, hiding formulas has no effect until you protect the worksheet. To finalize the process of hiding the formulas, make sure to follow the next step to protect the worksheet.


Step 3: Protect the worksheet
- Go to the "Review" tab, and select "Protect Sheet".

- In the "Protect Sheet" dialog, enter a password and click "OK".
 Tip: In the "Allow all users of this worksheet to:" box, you can choose to permit or restrict the listed actions by checking or unchecking the respective boxes next to each action.
 - The "Confirm Password" dialog box appears asking you to reenter the password. Please retype the password and click "OK".


Result
Now, when you select a cell containing a formula, you will observe that no formula is displayed in the formula bar.

If you attempt to double-click on the cell, a dialog box will appear instead.

(AD) All-in-one Excel content protection with Kutools for Excel
Struggling to find where to activate the Hidden property or protect your Excel worksheet? Make life easier with "Kutools for Excel"! It seamlessly combines Excel's native features into a single, user-friendly ribbon for effortless content protection. No more hunting for options, just pure simplicity!

Kutools for Excel - Supercharge Excel with over 300 essential tools, making your work faster and easier, and take advantage of AI features for smarter data processing and productivity. Get It Now
Hide formulas and keep specific cells editable
You may find yourself needing to share workbooks with others, granting them the ability to make changes to specific cells while safeguarding your formulas from view or edit. This is a frequent requirement for worksheets involving data entry, statistical analysis, and various other purposes. To achieve this, you have the option to employ one of three methods below:
- Using Excel’s built-in features (No need for external tools; Requires memorizing various settings)
- Using Kutools for Excel(All settings in one menu; Requires add-in installation)
- Using VBA (Quick once you know it; Requires some learning)
Hide formulas and keep specific cells editable using Excel’s built-in features
In this section, I will illustrate an approach to hiding formulas in your worksheet while preserving the ability to edit specific cells. This will be achieved by configuring cell protection properties and protecting your worksheet as follows:
Step 1: Select cells containing formulas you want to hide
- To hide specific formulas, select the cells containing these formulas. Tip: If the formulas are in non-adjacent cells or ranges, hold "Ctrl" and select each.
- To hide all formulas in the current worksheet, navigate to the "Home" tab and, within the "Editing" group, click on "Find & Select" > "Formulas" to select all cells with formulas.
Step 2: Enable the Hidden property for the cells with formulas
- Right click on any of the selected cells and choose "Format Cells" from the context menu to open the "Format Cells" dialog.
Tip: Alternatively, you can use the shortcut keys "Ctrl" + "1". - In the "Format Cells" dialog, on the "Protection" tab, check the "Hidden" option and click "OK".
Note: As indicated in the hint within this dialog box, hiding formulas has no effect until you protect the worksheet. To finalize the process of hiding the formulas, make sure to follow the next step to protect the worksheet.
Step 3: Disable the Lock property for the cells you want to keep editable
- Select the cells you wish to keep editable. Tip: You can select non-adjacent cells or ranges by holding down the "Ctrl" key.
- Press "Ctrl" + "1" to open the "Format Cells" dialog box.
- Switch to the "Protection" tab, uncheck the "Locked" option and click "OK".


Step 4: Protect the worksheet
- Go to the "Review" tab, and select "Protect Sheet".
- In the "Protect Sheet" dialog, enter a password and click "OK".
Tip: In the "Allow all users of this worksheet to:" box, you can choose to permit or restrict the listed actions by checking or unchecking the respective boxes next to each action.
- The "Confirm Password" dialog box appears asking you to reenter the password. Please retype the password and click "OK".
Result
In the unlocked cells, you can still input values, and the formulas will continue to generate calculation results while remaining invisible.

Hide formulas and keep specific cells editable using Kutools for Excel
The method described above instructs how to hide formulas and keep specific cells editable. However, it requires you to remember the location to enable the hidden property and disable the locked property. Additionally, you need to know where to protect your sheet, which can be cumbersome if you have to search for these options.
Kutools for Excel's "Design" tab streamlines these processes by integrating these options, making it easier to achieve your goals. Once you have downloaded and installed Kutools, please do as follows:
Step 1: Select "Kutools Plus" > "Design View" to display the "Kutools Design" tab

Step 2: Select cells containing formulas and click "Hide formulas"
- Select the cells containing formulas you want to hide.
Tips:
- To hide specific formulas, select the cells containing these formulas. Tip: If the formulas are in non-adjacent cells or ranges, hold "Ctrl" and select each.
- To hide all formulas in the current worksheet, navigate to the "Home" tab and, within the "Editing" group, click on "Find & Select" > "Formulas" to select all cells with formulas.
- Select "Hide formulas" on the "Kutools Design" tab.

- Tip: A dialog box will appear, informing you that the formulas in the selected cells will be hidden after the worksheet is protected. Click "OK".


Step 3: Select the cells you want to keep editable and select "Unlock Cells"
Tip: To keep multiple non-adjacent cells or ranges editable, hold "Ctrl" and select each, and then select "Unlock Cells".

Step 4: Protect the worksheet
- On the "Kutools Design" tab, select "Protect Sheet" to open the "Protect Sheet" dialog. Then, enter a password and click "OK".
 Tip: In the "Allow all users of this worksheet to:" box, you can choose to permit or restrict the listed actions by checking or unchecking the respective boxes next to each action.
 - The "Confirm Password" dialog box appears asking you to reenter the password. Please retype the password and click "OK".

Result
By following these steps, you can effectively hide formulas in Excel while allowing specific cells to remain editable.
Kutools for Excel - Supercharge Excel with over 300 essential tools, making your work faster and easier, and take advantage of AI features for smarter data processing and productivity. Get It Now
Hide formulas and keep specific cells editable using VBA
In this section, I will demonstrate how to efficiently conceal formulas from the formula bar within your worksheet and simultaneously maintain the ability to edit specific cells using a VBA macro.
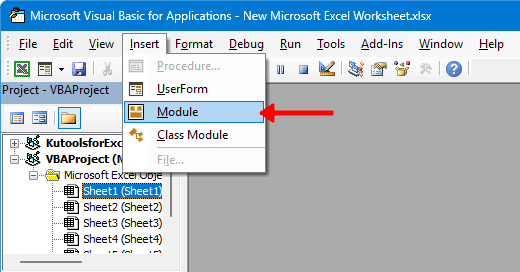
Step 1: Create a new module
- Press "Alt" + "F11" to open the "Visual Basic for Applications (VBA)" editor.
- Click "Insert" > "Module" to create a new module.

Step 2: Copy VBA code to module window
Copy the below VBA code and paste it into the opened "Module" window.
Sub HideFormulasAndProtectWithEditableCells()
'Update by ExtendOffice
    Dim xWs As Worksheet
    Dim xWb As Workbook
    Dim xPassword As String
    xPassword = "123456" ' Replace "123456" with the actual password for protecting the sheet
    Set xWb = Application.ActiveWorkbook

    Set xWs = xWb.Sheets("Sheet1") ' Replace "Sheet1" with your sheet's name
    xWs.Unprotect Password:=xPassword
    For Each cell In xWs.UsedRange
        If cell.HasFormula Then
            cell.FormulaHidden = True
        End If
        cell.Locked = True
    Next cell

    On Error Resume Next
    Set xEditableRange = Application.InputBox("Select the range to keep editable", "Kutools for Excel", Type:=8)

    If Not xEditableRange Is Nothing Then
        xEditableRange.Locked = False
    End If
    xWs.Protect Password:=xPassword, UserInterfaceOnly:=True
End Sub
Notes:
- You should replace "123456" on the 6th line with the actual password for protecting the sheet.
- You should replace "Sheet1" on the 9th line with the actual name of the worksheet that you will protect.
Step 3: Run the VBA code
- In the "Module" window, press "F5" or click the
 button to execute the pasted code.
 - In the "Select the range to keep editable" dialog box that appears, select the cells you wish to keep editable, and click "OK".

 button to execute the pasted code.
Result
Now, with the password you provided to the VBA, the worksheet is protected. All formulas in this worksheet are hidden, and the selected cells are editable.
What if you want to unhide formulas
To unhide formulas, simply unprotect your worksheet: Go to the "Review" tab, select "Unprotect Sheet", enter the password, and click "OK".

Notes:
- If you plan to protect the sheet in the future while allowing users to view the formulas, please select these formula cells and press "Ctrl" + "1" to open the "Format Cells" dialog. Then go to the "Protection" tab and uncheck the "Hidden" box.
- If you've unchecked the "Locked" box to make cells editable after protecting the worksheet, and later want to protect the sheet again without allowing users to edit those cells, select those cells, press "Ctrl" + "1" to open the "Format Cells" dialog, navigate to the "Protection" tab, and check the box next to the "Locked" option.
- Tip: For assistance in identifying unlocked or hidden cells, refer to the next section.


How to identify formula hidden cells and unlocked cells
When you've made adjustments to the hidden or locked attributes of specific cells, pinpointing which cells have been modified can be a tedious task. It typically involves individually checking each cell's format using Excel's Format Cell dialog.
However, with "Kutools for Excel", you can simplify this process with a single click. It swiftly highlights the cells that have had their attributes altered, making the identification of formula hidden cells and unlocked cells effortless and time-saving.
After installing Kutools for Excel, navigate to "Kutools Plus" > "Design View" to access the "Kutools Design" tab. From there, click "Highlight Unlocked" to mark all unlocked cells (the cells with the locked attribute removed), or click "Highlight Hidden" to identify all formula hidden cells (the cells with the hidden attribute added).

Kutools for Excel - Supercharge Excel with over 300 essential tools, making your work faster and easier, and take advantage of AI features for smarter data processing and productivity. Get It Now
Above is all the relevant content related to hiding formulas in Excel. I hope you find the tutorial helpful. If you're looking to explore more Excel tips and tricks, please click here to access our extensive collection of over thousands of tutorials.
The Best Office Productivity Tools
Kutools for Excel - Helps You To Stand Out From Crowd
Kutools for Excel Boasts Over 300 Features, Ensuring That What You Need is Just A Click Away...
Office Tab - Enable Tabbed Reading and Editing in Microsoft Office (include Excel)
- One second to switch between dozens of open documents!
- Reduce hundreds of mouse clicks for you every day, say goodbye to mouse hand.
- Increases your productivity by 50% when viewing and editing multiple documents.
- Brings Efficient Tabs to Office (include Excel), Just Like Chrome, Edge and Firefox.
Table of contents
- Video: Hide formulas in Excel
- Easily hide formulas in Excel
- Hide formulas and keep specific cells editable
- Using Excel’s built-in features
- Using Kutools for Excel
- Using VBA
- What if you want to unhide formulas
- How to identify formula hidden cells and unlocked cells
- Related articles
- The Best Office Productivity Tools
- Comments