How to prevent cell content overflow in Excel?
When working in Excel, it's common to enter lengthy text strings into cells. By default, if the text within a cell exceeds the width of the cell, it will overflow into the adjacent cell - provided that cell is empty. While enabling the "Wrap Text" feature can prevent this overflow, it automatically adjusts the row height based on the content's length, which might disrupt the appearance of your worksheet. In many practical scenarios, you may want to restrict cell content from spilling over into neighboring cells, yet wish to keep the current row height unchanged for a cleaner and more consistent layout. The following solutions provide detailed steps and considerations to help you manage text overflow according to your specific needs.
- Prevent cell contents from overflowing with Format Cell feature
- Prevent cell contents from overflowing with Kutools for Excel
- Prevent cell overflow using VBA code
 | >>> |  |
Prevent cell contents from overflowing with Format Cell feature
This method allows you to limit visible text to within the cell's boundaries by altering the cell format options. It's useful in scenarios where you want a simple way to hide overflowing text without inserting extra content or rows, but need to be aware of how Excel handles shorter texts in these cells. Follow these steps to prevent content overflow:
1. Select the column or range where you want to stop cell contents from overflowing. Right-click on the selection and choose Format Cells from the context menu.
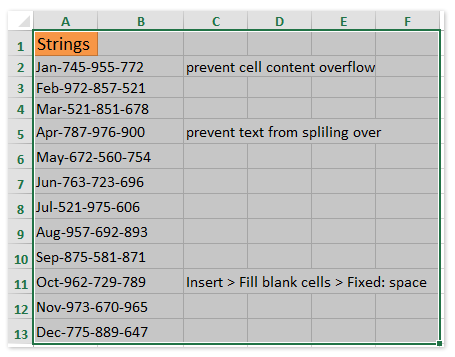
2. In the Format Cells dialog box, switch to the Alignment tab. Under the Horizontal dropdown menu, select Fill. This option repeats the cell's content to fill the entire width, cropping overflowing text naturally.
3. Click OK to apply the changes. You'll notice that the long text is now cropped within each cell and no longer spills into neighboring cells, as seen in the screenshot above.
Notes and Tips:
(1) This method works best when all selected cells have text longer than the cell width. If a cell contains shorter text, the Fill option will repeat its content within the cell until the cell is full, which may not always be desirable.
(2) As an alternative, you can use the Shrink to fit option under the Alignment tab. This compresses the text within the cell to fit the column width without changing row height. Be cautious, as very long text may become hard to read.
(3) If you want to maintain data readability, try slightly widening the column so that crucial content remains visible, or combine this approach with other formatting methods.
(4) Keep in mind that merging cells or frequent format changes might impact existing formulas or references in your worksheet.
Prevent cell contents from overflowing with Kutools for Excel
Under normal circumstances, Excel will only allow text to overflow if the next cell is blank. In cases where you want to retain the original cell width and row height, you can use Kutools for Excel to quickly fill all blank cells in the target range with a space or other character. This effectively prevents the text in each cell from overflowing into adjacent cells. This method is suitable for situations where you need a batch solution to handle multiple ranges at once, avoiding manual input or complex formulas.
1. Select the range of cells where you want to restrict content overflow, then go to the Kutools tab, click Insert, and choose Fill Blank Cells from the dropdown.
2. In the Fill Blank Cells dialog box that appears, select the Fixed value option. Type a single space character in the Filled value input box. This ensures that all previously blank cells in the range now contain a space, which visually appears blank but will block the overflow.
3. Click the OK button to apply. The overflowing text from each cell will now stop at the cell boundary and will no longer display in adjacent "blank" cells.
Kutools for Excel’s Fill Blank Cells utility can also fill blank cells with values from above, below, left, or right, or with custom fixed values, greatly increasing efficiency for worksheet management and preventing accidental data display errors.
Practical Tips and Considerations:
(1) The inserted space acts as a visual placeholder only and does not display prominently, but be aware that these spaces are actual characters. They might interfere with certain formulas that rely on detecting truly empty cells.
(2) To remove the spaces later, you can select these cells first and then use Find & Replace (Ctrl+H) to replace all single spaces with blank.
(3) This method is especially helpful in reports or exported data where cell alignment and presentation cannot be disrupted.
Kutools for Excel - Supercharge Excel with over 300 essential tools, making your work faster and easier, and take advantage of AI features for smarter data processing and productivity. Get It Now
Demo: Prevent cell contents from overflowing
Prevent cell overflow using VBA code
This VBA code method is recommended for users who frequently handle large batches of data or wish to automate the prevention of text overflow without installing add-ins. Please follow these steps:
1. Go to the Developer tab and click Visual Basic to open the Microsoft Visual Basic for Applications editor. If the Developer tab isn’t visible, see this guide: Show the Developer tab in Excel.
2. In the VBA editor, click Insert > Module to create a new module. Then, paste the following code into the editor window:
Sub PreventContentOverflow()
    Dim cell As Range
    Dim rng As Range
    On Error Resume Next
    xTitleId = "KutoolsforExcel"
    Set rng = Application.Selection
    Set rng = Application.InputBox("Select the range to block overflow", xTitleId, rng.Address, Type:=8)
    For Each cell In rng
        If cell.Value <> "" And cell.Offset(0, 1).Value = "" Then
            cell.Offset(0, 1).Value = " "
        End If
    Next
End Sub3. Press F5 or click the ![]() button to run the code.
button to run the code.
4. Select the range you wish to process in the popup window and confirm. The macro will automatically fill a space in the cell immediately to the right of any non-empty cell with text, so that overflow is prevented.
Tips and Precautions:
(1) Non-breaking spaces added are actual contents in cells. They may affect calculations or conditional formatting rules based on empty cells.
(2) Use VBA with caution and remember to back up your data before running automated codes.
(3) If you want to remove all inserted spaces, you can use a similar macro or Excel's Find & Replace function.
Best Office Productivity Tools
Supercharge Your Excel Skills with Kutools for Excel, and Experience Efficiency Like Never Before. Kutools for Excel Offers Over 300 Advanced Features to Boost Productivity and Save Time. Click Here to Get The Feature You Need The Most...
Office Tab Brings Tabbed interface to Office, and Make Your Work Much Easier
- Enable tabbed editing and reading in Word, Excel, PowerPoint, Publisher, Access, Visio and Project.
- Open and create multiple documents in new tabs of the same window, rather than in new windows.
- Increases your productivity by 50%, and reduces hundreds of mouse clicks for you every day!
All Kutools add-ins. One installer
Kutools for Office suite bundles add-ins for Excel, Word, Outlook & PowerPoint plus Office Tab Pro, which is ideal for teams working across Office apps.
- All-in-one suite — Excel, Word, Outlook & PowerPoint add-ins + Office Tab Pro
- One installer, one license — set up in minutes (MSI-ready)
- Works better together — streamlined productivity across Office apps
- 30-day full-featured trial — no registration, no credit card
- Best value — save vs buying individual add-in