Note: The other languages of the website are Google-translated. Back to English

How to insert a blank new row automatically by Command Button in Excel?

In many cases, you may need to insert a blank new row into a specified position of your worksheet. In this article, we will show you how to insert a blank new row automatically by clicking on a Command Button in Excel.

Insert a blank new row automatically by Command Button


Insert a blank new row automatically by Command Button

You can run the following VBA code to insert a blank new row by clicking a Command Button. Please do as follows.

1. Firstly, you need to insert a Command Button. Please click Developer > Insert > Command Button (ActiveX Control). See screenshot:

2. Then draw a Command Button in to the worksheet you need to add new rows, right click the Command Button and click Properties from the right-clicking menu.

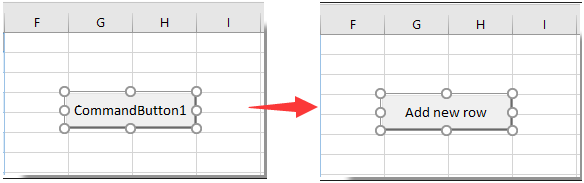
3. In the Properties dialog box, enter the displayed text of the Command Button into the Caption box under the Categorized tab, and then close the dialog box.

You can see the displayed text of the Command Button is changed as below screenshot shown.

4. Right click the Command Button again, and then click View Code from the right-clicking menu.

5. Then the Microsoft Visual Basic for Applications window, please replace the original code with the below VBA code into the Code window.

VBA code: Automatically insert blank new row by Command Button

Private Sub CommandButton1_Click()
    Dim rowNum As Integer
    On Error Resume Next
    rowNum = Application.InputBox(Prompt:="Enter Row Number where you want to add a row:", _
                                    Title:="Kutools for excel", Type:=1)
    Rows(rowNum & ":" & rowNum).Insert Shift:=xlDown
End Sub

Note: In the code, CommanButton1 is the name of the Command Button you have created.

6. Press Alt + Q keys simultaneously to close the Microsoft Visual Basic for Applications window. And turn off the Design Mode under the Developer tab.

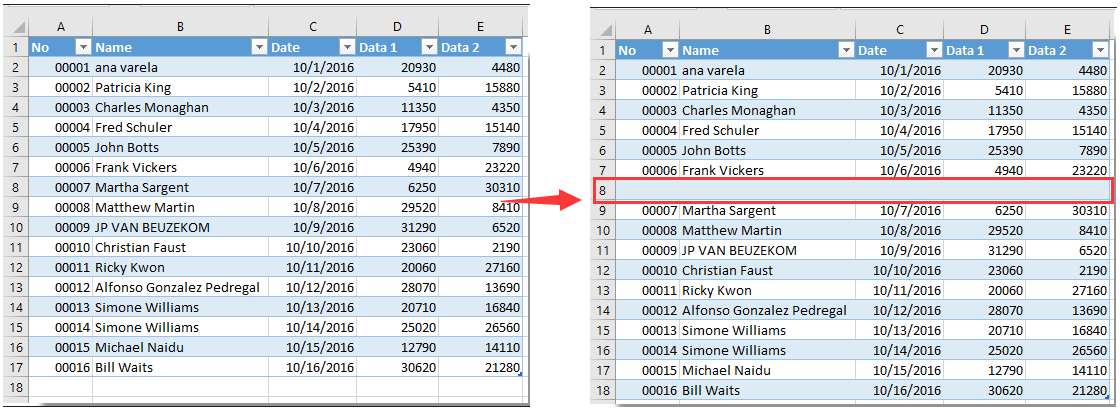
7. Click the inserted Command Button, and a Kutools for Excel dialog box pops up. Please enter a certain row number where you want to add a blank new row, and then click the OK button. See screenshot:

Then the blank new row is inserted into a specified position of your worksheet as below screenshot shown. And it keeps the cell formatting of the above cell.


Related articles:


The Best Office Productivity Tools

Kutools for Excel Solves Most of Your Problems, and Increases Your Productivity by 80%

  • Reuse: Quickly insert complex formulas, charts and anything that you have used before; Encrypt Cells with password; Create Mailing List and send emails...
  • Super Formula Bar (easily edit multiple lines of text and formula); Reading Layout (easily read and edit large numbers of cells); Paste to Filtered Range...
  • Merge Cells/Rows/Columns without losing Data; Split Cells Content; Combine Duplicate Rows/Columns... Prevent Duplicate Cells; Compare Ranges...
  • Select Duplicate or Unique Rows; Select Blank Rows (all cells are empty); Super Find and Fuzzy Find in Many Workbooks; Random Select...
  • Exact Copy Multiple Cells without changing formula reference; Auto Create References to Multiple Sheets; Insert Bullets, Check Boxes and more...
  • Extract Text, Add Text, Remove by Position, Remove Space; Create and Print Paging Subtotals; Convert Between Cells Content and Comments...
  • Super Filter (save and apply filter schemes to other sheets); Advanced Sort by month/week/day, frequency and more; Special Filter by bold, italic...
  • Combine Workbooks and WorkSheets; Merge Tables based on key columns; Split Data into Multiple Sheets; Batch Convert xls, xlsx and PDF...
  • More than 300 powerful features. Supports Office / Excel 2007-2021 and 365. Supports all languages. Easy deploying in your enterprise or organization. Full features 30-day free trial. 60-day money back guarantee.
kte tab 201905

Office Tab Brings Tabbed interface to Office, and Make Your Work Much Easier

  • Enable tabbed editing and reading in Word, Excel, PowerPoint, Publisher, Access, Visio and Project.
  • Open and create multiple documents in new tabs of the same window, rather than in new windows.
  • Increases your productivity by 50%, and reduces hundreds of mouse clicks for you every day!
officetab bottom
Comments (22)
No ratings yet. Be the first to rate!
This comment was minimized by the moderator on the site
Could anyone advise on how can I amend this to automatically add the new row to the bottom of an excel table?
This comment was minimized by the moderator on the site
did you find the answer ?
This comment was minimized by the moderator on the site
Hi I am using this code but it is not bringing down the formulas from the row before, can you help please.
This comment was minimized by the moderator on the site
Dear Kim,

Please insert a Table with the range you will insert blank rows inside. After that, when inserting new row, the formula will bring down automatically.

Best Regards, Crystal
This comment was minimized by the moderator on the site
Can you provide an example? Not following what you're say here. Thanks
This comment was minimized by the moderator on the site
Hi,
Please convert your range to a table range in order to bring down the formula automatically when inserting new rows. See screenshot:
This comment was minimized by the moderator on the site
I'm having the same issue as Kim - When the sheet is unprotected it adds the row with the correct formatting and correct formulas. Once the sheet is protected it doesn't copy down the formulas. Any thoughts?
This comment was minimized by the moderator on the site
Dear Michelle,
By default, a protected worksheet does not allow to insert blank row.
Therefore, the VBA code can't work in that case.
This comment was minimized by the moderator on the site
Is there a way to add an Insert Row button and have the new rows keep the cells merged/formatted as they are in the rest of a table?
This comment was minimized by the moderator on the site
Hi Simon,
Sorry can help solving this problem yet. Thanks for your comment.
This comment was minimized by the moderator on the site
Is there a way to have the new row keep the formatting of the row below instead of the row above?
This comment was minimized by the moderator on the site
Hi Tarl,
Sorry can help solving this problem yet. Thanks for your comment.
This comment was minimized by the moderator on the site
Yes, I played with the script and it worked for me. You just add the row number you want (I chose row 6), but I'll be shocked if it's allowed to be published.

Private Sub CommandButton1_Click()
Dim rowNum As Integer
On Error Resume Next
Rows(rowNum & "6").Insert Shift:=xlDown
End Sub
This comment was minimized by the moderator on the site
can possible insert multiple sheet row at one time click by this .
This comment was minimized by the moderator on the site
Hi,
The below code can help you solve the problem. Please have a try.

Private Sub CommandButton1_Click()
Dim xIntRrow As Integer
Dim rowNum As Integer
On Error Resume Next
rowNum = Application.InputBox(Prompt:="Enter Row Number where you want to add a row:", _
Title:="Kutools for excel", Type:=1)
xIntRrow = Application.InputBox(Prompt:="Type in the number of rows you want to insert", _
Title:="Kutools for excel", Type:=1)
Rows(rowNum + 1 & ":" & rowNum + 1).EntireRow.Resize(xIntRrow).Insert Shift:=xlShiftDown

End Sub
This comment was minimized by the moderator on the site
is it possible to create in a different sheet? I really need that
This comment was minimized by the moderator on the site
Sub AddNewRow()


Private Sub CommandButton1_Click()

ActiveSheet.Unprotect Password:="1234"


Dim mySheets

Dim i As Long


mySheets = Array("Sheet2")


For i = LBound(mySheets) To UBound(mySheets)

With Sheets(mySheets(i))

.Range("B10").EntireRow.Insert Shift:=xlDown

.Range("B10:H10").Borders.Weight = xlThin

End With

Next i


ActiveSheet.Protect Password:="1234"


End Sub

I don't know if this will work for you. It worked quite well for me. I even left unprotected cells that you can input data and the formulas are still active. Took me a whole day to figure it out. replace "1234" with whatever password you feel like, "Sheet2" with the Sheet you are working with and input the range you want.
The code first unprotects the worksheet, adds row and protects the worksheet.
kiongakamau@gmail.com
This comment was minimized by the moderator on the site
Hi

I used the code but wanted to add rows with formulas, therefore I added the last line to be able to add the rows with formulas.
However, in my excel file and in column "F" I have a text which can be entered manually and would be different in different cases. Therefore, I would like to add rows below the reference row with keeping the formulas and values in all cells except the cell from column "F" which I would like to be copied as blank!
Could you please help me with what should I add to the underneath code to be able to have the cells of column "F" blank whenever I add a row with this code?
thanks in advance!

Private Sub CommandButton1_Click()
Dim xIntRrow As Integer
Dim rowNum As Integer
On Error Resume Next
rowNum = Application.InputBox(Prompt:="Enter Row Number where you want to add a row:", _
Title:="Kutools for excel", Type:=1)
xIntRrow = Application.InputBox(Prompt:="Type in the number of rows you want to insert", _
Title:="Kutools for excel", Type:=1)
Rows(rowNum + 1 & ":" & rowNum + 1).EntireRow.Resize(xIntRrow).Insert Shift:=xlShiftDown
Rows(rowNum).Resize(xIntRrow + 1).FillDown

End Sub
This comment was minimized by the moderator on the site
Hi Mah,
The following VBA code may do you a favor. Please give it a try. Thank you.

Private Sub CommandButton1_Click()
'Updated by Extendoffice 20220707
    Dim rowNum As Integer
    Dim xRg1, xRg2 As Range
    
    On Error Resume Next
    
    rowNum = Application.InputBox(Prompt:="Enter Row Number where you want to add a row:", _
                                    Title:="Kutools for excel", Type:=1)
    
    Rows(rowNum & ":" & rowNum).Insert Shift:=xlDown
    Rows((rowNum - 1) & ":" & (rowNum - 1)).Copy
    Rows(rowNum & ":" & rowNum).Select
    Selection.PasteSpecial Paste:=xlPasteAll, Operation:=xlNone, SkipBlanks:= _
        False, Transpose:=False
    Range("F" & rowNum).Value = ""
End Sub
This comment was minimized by the moderator on the site
Caros colegas, após pesquisar (bastante) na net não consegui encontrar um atalho, comando, código, nada, nada, que eu possa usar para inserir em uma macro APENAS uma forma de inserir uma linha ABAIXO da célula ativa. Isto porquê se eu gravar o endereço da célula, ele não muda, fica sempre na mesma célula e as seguintes não vão ficar corretamente abaixo, e se eu usar um endereço de célula fixo, a linha tem que ser inserida acima, mas não formata da forma desejada, que seria o formato das linhas de cima.

Acho que o código existe, só não encontro, já tentei várias formas, selecionando um fixo, subindo uma linha e pedindo para inserir após, mas as seguintes não funcionam de acordo.

Alguém poderia me ajudar?
This comment was minimized by the moderator on the site
... Testei os códigos acima, mas, como se trata de pessoas que vão usar, não é viável os box que pedem a linha e a quantidade, não dá...
This comment was minimized by the moderator on the site
Criei uma linha e nomeei como spotB,
Mudei a altura da linha para 0,01 para ocultá-la (apenas por estética).
Criei um botão:
Application.Goto Reference:="spotB"
Selection.EntireRow.Insert

Problema resolvido.

Obrigado pelos códigos a Mah e crystal, mas eu tinha 8 títulos para separar, cada um inserindo linhas quando necessário ao usuário, e não queria nenhuma pergunta sobre quantidade de linhas, os usuários não leem perguntas e clicam logo em OK, depois reclamam...
There are no comments posted here yet

Follow Us

Copyright © 2009 - www.extendoffice.com. | All rights reserved. Powered by ExtendOffice. | Sitemap
Microsoft and the Office logo are trademarks or registered trademarks of Microsoft Corporation in the United States and/or other countries.
Protected by Sectigo SSL