How to create Yes or No checkboxes in Excel?
When collecting feedback, responses, or creating surveys and forms in Excel, it's common to want users to select "Yes" or "No" for a list of items and have only one selection possible per group. Achieving this functionality helps ensure data integrity and makes tallying results much easier. This is especially useful for forms, attendance lists, satisfaction surveys, or any scenario where users must choose between two mutually exclusive options for each item.
The following methods introduce practical ways to implement "Yes/No" style options in Excel, including:
- Create Yes/No checkboxes by grouping radio button
- Quickly insert checkboxes with Kutools for Excel
- Excel Formula - Use formulas linked to checkbox or option button cell references
- Other Built-in Excel Methods - Use Data Validation with drop-down list
- VBA Code - Create Yes/No checkboxes directly via VBA
Create Yes/No checkboxes by grouping radio button
Follow these steps to create a set of mutually exclusive Yes/No checkboxes in Excel using the Group Box and Option Button (radio button) form controls. This approach ensures that, for each group, only one selection (Yes or No) is allowed, making it ideal when you wish to avoid conflicting or multiple responses within a single item.
1. Go to the Developer tab and click Insert > Group Box (Form Control). (If you do not see the Developer tab, you need to enable it in Excel options.)

Note: Displaying the Developer tab allows you to access advanced form controls necessary for this operation.
2. Insert a Group Box into your worksheet at the desired location.
3. Repeat step2 as needed to create multiple Group Boxes. Each Group Box will contain a separate Yes/No choice for an item in your list. For example, if you want five rows of Yes/No choices, insert five Group Boxes. This separation ensures selections in one group do not affect others.

4. With the Group Box selected, go back to the Developer tab, click Insert, and select Option Button (Form Control). Click inside the Group Box to place the first Option Button.
5. Insert the second Option Button into the same Group Box. Repeat this process for each Group Box so that each has two Option Buttons.

6. Continue inserting Option Buttons until all Group Boxes have their Yes/No options set up. You can manually adjust the labels on the option buttons to display "Yes" and "No" by right-clicking and editing the text.

7. If you prefer a cleaner look, you can hide the borders of all Group Boxes using a simple VBA script. Press Alt + F11 to open the Microsoft Visual Basic for Applications window. Click Insert > Module, then copy and paste the VBA code below into the module window:
VBA code: Hide border of Group Boxes
Sub ToggleVisible()
Dim myGB As GroupBox
For Each myGB In ActiveSheet.GroupBoxes
myGB.Visible = False
Next myGB
End Sub
8. Press F5 to run the code in VBA. All Group Box borders will be hidden instantly, resulting in a neater form appearance. Remember to re-label each option button as "Yes" or "No" as needed. The final layout will allow end users to select only one answer ("Yes" or "No") per question.

Applicable scenarios: This method suits cases requiring clear, mutually exclusive answers, such as survey forms, timesheets, or approval checklists. The visual clarity and native feel of radio buttons make responses easy to interpret.
Tips and notes: After grouping the radio buttons, be careful to keep option buttons within their proper group box to ensure mutual exclusivity. Debug visibility using print preview if you plan to print the worksheet, as some borders may still appear slightly depending on printer settings. Remember to save your workbook after adding form controls, especially if using VBA.
Quickly insert checkboxes with Kutools for Excel
If you use "Kutools for Excel", the "Batch Insert Smart Checkboxes" feature provides a faster, easier way to insert checkboxes into multiple cells at once — with advanced options for linking and automatic label handling.
Kutools for Excel - Packed with over 300 essential tools for Excel. Make Excel tasks faster, easier, and more efficient. Download now!
After installing Kutools for Excel, do as follows to insert checkboxes to multiple cells at once.
- Select the range where you want checkboxes.
- Go to "Kutools" > "Insert" > "Batch Insert Smart Checkboxes".
- In the dialog:
- Choose whether to insert checkboxes only or link checkboxes to their own cells.
- (Optional) Check "Use cell content as checkbox label" for automatic labeling or display the logical value of the checkbox (True or False) in the linked cell.
- Click "OK".
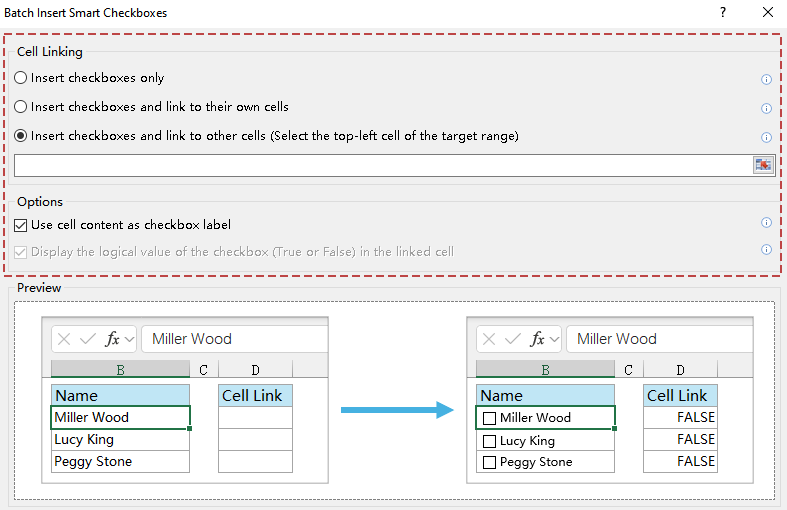

Kutools instantly inserts checkboxes for your selected range.
? Visual Results by Option
Depending on the Cell Linking mode and selected options, the result varies. Here’s how each option looks after checkbox insertion:
Insert checkboxes only
No linking, visual only
Link to own cell
Cell value becomes TRUE/FALSE
Link to other cells
TRUE/FALSE appears in linked column
This method is ideal if you want to insert many checkboxes efficiently without VBA or manual adjustments.
Excel Formula - Use formulas linked to checkbox or option button cell references
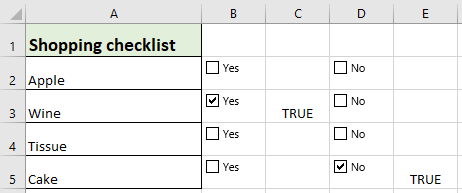
If you want to automatically display "Yes" or "No" in worksheet cells based on user interaction with option buttons or checkboxes, you can link each control to a specific worksheet cell and then use formulas (such as IF) to interpret the result. This method is helpful if you want visible summary values for downstream analysis, reporting, or data export, and it does not require VBA.
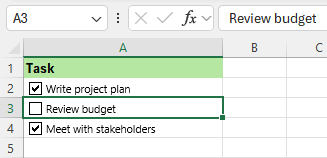
1. Insert a checkbox or option button (Form Control) into the worksheet for each question or item, using the Developer tab.
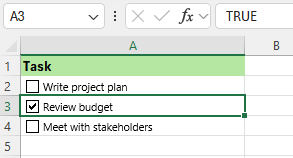
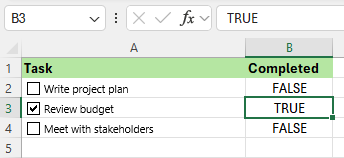
2. Right-click the control, choose Format Control, and set the Cell link to a designated cell (for example, you might link to cell C2 for the first checkbox or option button group). This cell will now show either TRUE/FALSE for checkboxes or a numeric value for option buttons (1 for the first option,2 for the second, etc.).
3. In a result cell (e.g., D2), enter a formula that interprets the linked cell value:
- For option buttons (Form Control), where C2=1 means "Yes", C2=2 means "No"
=IF(C2=1,"Yes","No") - For checkboxes, where C2=TRUE means checked (Yes) and C2=FALSE means unchecked (No):
=IF(C2=TRUE,"Yes","No")
4. Press Enter to confirm the formula. To apply this logic for several questions or rows, copy the controls and formulas for each row, modifying cell references accordingly (e.g., using C3, C4, etc.).
Tips: This solution is excellent for users who need clear "Yes"/"No" tracking within cells for further calculations, filtering, or exporting to other systems. Beware of deleting linked controls or their cell links, as this may break the formula references.
Other Built-in Excel Methods - Use Data Validation with drop-down list
If you do not require checkboxes or radio buttons but simply want users to choose between "Yes" or "No," the Data Validation drop-down list is a simple and effective built-in method. This approach streamlines the worksheet and helps standardize responses while minimizing the risk of input errors.
1. Select the range of cells where you want to insert the Yes/No selector (for example, B2:B10).
2. Go to the Data tab, click Data Validation in the Data Tools group, and in the dialog box, set Allow to List.
3. In the Source box, enter Yes,No (separated by a comma), and click OK.
4. Now, each selected cell will have a drop-down arrow, allowing users to select "Yes" or "No" quickly and comfortably.
Advantages: This method is easy to set up, reduces worksheet clutter, and prevents typos or inconsistent entries.
Limitations: Data validation drop-downs don't provide visual buttons, which might affect form aesthetics. They're not mutually exclusive in pairs—the user can leave cells blank. For lists with many items, consider using AutoFill to quickly copy validation to other cells.
Tips: Remember to protect the worksheet or restrict editing as needed to avoid users overriding the cell with custom entries unless only "Yes" or "No" are required.
VBA Code - Create Yes/No checkboxes directly via VBA
If your worksheet requires dynamically generating a large number of Yes/No checkboxes (especially when dealing with repetitive or variable-length lists), you can use VBA to automate this process. This approach is suitable for advanced users or those managing standardized forms for multiple projects or teams. VBA lets you instantly create checkbox controls with preset captions for "Yes" and "No" across any number of rows.
1. Click the Developer tab, then Visual Basic to open the VBA Editor. Next, click Insert > Module and paste the following code into the Module window:
Sub AddYesNoCheckboxes()
    Dim lastRow As Long
    Dim ws As Worksheet
    Dim i As Long

    Set ws = ActiveSheet
    lastRow = ws.Cells(ws.Rows.Count, "A").End(xlUp).Row

    On Error Resume Next
    xTitleId = "KutoolsforExcel"

    For i = 2 To lastRow
        ws.CheckBoxes.Add(ws.Cells(i, 2).Left, ws.Cells(i, 2).Top, 50, 15).Select
        With Selection
            .Caption = "Yes"
            .LinkedCell = ws.Cells(i, 3).Address
        End With

        ws.CheckBoxes.Add(ws.Cells(i, 4).Left, ws.Cells(i, 4).Top, 50, 15).Select
        With Selection
            .Caption = "No"
            .LinkedCell = ws.Cells(i, 5).Address
        End With
    Next i
End Sub2. Close the VBA Editor, return to your worksheet, and run the macro from Developer > Macros, select AddYesNoCheckboxes, and click Run. This script will automatically insert "Yes" and "No" checkboxes starting from row2 based on column A being filled, linking the "Yes" checkbox to column C and the "No" checkbox to column E (adjust the columns as needed for your layout).
Precautions: The VBA script adds checkboxes next to each data item, and each checkbox’s state is linked to a nearby cell for easy result retrieval. If you plan to re-run the macro, first remove existing checkboxes to avoid overlaps. Saving your workbook in a macro-enabled format (.xlsm) is essential to preserve your VBA solution.
Troubleshooting: If you encounter run-time errors, ensure the worksheet contains data in column A to define the checkbox rows, and that there are no worksheet protections active. Check your macro security settings if the "Macros" button is disabled.
Tip: For advanced applications, you can modify the macro to auto-format, resize, or name the checkboxes for specialized processing.
Advantages: Greatly improves efficiency when handling large data lists or generating multiple forms; ensures consistent layout and linking.
Limitations: Requires macro-enabled workbooks and a basic understanding of executing VBA code. Existing checkboxes may overlap if macros are run repeatedly without cleanup.

Unlock Excel Magic with Kutools AI
- Smart Execution: Perform cell operations, analyze data, and create charts—all driven by simple commands.
- Custom Formulas: Generate tailored formulas to streamline your workflows.
- VBA Coding: Write and implement VBA code effortlessly.
- Formula Interpretation: Understand complex formulas with ease.
- Text Translation: Break language barriers within your spreadsheets.
Best Office Productivity Tools
Supercharge Your Excel Skills with Kutools for Excel, and Experience Efficiency Like Never Before. Kutools for Excel Offers Over 300 Advanced Features to Boost Productivity and Save Time. Click Here to Get The Feature You Need The Most...
Office Tab Brings Tabbed interface to Office, and Make Your Work Much Easier
- Enable tabbed editing and reading in Word, Excel, PowerPoint, Publisher, Access, Visio and Project.
- Open and create multiple documents in new tabs of the same window, rather than in new windows.
- Increases your productivity by 50%, and reduces hundreds of mouse clicks for you every day!
All Kutools add-ins. One installer
Kutools for Office suite bundles add-ins for Excel, Word, Outlook & PowerPoint plus Office Tab Pro, which is ideal for teams working across Office apps.
- All-in-one suite — Excel, Word, Outlook & PowerPoint add-ins + Office Tab Pro
- One installer, one license — set up in minutes (MSI-ready)
- Works better together — streamlined productivity across Office apps
- 30-day full-featured trial — no registration, no credit card
- Best value — save vs buying individual add-in