Master Excel Data Entry with Flash Fill – with 5 Examples
Flash Fill is a feature in Microsoft Excel that automatically fills in data for you based on a pattern it detects in your actions which is introduced in Excel 2013 and available in the later versions of Excel. For example, you can use Flash Fill to quickly extract the first names from a list of full names to the adjacent column without manual entry as below demo shown. This tutorial shows 4 ways on applying Flash Fill and provides 5 examples for explaining how to use Flash Fill in Excel.

Video: How to use Flash Fill
How to apply Flash Fill in Excel
There are four different methods to apply Flash Fill in Excel, and this tutorial will demonstrate each of them for you.
- Apply Flash Fill automatically by pressing Enter key
- Apply Flash Fill with shortcuts
- Apply Flash Fill via the Excel Ribbon
- Apply Flash Fill with the Fill Handle
Apply Flash Fill by pressing Enter key
To apply Flash Fill automatically in Excel using the Enter key, follow these steps:
Step 1: Start Typing the Pattern
In the cell where you want the Flash Fill to begin, type the first example of the pattern you want Excel to follow.
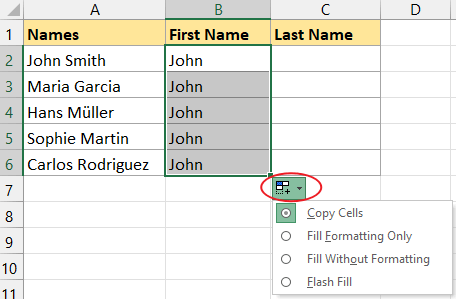
For instance, for extracting first names from full names in the list of A2:A6, type the first name in the cell next to the full name, here we type in B2.

Step 2: Initiate Flash Fill
Press Enter key after typing the first example. Move to the next cell down in the same column.

Step 3: Trigger Flash Fill
Start typing the second example; here, we enter the second first name from cell A3. As you type, Excel will recognize the pattern from the first cell and show a greyed-out preview of the Flash Fill for the rest of the column.

Step 4: Confirm with Enter
If the preview correctly shows what you want, press Enter key to confirm. Excel will automatically complete the rest of the cells based on the pattern it recognized from your initial entry.

Apply Flash Fill with shortcuts
Using shortcuts to apply Flash Fill in Excel is a quick and efficient way to manipulate data. Here’s how you can do it:
Step 1: Start Typing Your Pattern
In a cell adjacent to your data, begin by manually entering the first item of the pattern you want Excel to replicate. For example, if you are extracting first names from a list of full names, type the first name next to the first full name.
Step 2: Initiate Flash Fill
Press Enter key after typing the first example. Move to the next cell down in the same column.
Step 3: Use the Flash Fill Shortcut
Press the following keys on your keyboard:
Ctrl + E
Step 4: Review the Filled Data
Excel will instantly fill the remaining cells based on the pattern you started. It’s a good idea to review the data to ensure that Flash Fill has applied the pattern correctly.

Apply Flash Fill via the Excel Ribbon
Flash Fill is located under the ‘Data’ tab in the Excel Ribbon. Here is how to apply Flash Fill via the ribbon.
Step 1: Start Typing Your Pattern
In a cell adjacent to your data, begin by manually entering the first item of the pattern you want Excel to replicate. For example, if you are extracting first names from a list of full names, type the first name next to the first full name.
Step 2: Initiate Flash Fill
Press Enter key after typing the first example. Move to the next cell down in the same column.
Step 3: Apply Flash Fill in the ribbon
Select Data tab, then go to the Data Tools group, select Flash Fill.

Step 4: Review the Filled Data
Excel will instantly fill the remaining cells based on the pattern you started. Review the data to ensure that Flash Fill has applied the pattern correctly, if not, adjust them manually.
Apply Flash Fill with the Fill Handle Option
Another way to apply Flash Fill is by dragging the fill handle. This method is intuitive and works similarly to copying a formula or value down a column.
Step 1: Start Typing Your Pattern
In a cell adjacent to your data, begin by manually entering the first item of the pattern you want Excel to replicate. For example, if you are extracting first names from a list of full names, type the first name next to the first full name.
Step 2: Use the Fill Handle
Hover your mouse pointer over the bottom-right corner of the cell you type the first example. The pointer will change to a plus sign (+), which is the fill handle.

Step 3: Drag Downward
Click and drag the fill handle down the column, over the cells where you want Flash Fill to apply. Then release the mouse.

In some cases, at this stage, Excel automatically populates the cells correctly based on the first example you entered. However, in most cases, to get accurate filling, you should proceed to the next step.
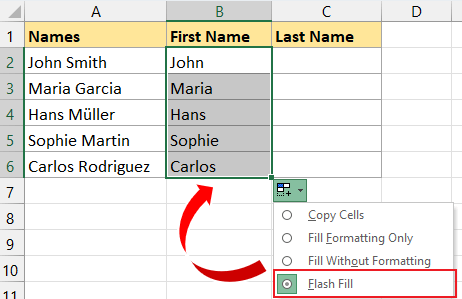
Step 4: Choose Flash Fill in the Auto Fill Options menu
- Click at the Auto Fill Options button in the bottom-right of the selected cells.
- Choose Flash Fill option.


5 examples for using Flash Fill
Taking advantage of Flash Fill in Excel to tackle various tasks is remarkably efficient. In this guide, we present five scenarios to demonstrate the power of Flash Fill.
- Example 1: Using Flash Fill to extract part of text (Split to columns)
- Example 2: Using Flash Fill to combine cells
- Example 3: Using Flash Fill to add text
- Example 4: Using Flash Fill to change formatting
- Example 5: Using Flash Fill to change string order
Example 1: Using Flash Fill to extract part of text (Split to columns)
Flash Fill is a powerful tool for tasks like separating first names from full names, extracting specific parts of addresses, or isolating numbers from text. It simplifies tasks that would otherwise require complex formulas or manual data entry.
Suppose you have a list of names and ID numbers in column A and you want to extract names in column B.
Here's a step-by-step guide on how to do it:
Step 1: Enter the First Example Manually
Click on cell B2 (next to the first data you want to extract from) and manually type the first name extracted from cell A2.

Step 2: Use Flash Fill:
Automatically:
- After typing the first name in B2, press Enter key to go to B3.
- Begin typing the second name. Excel may automatically show a greyed-out preview of the first names for the rest of your list based on the pattern.

- Press Enter key to accept this Flash Fill suggestion.

Manually:
If Excel doesn’t automatically suggest the fill, after typing the first name in B2, press Enter key to move to next cell in the same column, then press Ctrl + E. This will prompt Excel to use Flash Fill and fill down the column based on your initial input.


For getting the ID number from the list of A2:A5, repeat above steps to flash fill.


Transform Your Excel Experience with Kutools' Split Cells Feature!
Discover the power of Kutools' Split Cells in Excel! Effortlessly divide text, numbers, and dates into multiple columns or rows. (See the below demo👇.) Save time, reduce errors, and enhance your data management with this user-friendly tool. Download now and experience streamlined spreadsheet management!

Example 2: Using Flash Fill to combine cells
Flash Fill in Excel is a time-saving tool for tasks like combining names, addresses, or any data split across multiple cells. It eliminates the need for complex formulas or manual copying and pasting, streamlining your data management tasks.
Supposing you have three columns containing names, titles and ages, you want to combine each row in these three columns to one cell, please follow the steps below:
Step 1: Enter the First Example Manually
Click on cell D2 (next to the data you want to combine) and manually type the combination.

Step 2: Use Flash Fill:
Automatically:
- After typing the first combination, press Enter key to go to D3.
- Begin typing the second combination. Excel may automatically show a greyed-out preview of the combinations for the rest of your list based on the pattern.

- Press Enter key to accept this Flash Fill suggestion.

Manually:
If Excel doesn’t automatically suggest the fill, after typing the first combination in D2, press Enter key to move to next cell in the same column, then press Ctrl + E. This will prompt Excel to use Flash Fill and fill down the column based on your initial input.


🚀Revolutionize data merging with Kutools' Advanced Combine feature!
Seamlessly blend rows or columns in Excel without losing data. Ideal for complex datasets, the Advanced Combine feature simplifies consolidation tasks, enhancing accuracy and efficiency. Whether it's financial reports or extensive lists, Advanced Combine is your go-to tool for quick, error-free combinations. Upgrade your Excel game with Kutools today!

Example 3: Using Flash Fill to add text
Using Flash Fill to add text to your data can significantly speed up data entry and ensure consistency across your dataset.
Here we will add “kg” at the end of each cell in range A2:A5, please follow the steps below:
Step 1: Enter the First Example Manually
Click on cell B2 (next to the data you want to add text) and manually type the first example.

Step 2: Use Flash Fill:
Press Enter key to move to next cell in the same column, then press Ctrl + E. This will prompt Excel to use Flash Fill and fill down the column based on your initial input.

Enhance your Excel experience with Kutools' Add Text feature! 👀
Effortlessly append or prepend text to cells, saving hours of manual editing. Ideal for adding prefixes, suffixes, or formatting data uniformly. Simplify tasks like date standardization or categorizing entries with ease. Kutools' Add Text: A must-have for efficient, error-free Excel operations. Try it now and revolutionize your spreadsheet management!

Example 4: Using Flash Fill to change formatting
Flash Fill can be used for various formatting changes like converting text to lowercase, title case, or even reformatting phone numbers and dates. It's a powerful tool that can replace manual re-typing or the use of complex formulas for simple text formatting tasks.
Here we want to change the text in range A2:A5 to capitalize first letter, please follow the guide below:
Step 1: Enter the First Example Manually
Click on cell B2 (next to the data you want to change case) and manually type the first example.

Step 2: Use Flash Fill:
Automatically:
- After typing the first example, press Enter key to go to B3.
- Begin typing the second combination. Excel may automatically show a greyed-out preview of the combinations for the rest of your list based on the pattern.

- Press Enter key to accept this Flash Fill suggestion.

Manually:
If Excel doesn’t automatically suggest the fill, after typing the first example in B2, press Enter key to move to next cell in the same column, then press Ctrl + E. This will prompt Excel to use Flash Fill and fill down the column based on your initial input.


Example 5: Using Flash Fill to change string order
Changing the order of strings in Excel using Flash Fill is an efficient way to reorganize data without manual editing or complex formulas. Here’s how to do it:
Step 1: Enter the First Example Manually
Click on cell B2 (next to the data you want to change the order) and manually type the first example.

Step 2: Use Flash Fill:
Press Enter key to move to next cell in the same column, then press Ctrl + E. This will prompt Excel to use Flash Fill and fill down the column based on your initial input.

FAQ
Flash Fill Limitations
Flash Fill does not update data dynamically.
Flash Fill doesn't dynamically update. If you modify the original data, these changes won't reflect in the Flash Fill results.
Incorrect results can occur if patterns aren’t clear.
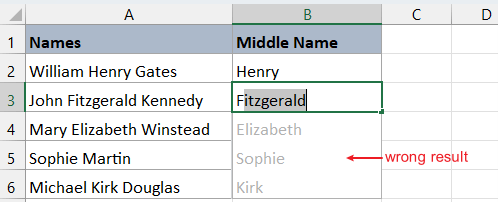
Flash Fill might not always detect complex patterns, especially with inconsistent data. Suppose we want to extract middle names from the list of names in cells A2:A6. When using Flash Fill, we encountered an error with the fourth middle name.
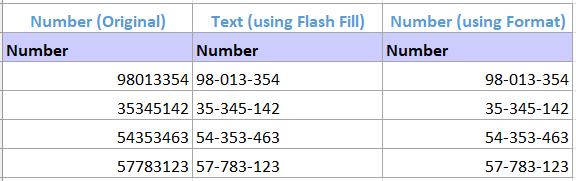
Numeric formats might convert to text.
Flash Fill may convert numbers to text during formatting tasks. For example, reformatting a list of dates or phone numbers might result in these being treated as text rather than numeric values.
Decimals might be inaccurately extracted.
If you use flash fill to extract numbers from a list of cells which contains decimals, the result may not correct.


Enable or disable Flash Fill
In Excel, Flash Fill is turned on by default. If you prefer not to receive automatic suggestions or changes from Flash Fill in your Excel worksheets, you can easily disable this feature. Here's how:
- Open Excel and go to File > Options.
- In the Options dialog, click on Advanced in the left panel. Scroll down to the Editing options section. Uncheck the box next to Automatically Flash Fill.
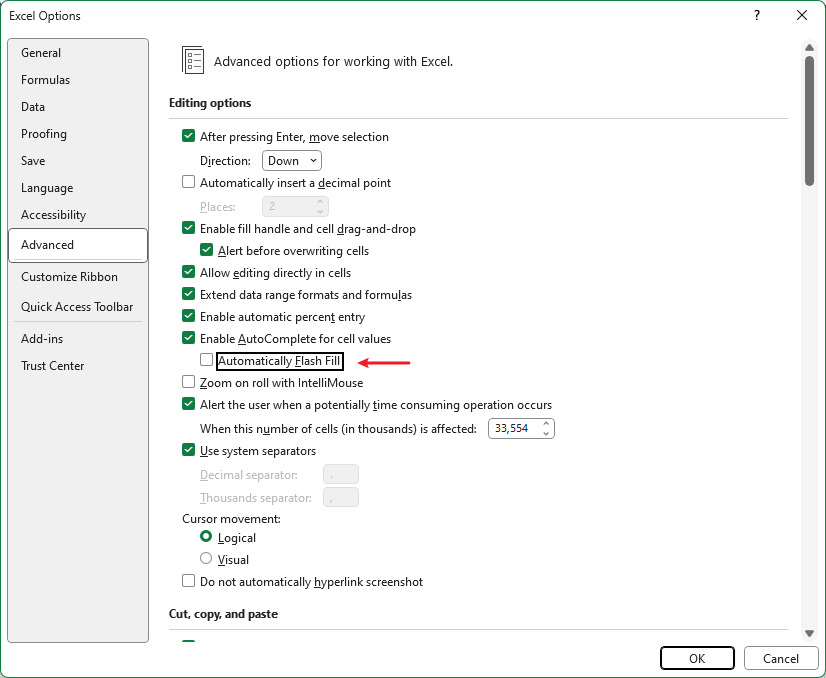
- Click OK to save your changes and disable Flash Fill.

To reactivate Flash Fill at any time, just follow above steps again and re-select the Automatically Flash Fill checkbox.
Flash Fill not working
When Excel's Flash Fill isn't working as expected, it can be frustrating. Fortunately, most issues can be resolved with a few simple checks and adjustments. Here’s what to do if you encounter problems with Flash Fill:
Provide more examples:
Flash Fill operates based on patterns. If it’s not picking up the pattern you’re trying to create, manually complete a few more cells. This gives Excel more data to understand the pattern you want.
Use shortcuts
If Flash Fill isn’t activating automatically, you can initiate it manually. This is often done by pressing Ctrl + E.
Ensure Flash Fill is turned on in Excel
Go to File > Options > Advanced, and under Editing options, verify that the Automatically Flash Fill box is checked.
If Flash Fill continues to malfunction despite these steps, you might need to resort to manual data entry or crafting formulas to get the job done.
Excel's Flash Fill truly revolutionizes data manipulation, significantly reducing time and effort. Whether it's for text reformatting or automating data entry, Flash Fill adeptly handles various tasks. I hope you found this tutorial beneficial. For more handy Excel tips and tricks, feel free to explore further here. Your journey to mastering Excel continues!
The Best Office Productivity Tools
Kutools for Excel - Helps You To Stand Out From Crowd
Kutools for Excel Boasts Over 300 Features, Ensuring That What You Need is Just A Click Away...
Office Tab - Enable Tabbed Reading and Editing in Microsoft Office (include Excel)
- One second to switch between dozens of open documents!
- Reduce hundreds of mouse clicks for you every day, say goodbye to mouse hand.
- Increases your productivity by 50% when viewing and editing multiple documents.
- Brings Efficient Tabs to Office (include Excel), Just Like Chrome, Edge and Firefox.
Table of contents
- Video: How to use Flash Fill
- How to apply Flash Fill in Excel
- By pressing Enter key
- With shortcuts
- Via the Excel Ribbon
- With the Fill Handle
- 5 examples for using Flash Fill
- Extract text
- Combine cells
- Add text
- Change formatting
- Change string order
- FAQ
- Flash Fill Limitations
- Enable or disable Flash Fill
- Flash Fill not working
- Related Articles
- Best Office Productivity Tools
- Comments