How to assign category to outgoing email in Outlook?
This article provides three methods for assigning category to outgoing email in Outlook.
Manually assign category to an outgoing email
Manually assign category to an outgoing email with VBA code
Automatically assign category to outgoing email by creating rule
Manually assign category to an outgoing email
You can manually assign category to an outgoing email in Outlook. Please do as follows.
1. In the new email window, click the Message Options button in the Tags group under the Message tab. See screenshot:

2. In the Properties dialog box, select a category from the Categories drop-down list, and then click the Close button.

3. Compose your email and send it. And the email with specified category is assigned for this outgoing message in the Sent Items folder in your Outlook.
AI Mail Assistant in Outlook: Smarter Replies, Clearer Communication (one-click magic!)
Streamline your daily Outlook tasks with the AI Mail Assistant from Kutools for Outlook. This powerful tool learns from your past emails to offer intelligent and accurate responses, optimize your email content, and help you draft and refine messages effortlessly.

This feature supports:
- Smart Replies: Get responses crafted from your past conversations—tailored, precise, and ready to go.
- Enhanced Content: Automatically refine your email text for clarity and impact.
- Effortless Composition: Just provide keywords, and let AI handle the rest, with multiple writing styles.
- Intelligent Extensions: Expand your thoughts with context-aware suggestions.
- Summarization: Get concise overviews of long emails instantly.
- Global Reach: Translate your emails into any language with ease.
This feature supports:
- Smart email replies
- Optimized content
- Keyword-based drafts
- Intelligent content extension
- Email summarization
- Multi-language translation
Don’t wait—download AI Mail Assistant now and enjoy!
Manually assign category to an outgoing email with VBA code
Then below VBA codes can help you easily assign category to an outgoing email in Outlook. Please do as follows.
1. Press the Alt + F11 keys to open the Microsoft Visual Basic for Applications window.
2. In the Microsoft Visual Basic for Applications window, please double click to open the ThisOutlookSession code window, and then copy below VBA code into the code window.
VBA code 1: Manually assign category to an outgoing email
Private Sub Application_ItemSend(ByVal Item As Object, Cancel As Boolean)
Dim xNewEmail As MailItem
If Item.Class = olMail Then
    Set NewMail = Item
   NewMail.ShowCategoriesDialog
End If
Set xNewEmail = Nothing
End Sub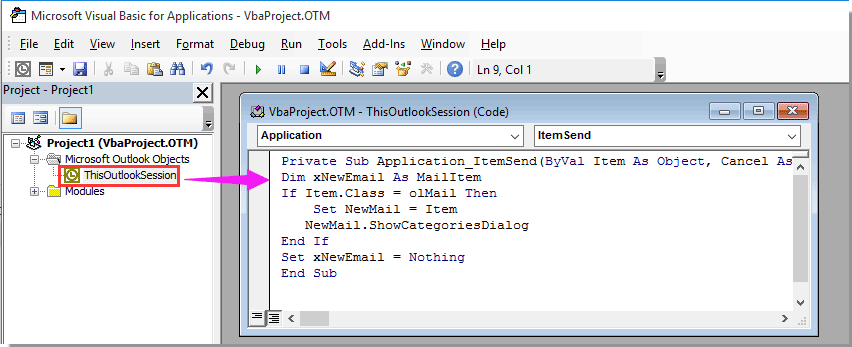
3. Press the Alt + Q keys to close the Microsoft Visual Basic for Applications window.
4. Every time when you click the Send button in a composing email, the Color Categories dialog box will be displayed. Please select the category you need and click the OK button. See screenshot:

Besides, you can add below VBA script to the Quick Access Toolbar for easily assigning category to outgoing email in Outlook.
1. After opening the ThisOutlookSession code window, copy below VBA code into the Code window.
VBA code 2: Manually assign category to an outgoing email
Sub SpecifyCategoryforNewEmail()
Dim xNewEmail As MailItem
Dim xItem As Object
Set xItem = Outlook.Application.ActiveInspector.CurrentItem
If xItem.Class = olMail Then
    Set xNewEmail = xItem
    xNewEmail.ShowCategoriesDialog
End If
Set xNewEmail = Nothing
End Sub
2. Press the Alt + Q keys to exit the Microsoft Visual Basic for Applications window.
3. Create a new email, click the Customize Quick Access Toolbar button, and then select More Commands from the drop-down list.

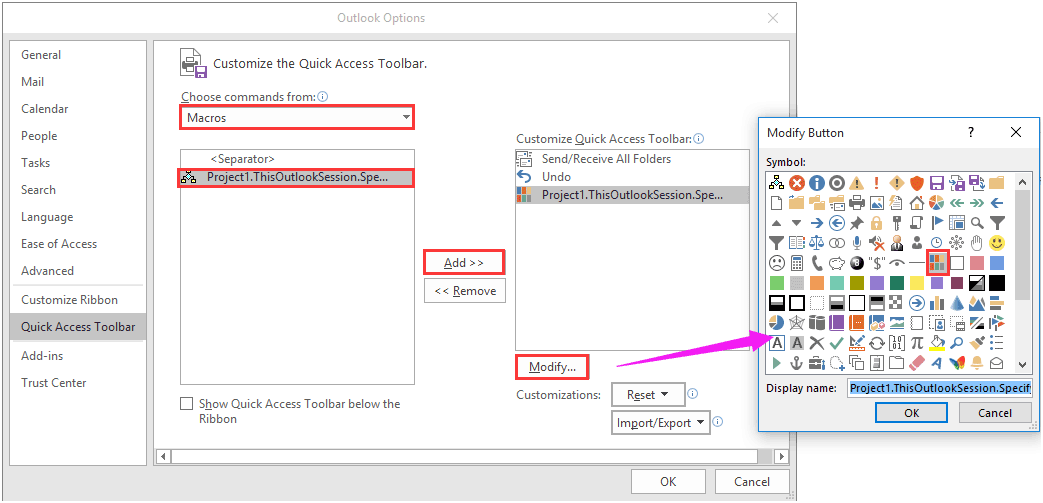
4. In the Outlook Options window, you need to:
4.1 Select Macros from the Choose commands from drop-down list;
4.2 Select Project1 in the left textbox and click the Add button;
4.3 Select Project1 in the right box, click the Modify button and modify a symbol button to the macro;
4.4 Click the OK button in the Outlook Options window to save the changes. See screenshot:
5. From now on, if you want to assign category to an email you are composing, just click the  button in the ribbon to open the Color Categories dialog box, and then select the category for this email. See screenshot:

Automatically assign category to outgoing email by creating rule
If you want to always assign category to emails which sent to a specific recipient, the below method can help you.
1. Click Rules > Manager Rules & Alerts on the Home tab.

2. In the Rules and Alerts dialog box, click the New Rule button. See screenshot:

3. In the first Rules Wizard dialog box, click the Apply rule on messages I send option in the Start from a blank rule section, and then click the Next button.

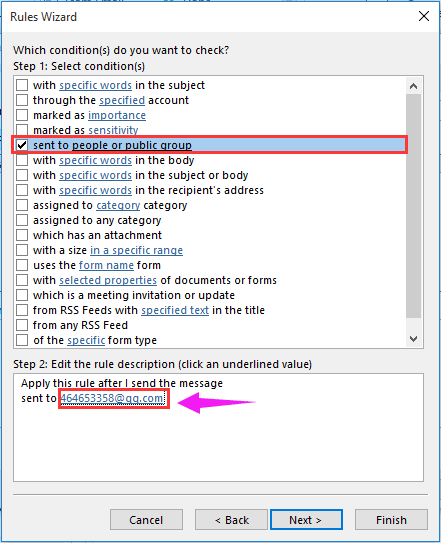
4. In the second Rules Wizard dialog box, check the sent to people or public group box in the Step 1, and specify the recipient’s email address in Step 2, and finally click the Next button. See screenshot:
5. In the third Rules Wizard dialog box, check the assign it to the category category box in the Step 1, select a category for the rule in Step 2, and then click the Next button.

6. Click the Next button directly in the fourth Rules Wizard dialog box without selecting any options.
7. In the last Rules Wizard dialog box, name the rule as you need, and then click the Finish button. See screenshot:

From now on, when sending email to this specified recipient, the email will be assigned by certain category automatically.
Related articles:
- How to keep original categories when replying or forwarding email in Outlook?
- How to move emails to specified folder after assigning certain category in Outlook?
Best Office Productivity Tools
Supercharge Your Excel Skills with Kutools for Excel, and Experience Efficiency Like Never Before. Kutools for Excel Offers Over 300 Advanced Features to Boost Productivity and Save Time. Click Here to Get The Feature You Need The Most...
Office Tab Brings Tabbed interface to Office, and Make Your Work Much Easier
- Enable tabbed editing and reading in Word, Excel, PowerPoint, Publisher, Access, Visio and Project.
- Open and create multiple documents in new tabs of the same window, rather than in new windows.
- Increases your productivity by 50%, and reduces hundreds of mouse clicks for you every day!
All Kutools add-ins. One installer
Kutools for Office suite bundles add-ins for Excel, Word, Outlook & PowerPoint plus Office Tab Pro, which is ideal for teams working across Office apps.
- All-in-one suite — Excel, Word, Outlook & PowerPoint add-ins + Office Tab Pro
- One installer, one license — set up in minutes (MSI-ready)
- Works better together — streamlined productivity across Office apps
- 30-day full-featured trial — no registration, no credit card
- Best value — save vs buying individual add-in