How to make a Word document read only?
For protecting a Word document, you may want to make it read only and prevent yourself or other users from changing it. Here, this article will introduce three tricky ways to make a Word document read only.
Recommended Productivity Tools for Word
Kutools for Word: Integrating AI 🤖, over 100 advanced features save 50% of your document handling time.Free Download
Office Tab: Introduces the browser-like tabs to Word (and other Office tools), simplifying multi-document navigation.Free Download
Make a Word document read only before opening
You can easily make a closed Word document read only by changing its properties. Please follow below steps to configure:
1. Open the folder containing the specified Word document, right click the Word document, and select Properties from the context menu. See screenshot: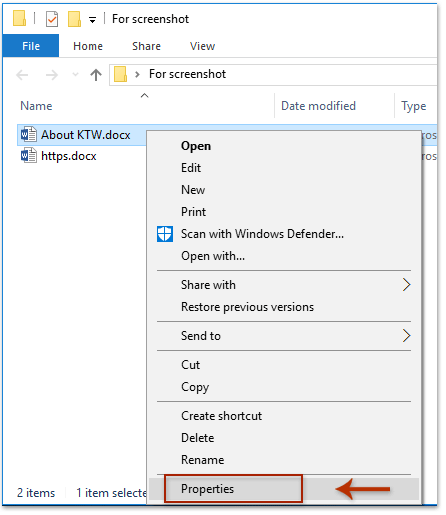
2. In the popping out Properties dialog box, please check the Read-only option at the bottom of this dialog box, and click the OK button. See screenshot: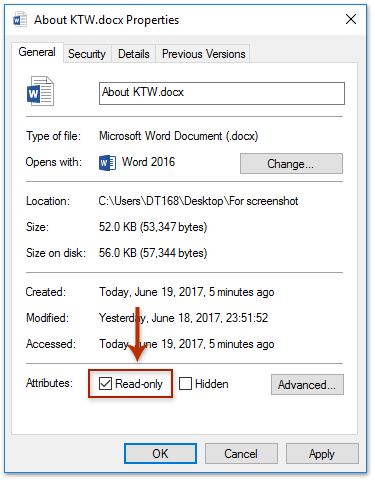
From now on, the Word document will be opened in Read-only view only as below screenshot shown:
Tabbed Browsing & Editing for Multiple Word Documents, Just Like in Chrome and Edge!
Just like browsing multiple webpages in Chrome, Safari and Edge, Office Tab lets you open and manage multiple Word documents in a single window. Switching between documents is now simple with a click on their tabs!
Try Office Tab for free now!
Make an opening Word document read only by Restrict Editing feature
If you need to make an opening Word document read only after editing, you can apply the Restrict Editing feature to get it done easily.
1. Click Review > Restrict Editing to enable the Restrict Editing pane. See screenshot:
2. In the Restrict Editing pane, please (1) check the Allow only this type of editing in the document option, (2) select Filling in forms from the below drop down list, and then (3) click the Yes, Start Enforcing Protection button. See screenshot:
3. In the opening Start Enforcing Protection dialog box, please type password into both Enter new password (optional) and Reenter password to confirm boxes, and click the OK button. See below screenshot:
4. Close the Restrict Editing pane.
From now on, the whole document is read-only, and any users are prevented from editing this document.
Note: For turning off the Read-only view, please (1) click Review > Restrict Editing to enabling the Restrict Editing pane, (2) Click the Stop Protection button, and then (3) type the specified password in the popping out Unprotect Document dialog box. See screenshot: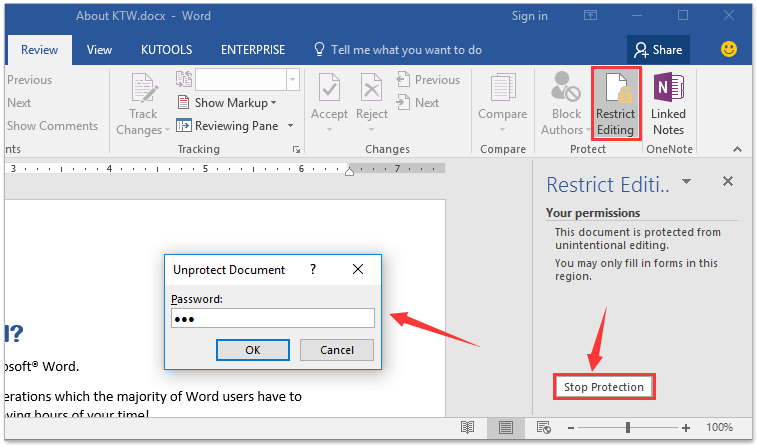
Make an opening Word document read only by Save as Tools
Other than Restrict Editing feature, you can also make an opening Word document read only by configuring the Save As Tools in Word. Please do as follows:
1. Click File > Save As > Browse.
2. In the Save As dialog box, please click Tools > General Options. See screenshot: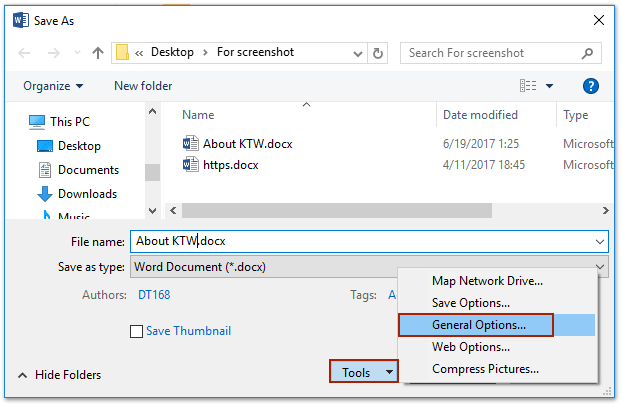
3. In the coming General Options dialog box, please check the Read-only recommended option, and click the OK button. See screenshot: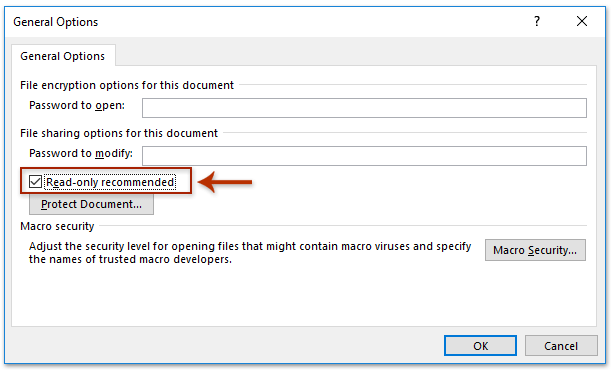
4. Now you return to the Save As dialog box, please click the Save button directly without specifying destination folder and file name at all.
Notes:
(1) If your Word document has never been saved before, you need to specify the destination folder and file name in the Save As dialog box as normal.
(2) If Microsoft Word warning dialog box pops out as below screenshot shown, please click Yes button to go ahead.![Confirmation dialog saying 'The file [file_name] already exists. Do you want to replace the existing file?'](http://cdn.extendoffice.com/images/stories/doc-word/make-word-document-readonly/doc-make-word-document-readonly-11.png)
5. Close the current Word document.
When you open the Word document later, a dialog box will come out and tell you this Word document is read-only as below screenshot shown: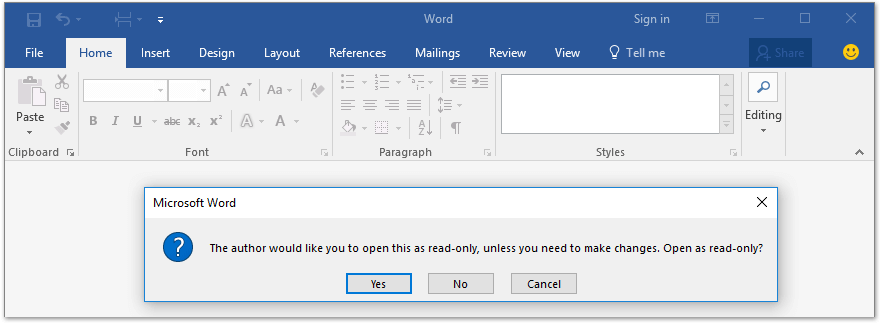
Best Office Productivity Tools
Kutools for Word - Elevate Your Word Experience with Over 100 Remarkable Features!
🤖 Kutools AI Features: AI Assistant / Real-Time Assistant / Super Polish (Preserve Format) / Super Translate (Preserve Format) / AI Redaction / AI Proofread...
📘 Document Mastery: Split Pages / Merge Documents / Export Selection in Various Formats (PDF/TXT/DOC/HTML...) / Batch Convert to PDF...
✏ Contents Editing: Batch Find and Replace across Multiple Files / Resize All Pictures / Transpose Table Rows and Columns / Convert Table to Text...
🧹 Effortless Clean: Sweap away Extra Spaces / Section Breaks / Text Boxes / Hyperlinks / For more removing tools, head to the Remove group...
➕ Creative Inserts: Insert Thousand Separators / Check Boxes / Radio Buttons / QR Code / Barcode / Multiple Pictures / Discover more in the Insert group...
🔍 Precision Selections: Pinpoint Specific Pages / Tables / Shapes / Heading Paragraphs / Enhance navigation with more Select features...
⭐ Star Enhancements: Navigate to Any Location / Auto-Insert Repetitive Text / Toggle Between Document Windows / 11 Conversion Tools...
🌍 Supports 40+ Languages: Use Kutools in your preferred language – supports English, Spanish, German, French, Chinese, and 40+ others!

Office Tab - Brings Tabbed interface to Office, Make Your Work Much Easier
- Enable tabbed editing and reading in Word, Excel, PowerPoint, Publisher, Access, Visio and Project.
- Open and create multiple documents in new tabs of the same window, rather than in new windows.
- Increases your productivity by 50%, and reduces hundreds of mouse clicks for you every day!
✨ Kutools for Office – One Installation, Five Powerful Tools!
Includes Office Tab Pro · Kutools for Excel · Kutools for Outlook · Kutools for Word · Kutools for PowerPoint
📦 Get all 5 tools in one suite | 🔗 Seamless integration with Microsoft Office | ⚡ Save time and boost productivity instantly
Best Office Productivity Tools
Kutools for Word - 100+ Tools for Word
- 🤖 Kutools AI Features: AI Assistant / Real-Time Assistant / Super Polish / Super Translate / AI Redaction / AI Proofread
- 📘 Document Mastery: Split Pages / Merge Documents / Batch Convert to PDF
- ✏ Contents Editing: Batch Find and Replace / Resize All Pictures
- 🧹 Effortless Clean: Remove Extra Spaces / Remove Section Breaks
- ➕ Creative Inserts: Insert Thousand Separators / Insert Check Boxes / Create QR Codes
- 🌍 Supports 40+ Languages: Kutools speaks your language – 40+ languages supported!