Using a Password to Protect a Word Document from Opening or Editing
In today's digital age, protecting sensitive information is more important than ever. Microsoft Word provides robust features to safeguard your documents from unauthorized access and editing. This guide will walk you through the steps to use a password to protect a Word document from opening or editing, as well as highlight other useful security features.
Protecting a Word Document from Opening (Windows & Mac)
Learn how to protect a Word document with a password to prevent unauthorized access on both Windows and Mac. This ensures your sensitive information stays secure and accessible only to those with permission.
Encrypt with a Password on Windows (Desktop)
🔵Method 1
Open the Document: Start by opening the Word document you want to protect.
Navigate to File: Click on the File tab in the upper-left corner of the screen.
Access Info: In the sidebar, select Info.
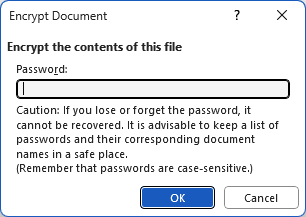
Protect Document: Click on Protect Document, then choose Encrypt with Password from the dropdown menu.

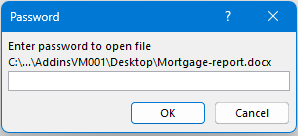
Set Password: A dialog box will appear. Enter the password you want to use and click OK.
Confirm Password: Re-enter the password to confirm it and click OK again.


Your document is now encrypted and can only be opened by entering the password.
🔵Method 2
Navigate to File: Click on the File tab in the upper-left corner of the screen.
Access Info: In the sidebar, select Save As.
Select a folder: Identify where to place the file in the Save As section.
Name the file: In the popping Save As dialog, name the file in the File name textbox.
Set General Options: Click the Tools button, and choose General Options from the drop-down list.

Set Password: Enter the password you want to use in the Password to open filed and click OK.
Confirm Password: Re-enter the password to confirm it and click OK again.


Your document is now encrypted and can only be opened by entering the password.
Remove protection
To remove the file protection, after entering the document, go to the file > Info > Protect Document > Encrypt with Password, and remove the password from the dialog, and click OK.
Encrypt with a Password on Mac
The process is slightly different on a Mac, but equally straightforward:
- Open the Document: Open the Word document you want to protect.
- Navigate to Preferences: Click on Word in the top menu, then select Preferences.
- Access Security Settings: In the Preferences dialog box, click on Security.
- Set Password: Enter your desired password in the Password to open box.
- Confirm Password: Re-enter the password to confirm and click OK.
Your document is now protected; you need the password to open it.
Protecting a Word Document from Editing
Sometimes you want users to view but not edit a document. Here’s how to protect your document from editing:
Open the Document: Open the Word document you want to protect.
Navigate to File: Click on the File tab.
Access Info: In the sidebar, select Info.
Protect Document: Click on Protect Document, then select Restrict Editing.

Set Editing Restrictions: In the Restrict Editing pane, check the box for Allow only this type of editing in the document and choose the desired restrictions, here we choose No changes.
Start Enforcement: Click Yes, Start Enforcing Protection.

Set Password: Enter and confirm a password, then click OK.


Your document is now protected from editing; users will need the password to make changes.
Other Security Features in Word
Microsoft Word offers additional security features such as always open as read and marking files as final to prevent unintended changes. These tools help protect your content and maintain document integrity.
Always Open Read-only
This feature makes your document open in read-only mode by default, discouraging edits.
Open the Document: Open the Word document.
Navigate to File: Click on the File tab.
Access Info: Select Info from the sidebar.
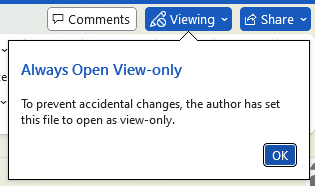
Protect Document: Click Protect Document and choose Always Open Read-Only.


Now, anyone who opens the document will see a message that it is read-only.
Mark as Final
Marking a document as final indicates that it is a completed version and should not be edited further.
Open the Document: Open the Word document.
Navigate to File: Click on the File tab.
Access Info: Select Info from the sidebar.
Protect Document: Click Protect Document and choose Mark as Final.


Now, anyone who opens the document will see a message that it is read-only.

Users can click Edit Anyway for editing content if they insist on editing.
Using passwords and other security features in Microsoft Word is essential for protecting sensitive information and maintaining document integrity. Whether you need to encrypt a document to restrict access or prevent editing, these steps will help you secure your files effectively. Start implementing these methods today to safeguard your Word documents.
Best Office Productivity Tools
Kutools for Word - Elevate Your Word Experience
🤖 Kutools AI Features: AI Assistant / Real-Time Assistant / Super Polish (Preserve Format) / Super Translate (Preserve Format) / AI Redaction / AI Proofread...
📘 Document Mastery: Split Pages / Merge Documents / Export Selection in Various Formats (PDF/TXT/DOC/HTML...) / Batch Convert to PDF...
✏ Contents Editing: Batch Find and Replace across Multiple Files / Resize All Pictures / Transpose Table Rows and Columns / Convert Table to Text...
🧹 Effortless Clean: Sweap away Extra Spaces / Section Breaks / Text Boxes / Hyperlinks / For more removing tools, head to the Remove group...
➕ Creative Inserts: Insert Thousand Separators / Check Boxes / Radio Buttons / QR Code / Barcode / Multiple Pictures / Discover more in the Insert group...
🔍 Precision Selections: Pinpoint Specific Pages / Tables / Shapes / Heading Paragraphs / Enhance navigation with more Select features...
⭐ Star Enhancements: Navigate to Any Location / Auto-Insert Repetitive Text / Toggle Between Document Windows / 11 Conversion Tools...
🌍 Supports 40+ Languages: Use Kutools in your preferred language – supports English, Spanish, German, French, Chinese, and 40+ others!

Office Tab - Tabs for Office, Power for You
- Enable tabbed editing and reading in Word, Excel, PowerPoint, Publisher, Access, Visio and Project.
- Open and create multiple documents in new tabs of the same window, rather than in new windows.
- Increases your productivity by 50%, and reduces hundreds of mouse clicks for you every day!

✨ Kutools for Office – One Installation, Five Powerful Tools!
Includes Office Tab Pro · Kutools for Excel · Kutools for Outlook · Kutools for Word · Kutools for PowerPoint
📦 Get all 5 tools in one suite | 🔗 Seamless integration with Microsoft Office | ⚡ Save time and boost productivity instantly
Best Office Productivity Tools
Kutools for Word - 100+ Tools for Word
- 🤖 Kutools AI Features: AI Assistant / Real-Time Assistant / Super Polish / Super Translate / AI Redaction / AI Proofread
- 📘 Document Mastery: Split Pages / Merge Documents / Batch Convert to PDF
- ✏ Contents Editing: Batch Find and Replace / Resize All Pictures
- 🧹 Effortless Clean: Remove Extra Spaces / Remove Section Breaks
- ➕ Creative Inserts: Insert Thousand Separators / Insert Check Boxes / Create QR Codes
- 🌍 Supports 40+ Languages: Kutools speaks your language – 40+ languages supported!