How to delete blank cells and move data left in Excel?
Working with datasets in Excel often leads to the presence of unwanted blank cells scattered among your data. These blank spaces can disrupt calculations, sorting, or analysis, especially when you want your data entries to be neatly aligned without gaps. Manually removing each blank cell and shifting the remaining content to the left can be extremely time-consuming and prone to error if you have a large volume of information. This tutorial introduces several quick and efficient methods to delete blank cells in a data range and move the remaining cells to the left, ensuring your worksheet remains tidy and more suitable for further processing or analysis. The following solutions cater to different needs, whether you prefer manual, formula-driven, or programmable approaches. Understanding the strengths and trade-offs of each method can help you choose the most appropriate one for your reality.
 |  |  |
Go To feature - Delete blank cells and move left
Excel Formula - Remove blanks and shift data left
VBA Code - Automatically delete blank cells and shift data left
Go To feature - Delete blank cells and move left
When you want to delete blank cells and shift the remaining data towards the left, Excel provides a built-in method that is quick for relatively small, consistent ranges. This approach is especially practical if you prefer not to use formulas or programming. However, it is most suitable for basic one-off cleanups rather than automated solutions or very large datasets. Here’s how to accomplish this task step by step:
1. Select your data range that contains the blank cells you wish to remove. This could be a single row, multiple rows, or an entire area. Then, press Ctrl + G to display the Go To dialog. In this window, click Special to further refine your selection. See screenshot:
2. In the Go To Special dialog box, check the Blanks option, and click OK. This step highlights all empty cells within your selected range. See screenshot: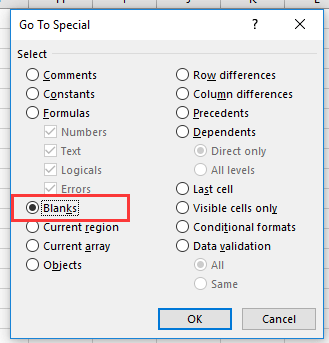
3. With all blank cells now selected, right-click on any one of the selected blanks and choose Delete from the context menu. See screenshot: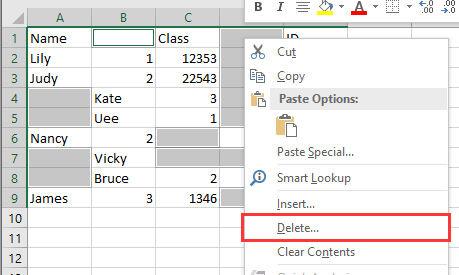
4. In the Delete dialog, select the Shift cells left option and click OK. This action causes all the data to move left, neatly filling the previous gaps created by the blank cells. See screenshot: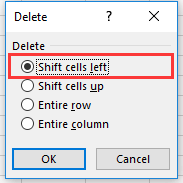
After completing these steps, the blank cells will be removed and the remaining data will be shifted left, as illustrated below:
 |  |  |
Excel Formula - Remove blanks and shift data left
For situations where you want a dynamic, formula-driven solution—such as eliminating blanks from rows or columns, and having the results update automatically when source data changes—Excel formula like FILTER (Excel 365 and Excel 2021) can be very effective. This approach is especially useful for generating a new range without blank cells, meaning you can keep your original data intact while getting a blank-free, left-shifted version elsewhere in your worksheet.
Note: The specific formulas available will depend on your version of Excel. The FILTER function is only available in newer versions (Excel 365, Excel 2021 or later).
1. Suppose your data is in A1:E10 (horizontally). To create a new row without blanks, select an empty cell where you want the output, for example, F1, and enter the following formula:
=FILTER(A1:E1, A1:E1 <> "")This formula collects only the non-blank cells from A1:E1 and lists them left-aligned starting at F1.
2. Press Enter and the non-blank data will auto-populate leftward in the new range. Then, drag or copy the formula down.
Applicable scenario: This method is recommended when you want to keep your source data unchanged and automatically create a cleaned-up range somewhere else. However, one limitation is that it does not overwrite the original data—instead, it provides a "virtually" shifted version of the data.
Practical tip: If you wish to keep only values in your new range, after applying the formula, copy the results and use Paste Special > Values to overwrite the original range, if needed. Always ensure cell references are adjusted if you copy formulas to other areas.
VBA Code - Automatically delete blank cells and shift data left
If you frequently need to delete blank cells and shift the remaining entries to the left—especially across large or irregularly-sized datasets—a VBA macro can automate this repetitive task. This approach processes cells in place, physically removing blanks so the data is "compacted" to the left within each row. Macros save time and help avoid manual errors when handling complex worksheets.
1. Open the VBA Editor by clicking Developer Tools > Visual Basic. In the Microsoft Visual Basic for Applications window that appears, click Insert > Module, and paste the code below into the module area:
Sub DeleteBlanksShiftLeft()
    Dim WorkRng As Range
    Dim RowRng As Range
    Dim xTitleId As String
    Dim i As Long, c As Long
    Dim TempList As Collection
    Dim Cell As Range
    xTitleId = "KutoolsforExcel"
    On Error Resume Next
    Set WorkRng = Application.Selection
    Set WorkRng = Application.InputBox("Select range to process (rows will be processed individually):", xTitleId, WorkRng.Address, Type:=8)
    On Error GoTo 0
    If WorkRng Is Nothing Then Exit Sub
    Application.ScreenUpdating = False
    ' Process each row individually
    For Each RowRng In WorkRng.Rows
        Set TempList = New Collection
        ' Collect non-empty values in the row
        For Each Cell In RowRng.Cells
            If Trim(Cell.Value) <> "" Then
                TempList.Add Cell.Value
            End If
        Next Cell
        ' Clear entire row first
        RowRng.ClearContents
        ' Refill row with collected values from left to right
        For i = 1 To TempList.Count
            RowRng.Cells(1, i).Value = TempList(i)
        Next i
    Next RowRng
    Application.ScreenUpdating = True
    MsgBox "All blank cells in rows have been removed and values shifted left.", vbInformation
End Sub
2. After inserting the code, click the ![]() button, or press F5 to run the macro. When prompted, select your target range. The macro will process each row, shifting left the values to fill blanks and removing empty cells along the way.
button, or press F5 to run the macro. When prompted, select your target range. The macro will process each row, shifting left the values to fill blanks and removing empty cells along the way.
Applicable scenario: Macros are best for users comfortable with enabling and using VBA, especially when routine removal of blanks is required on large data ranges, or in templates that are reused. This method actually modifies the original data, so it is recommended to back up your worksheet beforehand. Be cautious if your data structure is irregular or contains formulas, as the macro works on values and may disrupt underlying dependencies.
Troubleshooting tip: If unexpected results occur, it may be due to merged cells, formula outputs, or protected cells. Unmerge, unlock, or clear formulas as needed before running the macro.
Summary suggestion: Whenever possible, choose formulas for dynamic, non-destructive data transformation, and macros for batch in-place editing. Always save a copy of your data before running automation, and check the result to ensure your worksheet layout remains as intended.
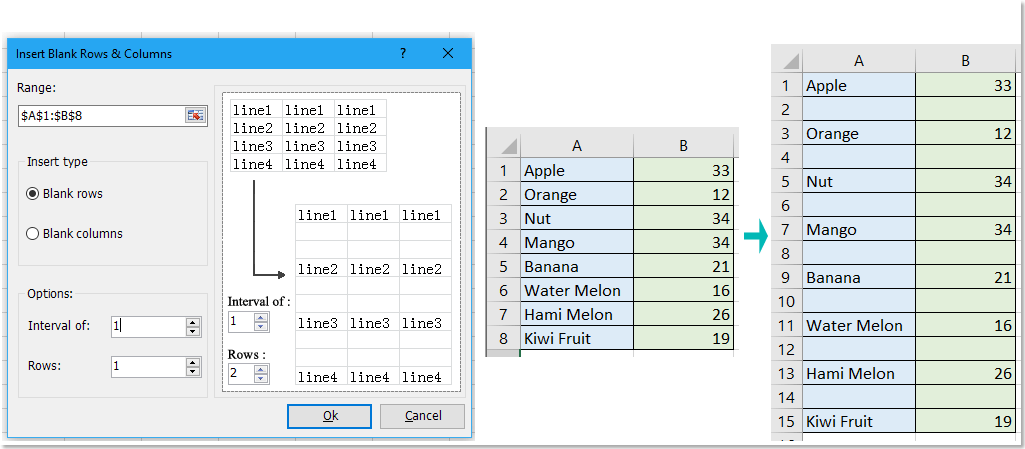
Batch insert blank rows or columns in a specific interval in Excel range |
| If you want to insert blank rows in every other row, you may need to insert them one by one, but the Insert Blank Rows & Columnsof Kutools for Excel can solve this job in seconds. Click for 30 days free trial! |
 |
| Kutools for Excel: with more than 300 handy Excel add-ins, free to try with no limitation in 30 days. |
Relative Articles
- How to copy and paste only nonblank cells in Excel?
- How to count ignoring zeros or blank cells in Excel?
Best Office Productivity Tools
Supercharge Your Excel Skills with Kutools for Excel, and Experience Efficiency Like Never Before. Kutools for Excel Offers Over 300 Advanced Features to Boost Productivity and Save Time. Click Here to Get The Feature You Need The Most...
Office Tab Brings Tabbed interface to Office, and Make Your Work Much Easier
- Enable tabbed editing and reading in Word, Excel, PowerPoint, Publisher, Access, Visio and Project.
- Open and create multiple documents in new tabs of the same window, rather than in new windows.
- Increases your productivity by 50%, and reduces hundreds of mouse clicks for you every day!
All Kutools add-ins. One installer
Kutools for Office suite bundles add-ins for Excel, Word, Outlook & PowerPoint plus Office Tab Pro, which is ideal for teams working across Office apps.
- All-in-one suite — Excel, Word, Outlook & PowerPoint add-ins + Office Tab Pro
- One installer, one license — set up in minutes (MSI-ready)
- Works better together — streamlined productivity across Office apps
- 30-day full-featured trial — no registration, no credit card
- Best value — save vs buying individual add-in