How to Create a Product Catalog in Excel?
A product catalog helps organize product information, pricing, and images in a single worksheet, making it easier to manage inventory, prepare quotations, or share product lists with customers. While creating the table itself is straightforward, inserting and matching product images can quickly become the most time-consuming part of the job—especially when you're working with dozens or hundreds of products.
This article explores three practical ways to build a product catalog in Excel: using Excel's built-in picture tools, automating the process with VBA, and batch importing images with Kutools for Excel. By the end, you'll know which method is best for your situation.

- Method 1. Insert Pictures One by One (Manual Way)
- Method 2. Use VBA to Import Pictures Automatically
- Method 3. Batch Match Product Images with Kutools for Excel (Recommended)
Why Use Excel for a Product Catalog?
Excel remains a popular choice for creating product catalogs because it's flexible, widely available, and easy to customize. Unlike dedicated catalog software, Excel lets you organize product information in any layout you need while using familiar features such as formulas, sorting, filtering, and printing.
It's especially suitable for small and medium-sized businesses that need a simple way to manage product information without investing in specialized catalog management software.
What Makes a Good Excel Product Catalog?
A well-designed product catalog should be both informative and easy to maintain. Besides listing basic product information, it should present images consistently and remain easy to update as products change.
A typical product catalog may include the following columns:
| Product ID | Product Name | Category | Price | Product Image | Description |
|---|
An effective product catalog should also:
- Keep every product image matched with the correct product.
- Display images in a consistent size for a clean appearance.
- Keep pictures aligned with their corresponding rows.
- Allow new products and images to be added easily in the future.
- Remain sortable and filterable without breaking image alignment.
The Biggest Challenge: Adding Hundreds of Product Photos
Creating the product table is relatively easy. The real challenge is adding and matching product images. For a small catalog, manually inserting pictures is perfectly acceptable. However, as the number of products increases, keeping every image correctly matched and efficiently managing updates becomes much more difficult.
Method 1. Insert Pictures One by One (Manual Way)
If your product catalog only contains a small number of items, Excel's built-in picture insertion feature is the simplest solution. It doesn't require any additional tools and works well when you only need to insert a few product images.
Step 1: Insert a picture into a cell
Select the cell where you want to display the product image, then go to:
Insert > Pictures > Place in Cell > This Device
If your pictures are stored in another location, choose the appropriate source instead.

Step 2: Choose the matching image
In the Insert Picture dialog box, browse to the folder containing your product images, select the picture that matches the current product, and click Insert.

The image will be inserted into the selected cell.

Step 3: Repeat for the remaining products
Repeat the same process for each product in your catalog until all images have been inserted.

Advantages
- Built into Microsoft Excel—no additional software required.
- Easy to learn and suitable for beginners.
- Works well for catalogs containing only a small number of products.
Limitations
- Each picture must be inserted individually.
- Matching images manually increases the chance of selecting the wrong picture.
- Older versions of Excel require manual resizing and positioning.
- Not practical for large catalogs with dozens or hundreds of products.
Method 2. Use VBA to Import Pictures Automatically
If your product images are named the same as the corresponding product names (or another matching column), you can use a VBA macro to automatically insert pictures into your worksheet. This approach eliminates the need to insert images one by one, but it requires basic VBA knowledge and some customization.
Step 1. Organize your images
Before running the macro:
- Store all product images in the same folder.
- Name each image exactly the same as the values in the Product Name column (or another column you want to use for matching).
- Use a consistent image format, such as PNG or JPG.
Product Name Picture File Lipstick Lipstick.jpg Mascara Mascara.jpg Coffee Maker Coffee Maker.jpg - Use a consistent image format such as JPG or PNG.
Step 2. Open the VBA Editor
Press Alt + F11 to open the Microsoft Visual Basic for Applications editor.
Step 3. Insert a module and paste the VBA code
Click Insert > Module, then copy and paste the following VBA code into the module window.
VBA code: Match import pictures in Excel
Option Explicit
'Updated by Extendoffice
Sub ImportProductPictures()
    Dim ws As Worksheet
    Dim fd As FileDialog
    Dim imgFolder As String
    Dim lastRow As Long
    Dim i As Long
    Dim productName As String
    Dim imgPath As String
    Dim targetCell As Range
    Dim shp As Shape
    Dim imported As Long
    Dim missing As Long
    Set ws = ActiveSheet
    'Select image folder
    Set fd = Application.FileDialog(msoFileDialogFolderPicker)
    With fd
        .Title = "Select the folder containing product images"
        If .Show <> -1 Then Exit Sub
        imgFolder = .SelectedItems(1)
    End With
    If Right(imgFolder, 1) <> "\" Then
        imgFolder = imgFolder & "\"
    End If
    Application.ScreenUpdating = False
    'Delete existing pictures
    For i = ws.Shapes.Count To 1 Step -1
        If ws.Shapes(i).Type = msoPicture Then
            ws.Shapes(i).Delete
        End If
    Next i
    lastRow = ws.Cells(ws.Rows.Count, "B").End(xlUp).Row
    imported = 0
    missing = 0
    For i = 2 To lastRow
        productName = Trim(ws.Cells(i, "B").Value)
        imgPath = imgFolder & productName & ".png"
        If Dir(imgPath) <> "" Then
            Set targetCell = ws.Cells(i, "H")
            'Optional: make rows taller for better display
            If ws.Rows(i).RowHeight < 90 Then
                ws.Rows(i).RowHeight = 90
            End If
            Set shp = ws.Shapes.AddPicture( _
                Filename:=imgPath, _
                LinkToFile:=msoFalse, _
                SaveWithDocument:=msoTrue, _
                Left:=0, _
                Top:=0, _
                Width:=-1, _
                Height:=-1)
            With shp
                .LockAspectRatio = msoTrue
                'Fit picture into cell
                If .Width / .Height > targetCell.Width / targetCell.Height Then
                    .Width = targetCell.Width - 4
                Else
                    .Height = targetCell.Height - 4
                End If
                'Center picture
                .Left = targetCell.Left + (targetCell.Width - .Width) / 2
                .Top = targetCell.Top + (targetCell.Height - .Height) / 2
                .Placement = xlMoveAndSize
            End With
            imported = imported + 1
        Else
            missing = missing + 1
        End If
    Next i
    Application.ScreenUpdating = True
    MsgBox imported & " picture(s) imported successfully." & vbCrLf & _
           missing & " picture(s) not found.", vbInformation
End Sub
productName = Trim(ws.Cells(i, "B").Value) 'Column B contains the matching valuesSet targetCell = ws.Cells(i, "H") 'Column H is where pictures will be insertedStep 4. Run the VBA macro
Press F5 to run the VBA code.
A dialog box will appear, prompting you to select the folder that contains your product images. After choosing the folder, click OK.

Result
The macro automatically inserts all matching pictures into Column H and displays a summary showing how many pictures were successfully imported and how many could not be found.

Advantages
- Automatically imports matching pictures.
- Eliminates repetitive manual insertion.
- Can be customized for different worksheet layouts.
Limitations
- Requires VBA programming knowledge.
- Macros may be disabled due to security settings.
- Scripts often need maintenance when worksheet layouts change.
- Difficult for non-technical users.
- Only supports the image format defined in the VBA code unless additional modifications are made.
Method 3. Batch Match Product Images with Kutools for Excel (Recommended)
If you regularly create product catalogs or inventory lists with product images, Match Import Pictures in Kutools for Excel provides the fastest and easiest solution. Instead of inserting pictures one by one or writing VBA code, it automatically matches images with your worksheet data based on filenames and imports them in a single operation.
Step 1: Open Match Import Pictures
Click Kutools Plus > Import & Export > Match Import Pictures.

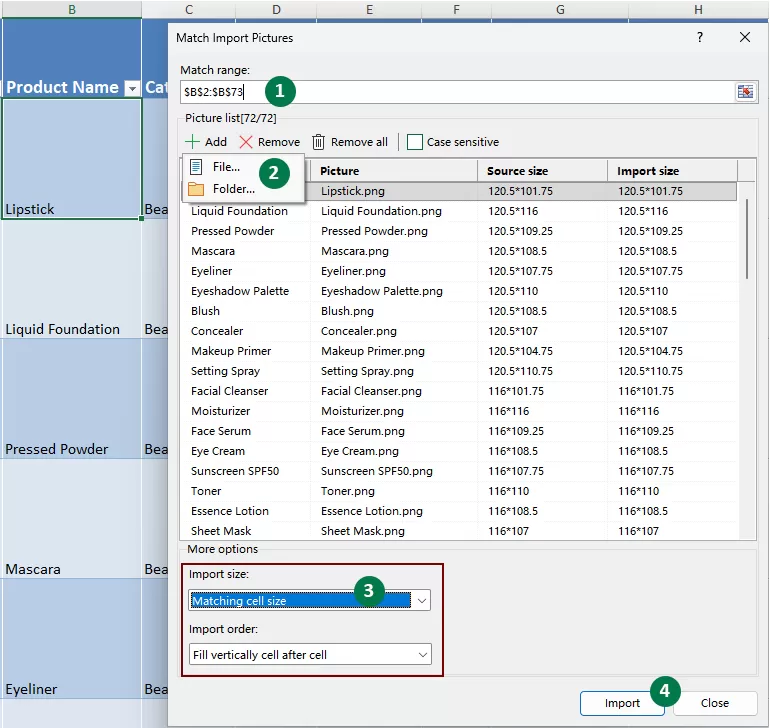
Step 2: Configure the Match Import Pictures dialog box
In the Match Import Pictures dialog box:
- Select the column containing the matching values in the Match range box.
Tip: If your data contains many rows, select the first cell in the column and press Ctrl + Shift + ↓ to quickly select the entire data range.
- Click Add > Folder to select the folder that contains your product images.
Kutools automatically scans the folder and lists all detected images in the dialog box.
- Choose an Import size option. In this example, select Matching cell size to fit each picture inside its destination cell.
- Choose the desired Import order, if necessary.
- Click Import.
Step 4: Select a destination cell
When the second Match Import Pictures dialog box appears, select the first destination cell where you want the pictures to be inserted, then click OK.

Result
Kutools automatically matches each picture with the corresponding worksheet value and imports all matching images into the selected column in one operation. The imported pictures are placed in the correct rows, making it easy to create a clean and professional product catalog.

Kutools for Excel - Supercharge Excel with over 300 essential tools, making your work faster and easier, and take advantage of AI features for smarter data processing and productivity. Get It Now
Why choose Kutools?
Compared with manual insertion or VBA, Match Import Pictures offers several advantages:
- No VBA coding or programming knowledge required.
- Automatically matches pictures by filename.
- Batch imports hundreds or even thousands of images in a single operation.
- Multiple import size options to fit different worksheet layouts.
- Flexible import order for different data arrangements.
- Much faster and easier than manual insertion or maintaining VBA scripts.
Comparison of Different Methods
| Feature | Manual Insertion | VBA | Kutools |
|---|---|---|---|
| Batch import images | ❌ | ✔ | ✔ |
| Automatically match images | ❌ | ✔ | ✔ |
| Coding required | ❌ | ✔ | ❌ |
| Beginner-friendly | ✔ | ❌ | ✔ |
| Consistent image sizing | Manual | Custom code | ✔ |
| Best for large catalogs | ❌ | ✔ | ✔ |
For most users, Kutools provides the best balance between simplicity and efficiency.
FAQs
Can Excel automatically match pictures to product IDs?
Not directly. Excel's built-in features allow you to insert pictures manually or place them in cells, but they cannot automatically match pictures to worksheet values. To automate the process, you can use VBA or a third-party tool such as Kutools for Excel.
Can I import hundreds of product images at once?
Yes. VBA macros or Kutools can batch import large numbers of pictures. Kutools provides a graphical interface without requiring any programming.
Will pictures stay aligned after sorting my product list?
Yes. Pictures inserted using Place in Cell, the VBA method described in this article, or Kutools Match Import Pictures will stay aligned with their corresponding rows when the worksheet is sorted or filtered. Problems typically occur only when pictures are inserted as floating objects without being configured to move and size with cells.
What image format works best?
PNG and JPG are the most commonly used formats. PNG is generally preferred because it provides better image quality and supports transparent backgrounds, while JPG files are usually smaller and suitable for product photos. Whichever format you use, keeping all images at similar dimensions helps create a more consistent-looking product catalog.
Can I use another column instead of Product Name to match pictures?
Yes. Both the VBA method and Kutools Match Import Pictures can use any column containing unique matching values, such as Product ID, SKU, or Barcode, as long as the picture filenames match the selected column values.
Conclusion
Whether you're creating a small product list or managing hundreds of products, Excel provides several ways to build a professional product catalog. Manual insertion is suitable for occasional tasks, VBA offers automation for advanced users, and Kutools Match Import Pictures delivers the fastest no-code solution for batch importing and matching images.
To ensure accurate matching and simplify future updates, use consistent filenames and store all product images in a single folder.
Best Office Productivity Tools
Supercharge Your Excel Skills with Kutools for Excel, and Experience Efficiency Like Never Before. Kutools for Excel Offers Over 300 Advanced Features to Boost Productivity and Save Time. Click Here to Get The Feature You Need The Most...
Office Tab Brings Tabbed interface to Office, and Make Your Work Much Easier
- Enable tabbed editing and reading in Word, Excel, PowerPoint, Publisher, Access, Visio and Project.
- Open and create multiple documents in new tabs of the same window, rather than in new windows.
- Increases your productivity by 50%, and reduces hundreds of mouse clicks for you every day!
All Kutools add-ins. One installer
Kutools for Office suite bundles add-ins for Excel, Word, Outlook & PowerPoint plus Office Tab Pro, which is ideal for teams working across Office apps.





- All-in-one suite — Excel, Word, Outlook & PowerPoint add-ins + Office Tab Pro
- One installer, one license — set up in minutes (MSI-ready)
- Works better together — streamlined productivity across Office apps
- 30-day full-featured trial — no registration, no credit card
- Best value — save vs buying individual add-in
Table of contents
- Why Use Excel for a Product Catalog?
- What Makes a Good Excel Product Catalog?
- The Biggest Challenge: Adding Hundreds of Product Photos
- Insert Pictures One by One
- Use VBA to Match Import Pictures
- Batch Match Product Images with Kutools
- Comparison of Different Methods
- FAQs
- Conclusion
- The Best Office Productivity Tools
Kutools for Excel
Brings 300+ powerful features to streamline your Excel tasks.
- ⬇️ Free Download
- 🛒 Purchase Now
- 📘 Feature Tutorials
- 🎁 30-Day Free Trial