How to protect worksheet from viewing in Excel?
When working with sensitive data in Excel, sometimes you need to ensure that certain worksheet contents are kept confidential, preventing other users from viewing them even if they have access to the workbook. This article will introduce several practical solutions to help protect worksheets from being viewed by unauthorized users in Excel, as well as discuss applicable scenarios, considerations, and troubleshooting tips for each method.
- Protect worksheet from viewing in Excel
- Make a worksheet Very Hidden to protect it from viewing
- Other Built-in Excel Methods - Set password to open workbook
Protect worksheet from viewing in Excel
The most common way to prevent users from viewing a specific worksheet is to hide it and then protect the workbook’s structure with a password. This stops others from simply unhiding your sensitive sheet using the normal Excel interface.
Please do as follows to protect a specific worksheet from being viewed by other users:
Scenario: You want to make certain data in a worksheet inaccessible for general viewing, while still allowing access to other parts of the workbook.
1. Open the worksheet you want to protect from viewing. Right-click the sheet tab and select Hide from the context menu to hide the worksheet. See screenshot:

Tip: Hiding a worksheet only makes it invisible, but does not prevent other users from using the Unhide option to view it again. For real protection, the structure of the workbook must be protected as detailed below.
2. Click Review > Protect Workbook.
This opens up options to guard the workbook's structure, including hidden sheets.

3. In the Protect Structure and Windows dialog box, enter a password into the Password textbox, make sure the Structure box is checked, and then click OK. You will be asked to re-enter the password to confirm. See screenshot:

Practical Tip: Choose a strong password and keep it safe. Without the password, other users will not be able to access, rename, move, add, delete, or unhide the protected sheet.
After these steps, the specific worksheet is protected from viewing:
- Other users cannot see the hidden worksheet nor unhide it through the Excel user interface without the structure password.
- If your workbook contains confidential calculations or private data, this method greatly improves confidentiality among regular users.
- Limitation: This protection can be bypassed by advanced users using VBA or other hacking methods, so it is not suitable for highly sensitive or critical information in a high-risk environment.
Error Reminder: If you forget the password set for structure protection, you won’t be able to unhide the sheets or adjust structure-related settings. Also, structure protection does not encrypt data; it simply restricts actions within Excel.
Make a worksheet Very Hidden to protect it from viewing
In addition to the standard hiding method, Excel provides a deeper level of hiding called "Very Hidden." When a worksheet is set to Very Hidden, it will not appear in the Unhide dialog box and cannot be made visible from the Excel user interface.
Use VBA code to make a worksheet Very Hidden
The following VBA code can help you make a worksheet very hidden in Excel.
Applicable Scenario: When you want to prevent all regular users from viewing a sheet and you don't want them to even know the sheet exists, using the Very Hidden property is especially useful in multi-user or shared environments.
Advantages: Higher concealment than standard hiding, and more difficult for average users to find or display.
Disadvantages: Advanced users with knowledge of VBA can still potentially access and unhide the sheet. This should not be considered bulletproof for highly confidential data.
1. Go to Developer Tools > Visual Basic to open the Microsoft Visual Basic for Applications window. In the VBA window, select the target worksheet in the Project Explorer on the left. If you do not see the Developer tab, you may need to enable it through File > Options > Customize Ribbon.
2. Press F4 to bring up the Properties window if it is not already visible.
3. In the Properties window, locate the Visible property for your selected worksheet and set its value to xlSheetVeryHidden from the dropdown menu, or enter it directly. You can also do this programmatically:
Sub SetVeryHidden()
    On Error Resume Next
    xTitleId = "KutoolsforExcel"
    Sheets("Sheet2").Visible = xlSheetVeryHidden
End Sub
How to execute: After inserting the code into the module, click the ![]() button, or press F5 to run the code. Replace "Sheet2" with the actual name of your worksheet.
button, or press F5 to run the code. Replace "Sheet2" with the actual name of your worksheet.
Once set to Very Hidden, the worksheet will not be listed in Excel's Unhide prompt, and only by using VBA can a user unhide and access it.
To unhide: Use a similar code:
Sub UnhideVeryHidden()
    On Error Resume Next
    xTitleId = "KutoolsforExcel"
    Sheets("Sheet2").Visible = xlSheetVisible
End SubNote: Very Hidden sheets can still be accessed by users who know VBA. Be sure to combine with workbook structure protection or file password for stronger security if needed.
Troubleshooting: If the Developer tab is not visible, enable it via Excel Options. If "Run-time error9: Subscript out of range" occurs, double-check worksheet names used in the code. Always save your workbook before making VBA modifications in case you need to revert changes.
Use Kutools for Excel to easily make a worksheet Very Hidden
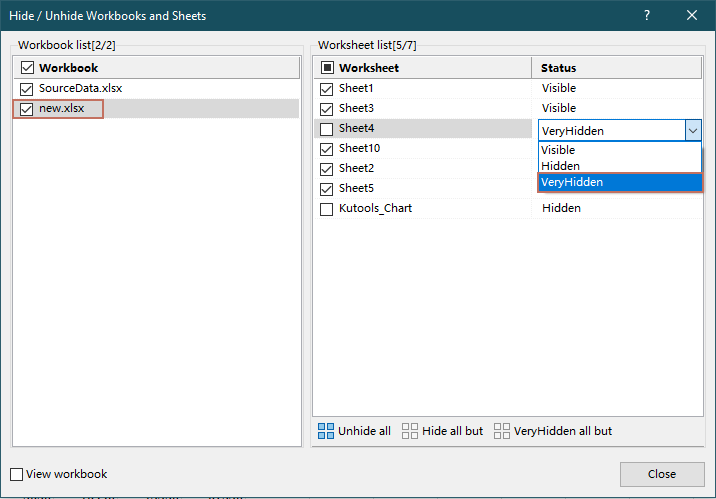
If you want to prevent casual users from viewing certain sheets—without writing VBA—you can use Kutools for Excel's Hide / Unhide Workbooks and Sheets feature to set sheets to VeryHidden in one go. A VeryHidden sheet cannot be unhidden from Excel's UI; it can only be shown again via VBA or this Kutools dialog.
Kutools for Excel - Packed with over 300 essential tools for Excel. Make Excel tasks faster, easier, and more efficient. Download now!
After installing Kutools for Excel, do as follows to easily make sheets very hide.
- Open the workbook(s) that contain the sheets you want to hide.
- Go to Kutools > View > Hide / Unhide Workbooks and Sheets.
- The left pane (Workbook list) lists all opened workbooks. Tick the workbook(s) you want to manage.
- In the right pane (Worksheet list), select the target sheet and choose VeryHidden from the Status column's drop-down.
This method complements the VBA approach in the article and is ideal when you need to hide many sheets across one or multiple workbooks quickly with a clean, point-and-click interface.
Kutools for Excel - Supercharge Excel with over 300 essential tools, making your work faster and easier, and take advantage of AI features for smarter data processing and productivity. Get It Now
Other Built-in Excel Methods - Set password to open workbook
For maximum protection—to ensure nobody can view any part of the workbook, including all worksheets and data—set a password required to open the entire file. This is the only built-in method that prevents viewing content regardless of user knowledge or skill level.
Applicable Scenario: When the entire workbook contains sensitive or confidential data, and you want to prevent all unauthorized viewing, not just specific sheets. Ideal for files shared via email, cloud, or portable drive.
Advantages: Unbreakable from within Excel’s interface, as unauthorized users cannot open the workbook at all without the password. Applies to all worksheet and workbook data.
Disadvantages: If you forget the password, you will lose access to your entire file. This method might not be convenient for collaborative workbooks where frequent edits are made by multiple users.
Specific steps:
- Click File > Info > Protect Workbook > Encrypt with Password.
- In the pop-up dialog, enter a password to encrypt the file, and click OK. You will be asked to confirm the password by re-entering it.
- Save the workbook. Now, every time the file is opened, Excel will prompt for the password before displaying any content.
Precautions:
- Be very careful never to forget or lose your password. There is no official way to recover a forgotten open password in Excel.
- This method is the most effective for completely blocking viewing by unauthorized users.
Troubleshooting: If your file is not prompting for a password after saving, re-open the file and verify that the password was correctly set. If you need to remove the password protection, return to the encryption dialog, erase the password, and save the file again.
Related articles:
- How to use drop down list in a protected worksheet in Excel?
- How to lock specified cells without protecting the whole worksheet in Excel?
- How to hide formula but display the result without protecting worksheet in Excel?
Best Office Productivity Tools
Supercharge Your Excel Skills with Kutools for Excel, and Experience Efficiency Like Never Before. Kutools for Excel Offers Over 300 Advanced Features to Boost Productivity and Save Time. Click Here to Get The Feature You Need The Most...
Office Tab Brings Tabbed interface to Office, and Make Your Work Much Easier
- Enable tabbed editing and reading in Word, Excel, PowerPoint, Publisher, Access, Visio and Project.
- Open and create multiple documents in new tabs of the same window, rather than in new windows.
- Increases your productivity by 50%, and reduces hundreds of mouse clicks for you every day!
All Kutools add-ins. One installer
Kutools for Office suite bundles add-ins for Excel, Word, Outlook & PowerPoint plus Office Tab Pro, which is ideal for teams working across Office apps.
- All-in-one suite — Excel, Word, Outlook & PowerPoint add-ins + Office Tab Pro
- One installer, one license — set up in minutes (MSI-ready)
- Works better together — streamlined productivity across Office apps
- 30-day full-featured trial — no registration, no credit card
- Best value — save vs buying individual add-in