How to split an Excel sheet into multiple sheets automatically?
When a large Excel worksheet contains records for different departments, customers, regions, or other categories, manually filtering, copying, and creating separate sheets can be time-consuming and error-prone.
This guide shows how to split one Excel sheet into multiple sheets automatically using VBA, FILTER, PivotTable, or Kutools for Excel, including options for splitting by unique values or fixed rows and saving the results as separate files.

Split one Excel sheet into multiple sheets
- Automatically create separate sheets with VBA
- Quickly split data without VBA using Kutools
- Create automatically updating sheets with FILTER
- Create separate PivotTable report sheets
Optional: Export the split worksheets as separate files
Video: Split one Excel sheet into multiple sheets
Plan your worksheet split
Start by identifying how the data should be divided and whether you need ordinary worksheets, automatically updating results, summary reports, or separate files.
Choose the split and result you need
Before selecting a method, decide how the source data should be divided and what type of result you want to create.
How should the data be divided?
- By unique values in a column: Create one worksheet for each department, customer, region, salesperson, status, or other category. Use VBA or the faster no-code Kutools method .
- By a fixed number of rows: Divide a large list into batches of 100, 1,000, or another specified number of rows. See the fixed-row Kutools method .
What type of result do you need?
- Ordinary independent worksheets: Create normal copies of the matching records with VBA or Kutools .
- Automatically updating worksheets: Keep the displayed records linked to the master table with FILTER .
- Separate summary reports: Create one summarized report for each category with PivotTable .
Compare the available splitting methods
The methods below differ mainly in ease of use, output type, and whether the results update when the source data changes.
| Method | Best for | Creates sheets automatically | Updates automatically | Ease of use |
|---|---|---|---|---|
| VBA | Customized splitting rules and automation | Yes | No; rerun the macro | ●Advanced |
| Kutools for Excel | Fast no-code splitting by unique values or fixed rows | Yes | No; run the feature again | ●Very easy |
| FILTER | Live results linked to the master table | No; prepare the sheets first | Yes | ●Moderate |
| PivotTable | Separate summarized reports | Yes | Refresh required | ●Moderate |
Split one Excel sheet into multiple sheets
After deciding what type of split you need, use one of the following methods to create the destination worksheets. VBA and Kutools create ordinary copied worksheets, FILTER creates live formula results, and PivotTable creates separate summarized report sheets.
Automatically create separate sheets with VBA
A VBA macro can read the unique values in a selected column, create a worksheet for each value, filter the source data, and copy the corresponding rows into the new worksheet. This is a flexible solution when you are comfortable using macros or need to customize the process.
Example: Create one sheet for each department
Suppose a master worksheet contains records for several departments, with Sales, Finance, and Support repeated in the Department column. The macro identifies each unique department, creates a worksheet named after it, and copies the corresponding records together with the header row.
Result:
- Sales – contains all Sales records
- Finance – contains all Finance records
- Support – contains all Support records
Step 1: Open the VBA editor
Press Alt + F11 to open the Microsoft Visual Basic for Applications window.
Step 2: Insert a module
Click Insert > Module, then paste the following macro into the module window. When run, the macro asks you to select the complete source range and the header of the column to split by, then creates one worksheet for each unique nonblank value while safely handling duplicate, invalid, or overly long worksheet names.
Option Explicit
'Updated by ExtendOffice 2026/8/5

Sub SplitSheetIntoMultipleSheets()

    Dim sourceRange As Range
    Dim splitHeader As Range
    Dim sourceSheet As Worksheet
    Dim targetSheet As Worksheet
    Dim sheetNames As Object
    Dim nextRows As Object
    Dim splitField As Long
    Dim rowIndex As Long
    Dim columnIndex As Long
    Dim splitValue As String
    Dim targetName As String

    On Error Resume Next
    Set sourceRange = Application.InputBox( _
        "Select the complete data range, including headers.", _
        "Select Data Range", Type:=8)
    On Error GoTo 0

    If sourceRange Is Nothing Then Exit Sub

    If sourceRange.Areas.Count > 1 Or sourceRange.Rows.Count < 2 Then
        MsgBox "Please select one continuous data range.", vbExclamation
        Exit Sub
    End If

    Set sourceSheet = sourceRange.Worksheet

    On Error Resume Next
    Set splitHeader = Application.InputBox( _
        "Select the header cell of the column to split by.", _
        "Select Split Column", Type:=8)
    On Error GoTo 0

    If splitHeader Is Nothing Then Exit Sub
    Set splitHeader = splitHeader.Cells(1, 1)

    If Not splitHeader.Worksheet Is sourceSheet Then
        MsgBox "The header must be on the source worksheet.", vbExclamation
        Exit Sub
    End If

    If Intersect(splitHeader, sourceRange.Rows(1)) Is Nothing Then
        MsgBox "Please select a header cell in the first row.", vbExclamation
        Exit Sub
    End If

    splitField = splitHeader.Column - sourceRange.Column + 1

    Set sheetNames = CreateObject("Scripting.Dictionary")
    Set nextRows = CreateObject("Scripting.Dictionary")

    sheetNames.CompareMode = vbTextCompare
    nextRows.CompareMode = vbTextCompare

    Application.ScreenUpdating = False
    On Error GoTo HandleError

    For rowIndex = 2 To sourceRange.Rows.Count

        If Not IsError(sourceRange.Cells(rowIndex, splitField).Value) Then

            splitValue = Trim$(CStr( _
                sourceRange.Cells(rowIndex, splitField).Value))

            If Len(splitValue) > 0 Then

                If Not sheetNames.Exists(splitValue) Then

                    targetName = GetAvailableSheetName( _
                        splitValue, sourceSheet.Parent)

                    Set targetSheet = _
                        sourceSheet.Parent.Worksheets.Add( _
                        After:=sourceSheet.Parent.Worksheets( _
                            sourceSheet.Parent.Worksheets.Count))

                    targetSheet.Name = targetName

                    sourceRange.Rows(1).Copy _
                        Destination:=targetSheet.Range("A1")

                    For columnIndex = 1 To sourceRange.Columns.Count
                        targetSheet.Columns(columnIndex).ColumnWidth = _
                            sourceRange.Columns(columnIndex).ColumnWidth
                    Next columnIndex

                    sheetNames.Add splitValue, targetName
                    nextRows.Add splitValue, 2

                End If

                Set targetSheet = sourceSheet.Parent.Worksheets( _
                    CStr(sheetNames(splitValue)))

                sourceRange.Rows(rowIndex).Copy _
                    Destination:=targetSheet.Cells( _
                        CLng(nextRows(splitValue)), 1)

                nextRows(splitValue) = _
                    CLng(nextRows(splitValue)) + 1

            End If

        End If

    Next rowIndex

    Application.CutCopyMode = False
    Application.ScreenUpdating = True

    MsgBox sheetNames.Count & _
        " worksheet(s) were created.", _
        vbInformation, "Split Complete"

    Exit Sub

HandleError:

    Application.CutCopyMode = False
    Application.ScreenUpdating = True

    MsgBox "The worksheet could not be split." & vbCrLf & _
        Err.Description, vbExclamation, "Split Failed"

End Sub

Private Function GetAvailableSheetName( _
    ByVal value As String, _
    ByVal targetBook As Workbook) As String

    Dim invalidCharacter As Variant
    Dim baseName As String
    Dim candidateName As String
    Dim suffix As String
    Dim number As Long

    baseName = Trim$(value)

    For Each invalidCharacter In Array("\", "/", ":", "*", "?", "[", "]")
        baseName = Replace(baseName, invalidCharacter, "_")
    Next invalidCharacter

    baseName = Replace(baseName, "'", "")

    If Len(baseName) = 0 Then baseName = "Blank"

    baseName = Left$(baseName, 31)
    candidateName = baseName
    number = 1

    Do While WorksheetExists(candidateName, targetBook)

        number = number + 1
        suffix = " (" & number & ")"

        candidateName = _
            Left$(baseName, 31 - Len(suffix)) & suffix

    Loop

    GetAvailableSheetName = candidateName

End Function

Private Function WorksheetExists( _
    ByVal sheetName As String, _
    ByVal targetBook As Workbook) As Boolean

    Dim testSheet As Worksheet

    On Error Resume Next
    Set testSheet = targetBook.Worksheets(sheetName)
    On Error GoTo 0

    WorksheetExists = Not testSheet Is Nothing

End Function
✏️ What this macro does:
- Creates one worksheet for each unique nonblank value in the selected split column.
- Copies the header row and all matching records to each new worksheet.
- Replaces invalid worksheet-name characters such as \ / : * ? [ ] with underscores.
- Shortens worksheet names that exceed 31 characters.
- Adds a numbered suffix such as (2) if a worksheet with the same name already exists.
- Skips rows with blank values in the selected split column.
Step 3: Run the macro
- Run the macro using either of the following methods:
- Place the cursor inside the main macro and press F5.
- Close the VBA editor, press Alt + F8, select SplitSheetIntoMultipleSheets, and click Run.
- When prompted, select the complete source range, including the header row, and click OK.
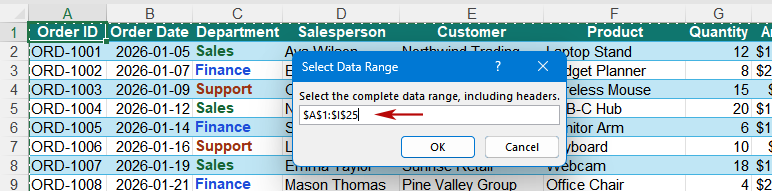
- In the second prompt, select the header cell of the column you want to split by, such as Department, and click OK.
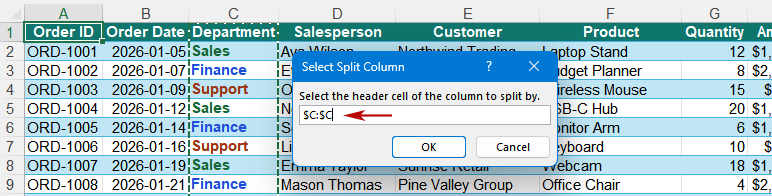
Result:
Records with the same department are copied to the same worksheet. Each new worksheet includes the header row, the original cell formatting, and the source column widths.
Advantages and limitations of VBA
VBA offers powerful automation and customization, but it requires coding knowledge and is less suitable for users who prefer a simple, no-code solution.
- Creates multiple worksheets automatically.
- Supports customized splitting rules.
- Can automate sheet names and file exports.
- Works with many desktop versions of Excel.
- Requires basic VBA knowledge.
- Can be difficult for general Excel users.
- May be blocked by macro security settings.
- Creates static sheets that do not auto-update.
Quickly split data without VBA using Kutools
Compared with VBA, which requires inserting code, enabling macros, and running the macro manually, Kutools for Excel provides a much faster and easier way to split a worksheet. Simply select the data, choose the split settings, and create all the required worksheets in a few clicks.
The Split Data feature can create separate worksheets based on unique values in a column or divide a large range by a fixed number of rows. You can also repeat one or more header rows, generate worksheet names automatically, add a custom prefix or suffix, and place the resulting worksheets in either the current workbook or a new workbook.
- Split data by unique values in a column with Kutools – create separate Sales, Finance, and Support worksheets based on the Department column.
- Split data by a fixed number of rows with Kutools – divide the 24 data rows in the example workbook into three worksheets containing 8 rows each.
Split data by unique values in a column with Kutools
Using the same example as the VBA method, the Master Data worksheet contains Sales, Finance, and Support records in the Department column. With Kutools, you can create one worksheet for each department in just a few clicks, while also controlling the worksheet names, repeated header rows, and destination workbook.
Step 1: Select the data and open Split Data
- Select the complete data range, including the header row.
- Go to Kutools Plus > Worksheet > Split Data.
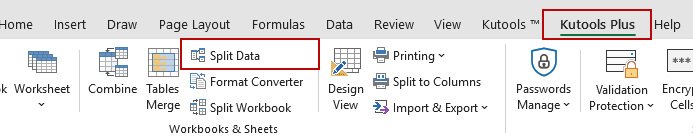
Step 2: Configure the split settings
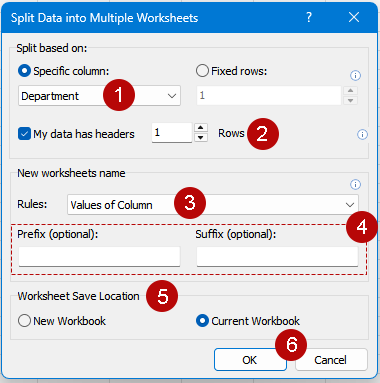
In the Split Data into Multiple Worksheets dialog box, configure the following options:
- Select Specific column, and choose Department as the column to split by.
- Select My data has headers, and specify 1 header row to repeat on each new worksheet.
- Choose Values of Column so the department values are used as worksheet names.
- Optionally, add a prefix or suffix to the worksheet names.
- Choose whether to create the new worksheets in the current workbook or a new workbook.
- Click OK.
Result:
Kutools creates three worksheets named Sales, Finance, and Support. Each worksheet contains the matching department records together with the repeated header row.
Split data by a fixed number of rows with Kutools
For this example, use a different Master Data worksheet that contains 25 order records. Instead of splitting by category, the goal is to divide the list into smaller worksheets containing a fixed number of rows. This is useful when you want to split a large export into smaller batches for review, sharing, or upload.
Step 1: Select the data and open Split Data
- Select the complete data range, including the header row.
- Go to Kutools Plus > Worksheet > Split Data.
Step 2: Configure the split settings
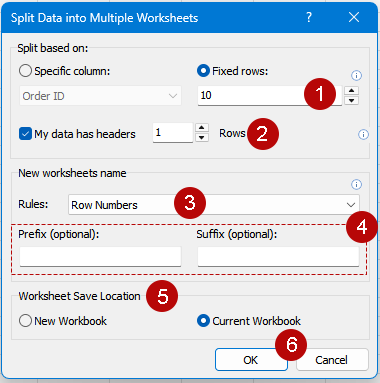
In the Split Data into Multiple Worksheets dialog box, configure the following options:
- Select Fixed rows. And enter 10 as the number of data rows to place on each worksheet.
- Select My data has headers, and specify 1 header row to repeat on each new worksheet.
- Select Row Numbers as the worksheet naming rule so each worksheet name indicates the source rows it contains.
- Optionally, add a prefix or suffix to make the worksheet names easier to identify.
- Choose whether to create the new worksheets in the current workbook or a new workbook.
- Click OK.
Result:
Kutools creates three worksheets from the 25-row list. The first two worksheets contain 10 data rows each, and the last worksheet contains the remaining 5 rows. The header row is repeated automatically on every new worksheet.
- Splits a worksheet into multiple sheets in just a few clicks
- Works by unique values in a column or a fixed number of rows
- Requires no VBA code, formulas, or macro-enabled workbook
- Repeats one or more header rows on every new worksheet
- Supports custom prefixes, suffixes, and automatic worksheet names
- Creates the results in the current workbook or a new workbook
Create automatically updating sheets with FILTER
VBA and Kutools create separate copies of the source records. The FILTER function works differently: it keeps prepared destination worksheets linked to the master table, so their displayed records update automatically when the source data changes.
Example: Keep department sheets linked to the master data
Using the same example as the previous methods, the Master Data worksheet contains Sales, Finance, and Support records in the Department column. With FILTER, each department worksheet displays only its matching records and updates when the master table changes.
Step 1: Prepare the master table
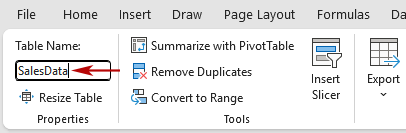
- Click any cell in the source data and check whether the Table Design tab appears.
- If the Table Design tab does not appear, press Ctrl + T, select My table has headers, and click OK.
- On the Table Design tab, set the table name to SalesData.
Step 2: Create the first department worksheet
- Create a new worksheet and name it Sales.
- Enter Sales in cell B1.
- In cell A3, enter the following formula to display the table headers:
=SalesData[#Headers]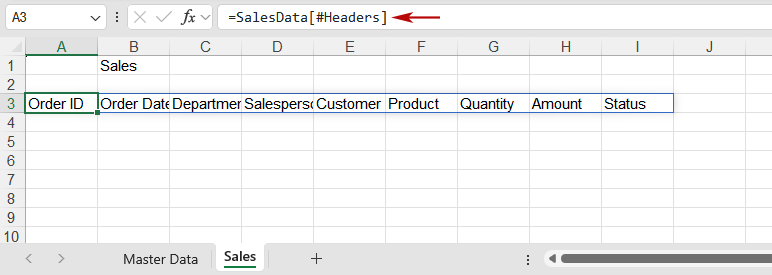
- In cell A4, enter the FILTER formula:
=FILTER(SalesData,SalesData[Department]=$B$1,"No records")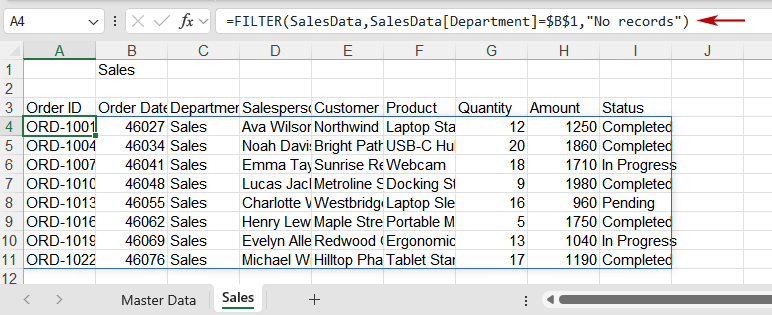
The formula in A3 displays the header row from the SalesData table. The FILTER formula in A4 then returns every row where the value in the Department column matches Sales in cell B1. If the value in B1 is changed, the displayed records update to match the new department.
Step 3: Create the remaining department worksheets
Because all department worksheets use the same formulas, copy the completed Sales worksheet instead of creating each one from scratch.
- Right-click the Sales worksheet tab, select Move or Copy, select Create a copy, and click OK.
- Rename the copied worksheet Finance, and change cell B1 to Finance.
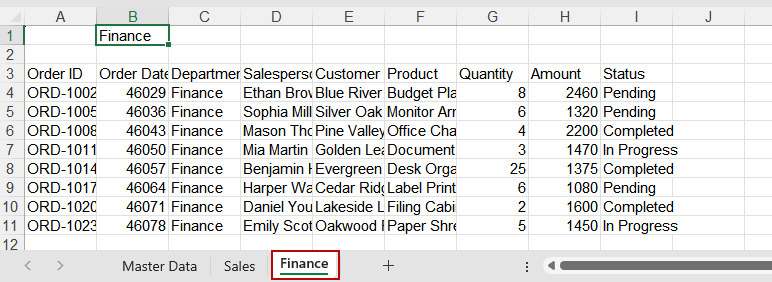
- Copy the Sales worksheet again, rename the copy Support, and change cell B1 to Support.
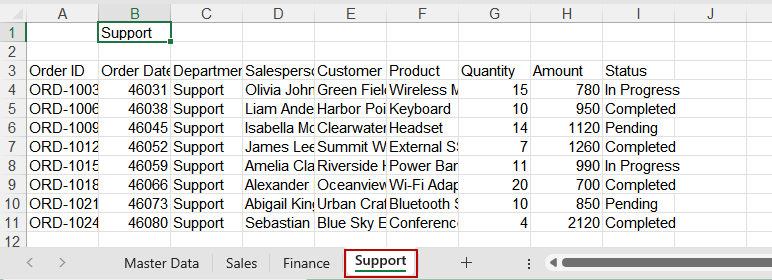
The header and FILTER formulas remain unchanged on all three worksheets. Only the department name in cell B1 needs to be changed, and the results update automatically.
Result:
Each department worksheet displays only the records that match the value entered in cell B1. Because the FILTER formulas remain linked to the SalesData table, the displayed results update automatically whenever source records are added, edited, or deleted.
Advantages and limitations of FILTER
FILTER is useful when the split results need to remain connected to the master table, but it requires the destination worksheets to be prepared manually.
- Updates automatically when the source data changes.
- Requires no VBA or macros.
- Returns all matching rows dynamically without copying the source data.
- Cannot create worksheet tabs automatically.
- Requires manually prepared destination sheets.
- Needs an empty spill range.
- Does not copy source formatting or column widths.
Create separate PivotTable report sheets
If you need a separate summarized report for each department, region, salesperson, or other category, use the PivotTable Show Report Filter Pages command. It automatically creates one worksheet for each item in a selected report filter.
Unlike VBA or Kutools, this method does not copy every original record into ordinary ranges. Each new worksheet contains a PivotTable designed for summarized reporting and analysis.
Example: Create one summary report for each department
Using the same Master Data example, create separate PivotTable reports for Sales, Finance, and Support. Each worksheet will show a summary filtered to one department.
Step 1: Create the PivotTable
- Select any cell in the source data.
- Go to Insert > PivotTable.
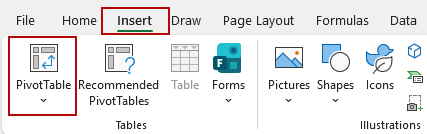
- Confirm the source table or range, select New Worksheet, and click OK.
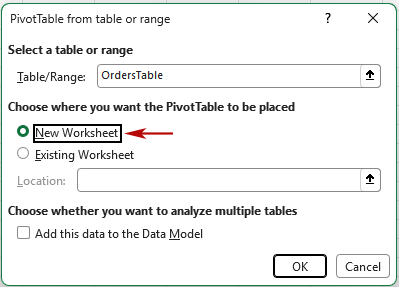
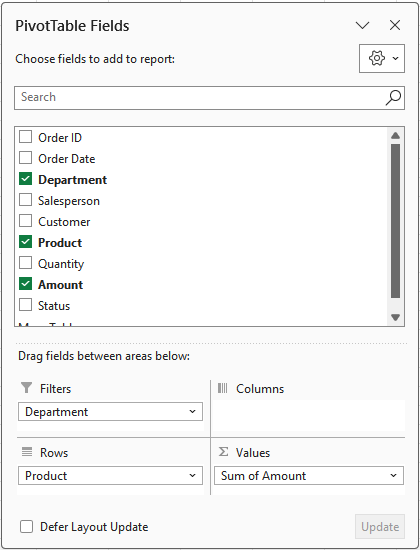
- In the PivotTable Fields pane, drag Department to the Filters area.
- Add the fields you want to summarize:
- Drag fields such as Salesperson or Product to Rows.
- Drag fields such as Amount or Quantity to Values.
Step 2: Create the separate report sheets
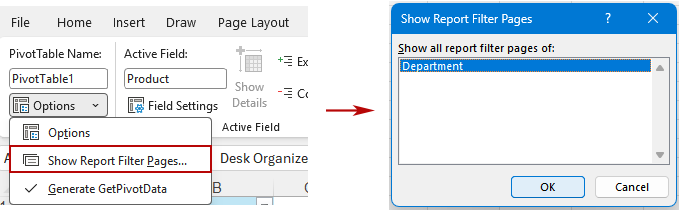
- Click anywhere inside the PivotTable.
- Go to the PivotTable Analyze tab.
- Open the Options menu and select Show Report Filter Pages.
- Select Department in the dialog box.
- Click OK.
Result:
Excel creates three new worksheets named Sales, Finance, and Support. Each worksheet contains the same PivotTable layout, but its report filter is set to a different department, so the displayed totals and summaries show only that department’s data. These sheets are PivotTable reports rather than ordinary copies of the original rows.
- When the source data changes, go to Data > Refresh All to update the existing PivotTables.
- If a new department is added, refresh the PivotTable and run Show Report Filter Pages again to create a report sheet for it.
- Use an Excel Table as the PivotTable source so newly added rows are included when the reports are refreshed.
Advantages and limitations of PivotTable
This method is useful for creating separate summary reports, but it does not produce ordinary copies of the source records.
- Creates separate summary sheets automatically.
- Requires no VBA or additional tools.
- Supports flexible grouping and calculations.
- Can be refreshed when the source data changes.
- Creates PivotTables instead of ordinary data ranges.
- Does not reproduce every source row and format.
- Requires manual refreshing after source changes.
- New categories require running the command again.
Optional: Export the split worksheets as separate files
After splitting the source data into multiple worksheets, you may also need to save each worksheet as a separate Excel, CSV, TXT, or PDF file for sharing, uploading, or distribution.
For one or two worksheets, right-click a worksheet tab, select Move or Copy, choose (new book), and save the new workbook manually.
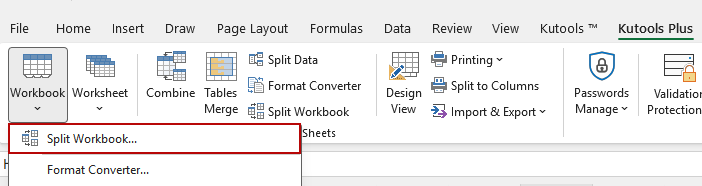
For many worksheets, Kutools for Excel’s Split Workbook feature can export selected worksheets as separate files in one operation:
- Open the workbook containing the split worksheets.
- Go to Kutools Plus > Workbook > Split Workbook.
- Select the worksheets you want to export.
- Choose an output format, such as Excel, CSV, TXT, or PDF.
- Click Split, and select the destination folder.
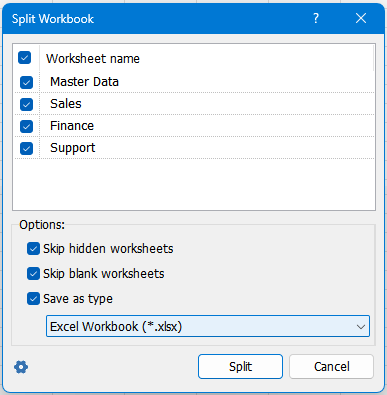
Result: Each selected worksheet is saved as a separate file in the chosen folder.
For complete instructions, see how to split a workbook into separate Excel, CSV, TXT, or PDF files.
Fix common worksheet-splitting issues
If the split results are incomplete or unexpected, check the source data and the selected method before running the process again.
The header row is missing
Make sure the header row is included in the selected source range. In Kutools, select My data has headers and specify the number of header rows. With FILTER, use the following formula above the filtered results:
=SalesData[#Headers]Some worksheet names are invalid or duplicated
Worksheet names cannot exceed 31 characters or contain \ / : * ? [ ]. Two worksheets also cannot have the same name, even when the capitalization is different.
Clean the category values before splitting, or use a method that automatically shortens, replaces, or adjusts invalid names.
Rows with blank category values are missing
Decide how blank values should be handled before splitting. You can replace them with a label such as Unassigned, exclude those rows, or use a method that places them in a separate worksheet.
The split worksheets do not update
Worksheets created with VBA or Kutools are static copies. Run the splitting process again after the source data changes.
Use FILTER when the displayed records need to update automatically, or refresh PivotTable reports after source changes.
The split creates too many worksheets
Check the number of unique values in the split column first. Avoid fields such as Order ID when almost every row contains a different value.
For a large number of categories, consider using FILTER with a category selector, a PivotTable with filters, or broader category groups.
Large datasets take too long to split
Use one continuous data range with a clear header row, avoid merged cells, and remove unnecessary formatting. When appropriate, divide very large lists into fixed-size batches instead of creating a worksheet for every unique value.
Frequently asked questions
Can Excel split one sheet into multiple sheets without VBA?
Yes. Kutools for Excel creates ordinary split worksheets without code. FILTER creates dynamic results on worksheets prepared in advance.
How do I create one sheet for each unique value?
Use the VBA method or select Specific column in Kutools Split Data . Each unique value in the selected column is used to create a separate worksheet.
How do I split a worksheet every 100 or 1,000 rows?
Select Fixed rows in Kutools Split Data , and enter the required number of rows. The final worksheet contains any remaining records.
Can I split data based on multiple columns?
Create a helper column that combines the required values, and then split by that column. For example, to combine Region in C2 and Status in D2, use:
=C2&" - "&D2The resulting categories may be named East - Pending, East - Completed, and so on.
Can the split worksheets update automatically?
Ordinary worksheets created by copying records do not update automatically. Run VBA or Kutools again after the source changes.
For live results, use FILTER formulas linked to an Excel Table.
Can I keep the same header row on every worksheet?
Yes. Include the header in the selected VBA range, select My data has headers in Kutools, or use =SalesData[#Headers] with FILTER.
How do I save each split worksheet as a separate file?
For one or two worksheets, use Excel’s Move or Copy command. For many worksheets, use Kutools Split Workbook to export them as separate Excel, CSV, TXT, or PDF files.
Conclusion
The best way to split an Excel sheet depends on the type of result you need. Use VBA for code-based automation, FILTER for dynamically updating results, and PivotTable for separate summary reports.
For most users who need ordinary worksheets created by unique values or a fixed number of rows, Kutools for Excel provides the quickest and simplest option. It creates and names the worksheets in a few clicks, supports repeated header rows and custom prefixes or suffixes, and can place the results in either the current workbook or a new workbook.
If the worksheets need to be distributed separately, you can also export them as individual Excel, CSV, TXT, or PDF files.
Best Office Productivity Tools
Supercharge Your Excel Skills with Kutools for Excel, and Experience Efficiency Like Never Before. Kutools for Excel Offers Over 300 Advanced Features to Boost Productivity and Save Time. Click Here to Get The Feature You Need The Most...
Office Tab Brings Tabbed interface to Office, and Make Your Work Much Easier
- Enable tabbed editing and reading in Word, Excel, PowerPoint, Publisher, Access, Visio and Project.
- Open and create multiple documents in new tabs of the same window, rather than in new windows.
- Increases your productivity by 50%, and reduces hundreds of mouse clicks for you every day!
All Kutools add-ins. One installer
Kutools for Office suite bundles add-ins for Excel, Word, Outlook & PowerPoint plus Office Tab Pro, which is ideal for teams working across Office apps.





- All-in-one suite — Excel, Word, Outlook & PowerPoint add-ins + Office Tab Pro
- One installer, one license — set up in minutes (MSI-ready)
- Works better together — streamlined productivity across Office apps
- 30-day full-featured trial — no registration, no credit card
- Best value — save vs buying individual add-in
Table of Contents
- Watch the Video
- Plan your worksheet split
- Choose how you want to split the Excel sheet
- Compare the available splitting methods
- Split one Excel sheet into multiple sheets
- Automatically create separate sheets with VBA
- Quickly split data without VBA using Kutools
- Create automatically updating sheets with FILTER
- Create separate PivotTable report sheets
- Optional: Export the split worksheets as separate files
- Fix common worksheet-splitting issues
- Frequently asked questions
- Conclusion
- The Best Office Productivity Tools
Kutools for Excel
Brings 300+ advanced features to Excel
- 🧩 Overview
- 📥 Free Download
- 🎁 30-Day Free Trial available