How to show missing subject column in Outlook?
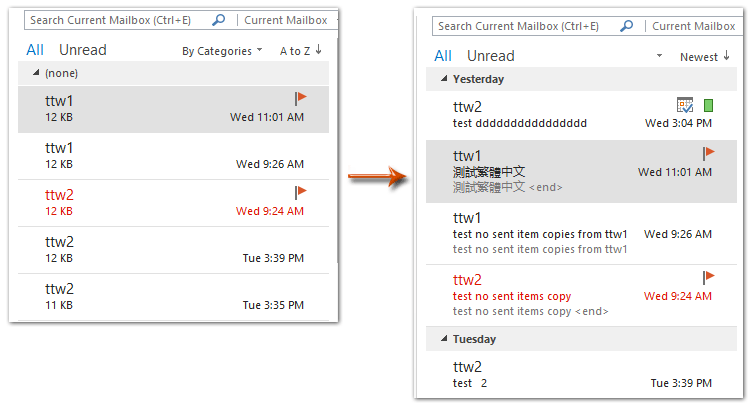
When you are viewing emails in the Compact view in Microsoft Outlook, it will show the subjects in the mail list automatically. However, the subjects disappear in some cases. See screen shot below. Here we will guide you step by step to add and show missing subject column in the mail list in Outlook easily.
- Enhance your email productivity with AI technology, enabling you to quickly reply to emails, draft new ones, translate messages, and more efficiently.
- Automate emailing with Auto CC/BCC, Auto Forward by rules; send Auto Reply (Out of Office) without requiring an exchange server...
- Get reminders like BCC Warning when replying to all while you're in the BCC list, and Remind When Missing Attachments for forgotten attachments...
- Improve email efficiency with Reply (All) With Attachments, Auto Add Greeting or Date & Time into Signature or Subject, Reply Multiple Emails...
- Streamline emailing with Recall Emails, Attachment Tools (Compress All, Auto Save All...), Remove Duplicates, and Quick Report...
To restore and show the subject column in the mail list in Microsoft Outlook, please do as following:
Step 1: Shift to the Mail view, and open the mail folder in which the subject column is missing.
Step 2: Make sure the mail folder shows in the Compact view. If not:
- Click the Change View > Compact on the View tab in Outlook 2010 and 2013;
- Click the View > Current View > Messages in Outlook 2007.
Step 3: Click the View Settings button on the View tab. See screen shot:

Note: If you are using Microsoft Outlook 2007, please click the View > Current View > Customize Current View.
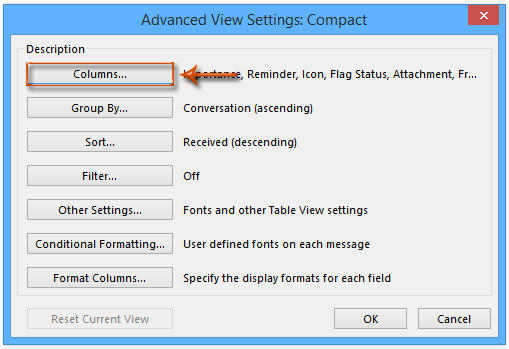
Step 4: In the popping up dialog box, please click the Columns button (or Fields button).
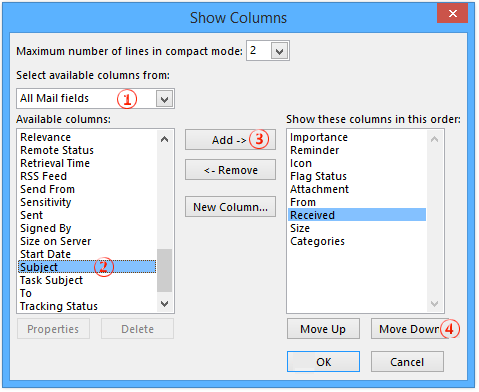
Step 5: Then the Show Columns dialog box comes out, and:
- Click the Select available columns from box, and select the All Mail fields from the drop down list;
- Click to highlight the Subject in the Available columns box;
- Click the Add button.
- In the Show these columns in this order box , Move the Subject item up to the Size item with clicking to highlight the Subject item, and then clicking the Move Up button repeatedly.
- Click the OK button.
Step 6: Then click the OK button to exit the Advanced View Settings dialog box.
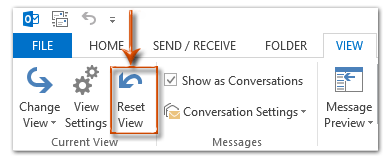
Note: Apart from adding the subject columns with view settings, you can easily click the Reset View button on the View tab in Outlook 2010 and 2013 to restore the initial folder view, so that you can get the Subject column. Click to know more about restoring view.
Please note that this Reset View method will clear all special view settings you specified for this folder too.
 Related Articles:
How to show subject above/below sender in mail list in Outlook?
How to change subjects’ font size in mail list of Outlook?
Best Office Productivity Tools
Experience the all-new Kutools for Outlook with 100+ incredible features! Click to download now!
📧 Email Automation: Auto Reply (Available for POP and IMAP) / Schedule Send Emails / Auto CC/BCC by Rules When Sending Email / Auto Forward (Advanced Rules) / Auto Add Greeting / Automatically Split Multi-Recipient Emails into Individual Messages ...
📨 Email Management: Recall Emails / Block Scam Emails by Subjects and Others / Delete Duplicate Emails / Advanced Search / Consolidate Folders ...
📁 Attachments Pro: Batch Save / Batch Detach / Batch Compress / Auto Save / Auto Detach / Auto Compress ...
🌟 Interface Magic: 😊More Pretty and Cool Emojis / Remind you when important emails come / Minimize Outlook Instead of Closing ...
👍 One-click Wonders: Reply All with Attachments / Anti-Phishing Emails / 🕘Show Sender's Time Zone ...
👩🏼🤝👩🏻 Contacts & Calendar: Batch Add Contacts From Selected Emails / Split a Contact Group to Individual Groups / Remove Birthday Reminders ...
Use Kutools in your preferred language – supports English, Spanish, German, French, Chinese, and 40+ others!


🚀 One-Click Download — Get All Office Add-ins
Strongly Recommended: Kutools for Office (5-in-1)
One click to download five installers at once — Kutools for Excel, Outlook, Word, PowerPoint and Office Tab Pro. Click to download now!
- ✅ One-click convenience: Download all five setup packages in a single action.
- 🚀 Ready for any Office task: Install the add-ins you need, when you need them.
- 🧰 Included: Kutools for Excel / Kutools for Outlook / Kutools for Word / Office Tab Pro / Kutools for PowerPoint