How to hide/turn off message preview in Outlook?
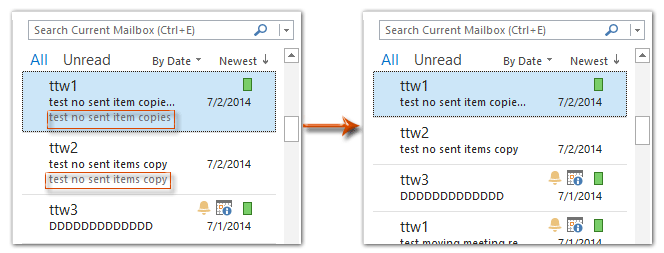
In Microsoft Outlook, each email message in your inbox and other mail folders often displays a line or two of the email's content beneath the subject. This feature, known as message preview, allows users to get a quick glimpse of email contents directly from the message list. While message preview can help you gauge the importance of emails at a glance, it also takes up additional screen space and can clutter the mail list, especially if you receive a high volume of emails. For users who prefer a more streamlined view or want to maximize how many messages are visible at once, disabling or hiding the message preview is a practical solution.
Turn off message preview in mail list in Outlook 2013 and later versions
Turn off message preview in mail list in Outlook 2007 and 2010
- Enhance your email productivity with AI technology, enabling you to quickly reply to emails, draft new ones, translate messages, and more efficiently.
- Automate emailing with Auto CC/BCC, Auto Forward by rules; send Auto Reply (Out of Office) without requiring an exchange server...
- Get reminders like BCC Warning when replying to all while you're in the BCC list, and Remind When Missing Attachments for forgotten attachments...
- Improve email efficiency with Reply (All) With Attachments, Auto Add Greeting or Date & Time into Signature or Subject, Reply Multiple Emails...
- Streamline emailing with Recall Emails, Attachment Tools (Compress All, Auto Save All...), Remove Duplicates, and Quick Report...
Turn off message preview in mail list in Outlook 2013 and later versions
Outlook 2013 and later versions introduced enhanced message preview options, allowing users to display up to three lines of preview text for each email in the message list. However, if you find this function unnecessary or feel it limits the number of emails visible without scrolling, you can easily turn it off either for a specific folder or for all mail folders at once.
Start by switching to the Mail view. Once in Mail view, select the folder where you want to hide the message preview (for example, your Inbox or Sent Items). Be aware that changing the message preview setting can either apply only to your current folder or across all mailboxes, depending on your selection in the final step.
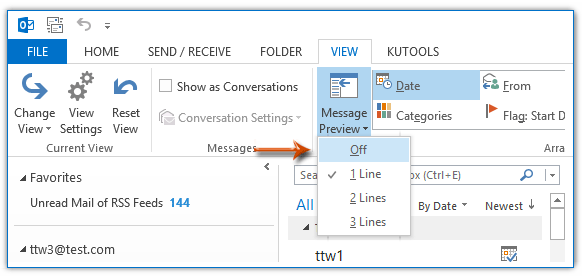
On the View tab in the ribbon, locate the Message Preview button. Click it and choose Off from the drop-down menu. This will prevent any preview text from showing beneath the subject line in the message list, leaving only the sender and subject visible for a tidier view.
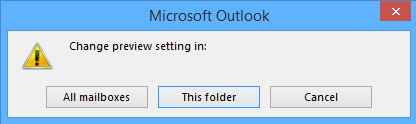
A prompt will appear, asking you to specify whether you want this change to apply to All mailboxes or just This folder. If you often switch between folders and want a consistent look, select "All mailboxes." If you prefer finer control and only want to modify one folder, select "This folder."
Once confirmed, all message previews for the chosen scope will be hidden, and your mail list will display only the essentials, enhancing the overall visibility and making your navigation more efficient. Please note that these settings can be changed back at any time if you decide to re-enable message previews.
In daily use, hiding message previews can help improve privacy, especially if you often keep Outlook open when sharing your screen. Additionally, it allows you to see more emails per page, which can be beneficial for users managing large volumes of communication. However, the trade-off is that you may need to open more messages individually to determine their content.
If you do not see the Message Preview option in the View tab, ensure you are using Outlook 2013 or later, as earlier versions use a different interface and steps. Occasionally, Outlook’s ribbon can be customized, so if you’ve modified tab layouts, the Message Preview button may be hidden; resetting the View tab can resolve this.
Turn off message preview in mail list in Outlook 2007 and 2010
Earlier Outlook versions, including 2007 and 2010, use a feature called AutoPreview to display lines of incoming message content. Sometimes, users turn on AutoPreview by mistake or may wish to remove clutter from their email list for improved focus or aesthetics. Outlook 2007 and 2010 have a slightly different method for hiding these previews compared to Outlook 2013, but users can customize the display to suit their personal workflow just as easily.
To start, switch to the Mail view, then open the specific email folder where you want the message previews hidden. This operation will apply only to the selected folder, so you'll need to repeat these steps for other folders if desired.
In Outlook 2010, click the View Settings button located on the View tab. For Outlook 2007, go to the View menu, point to Current View, and select Customize Current View. These options lead you to advanced configuration settings for your mail list display.
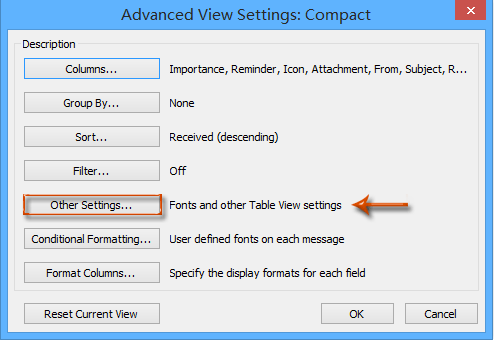
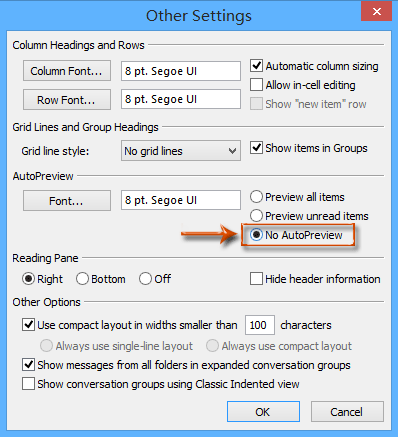
Within the Advanced View Settings dialog box that appears, click on the Other Settings button. This allows you to access further display customizations, including how previews are shown in your email list.
In the Other Settings dialog, look for the No AutoPreview option. Check this to disable the preview lines in the folder. Click OK to confirm and close the dialog box. Make sure not to accidentally select the "AutoPreview unread items" or "AutoPreview all items" options, as these will turn previews on rather than off.
Click OK again to exit the Advanced View Settings dialog box and apply your changes.
After completing these steps, message previews will be hidden in the mail list for the selected folder. This adjustment can help make your email list easier to scan, give you a cleaner and more organized feel, and reduce the risk of sensitive information showing accidentally. If you decide later that you prefer seeing message previews, you can repeat these steps and select the appropriate preview option to restore them.
Note: The display options in Outlook 2007 and 2010 are folder-specific. To hide message previews across multiple folders, you’ll need to perform the operation for each one individually. Also, if the interface options seem missing, verify you are using the correct folder type, as calendar or task folders will not have these message preview settings.
Best Office Productivity Tools
Experience the all-new Kutools for Outlook with 100+ incredible features! Click to download now!
📧 Email Automation: Auto Reply (Available for POP and IMAP) / Schedule Send Emails / Auto CC/BCC by Rules When Sending Email / Auto Forward (Advanced Rules) / Auto Add Greeting / Automatically Split Multi-Recipient Emails into Individual Messages ...
📨 Email Management: Recall Emails / Block Scam Emails by Subjects and Others / Delete Duplicate Emails / Advanced Search / Consolidate Folders ...
📁 Attachments Pro: Batch Save / Batch Detach / Batch Compress / Auto Save / Auto Detach / Auto Compress ...
🌟 Interface Magic: 😊More Pretty and Cool Emojis / Remind you when important emails come / Minimize Outlook Instead of Closing ...
👍 One-click Wonders: Reply All with Attachments / Anti-Phishing Emails / 🕘Show Sender's Time Zone ...
👩🏼🤝👩🏻 Contacts & Calendar: Batch Add Contacts From Selected Emails / Split a Contact Group to Individual Groups / Remove Birthday Reminders ...
Use Kutools in your preferred language – supports English, Spanish, German, French, Chinese, and 40+ others!


🚀 One-Click Download — Get All Office Add-ins
Strongly Recommended: Kutools for Office (5-in-1)
One click to download five installers at once — Kutools for Excel, Outlook, Word, PowerPoint and Office Tab Pro. Click to download now!
- ✅ One-click convenience: Download all five setup packages in a single action.
- 🚀 Ready for any Office task: Install the add-ins you need, when you need them.
- 🧰 Included: Kutools for Excel / Kutools for Outlook / Kutools for Word / Office Tab Pro / Kutools for PowerPoint