Remove Page Breaks from Selection or Whole Document: A Step-by-Step Guide
Removing page breaks in a Word document can streamline the layout and improve document readability. Whether you're working with manually inserted or automatic page breaks, this guide covers several methods to remove them efficiently from selected parts of your document or the entire file.
Remove page breaks one by one manually
Batch remove all page breaks in a selection or the whole document
Remove or stop automatic page breaks
Video: Remove Page Breaks in Word
Remove page breaks one by one manually
If you need to remove a few specific page breaks, doing so manually is straightforward:
Step 1. Show the page breaks (Generally, page breaks are hidden)
Navigate to the Home tab, and click on the Show/Hide ¶ button to display all formatting marks, including page breaks.

Step 2. Remove page breaks
Scroll to the page break you want to remove. Select the page break line and delete it by pressing the Delete or Backspace key on your keyboard.

It is easy to use the above way to remove a page break in Word, but how to remove dozens of page breaks? It is feasible to press the Ctrl key to select all page breaks and then press Delete key, but it seems time-consuming if the document has more than 100 pages.
Office Tab: Brings tabbed interfaces to Word, Excel, PowerPoint... |
Enhance your workflow now. Learn More about Office Tab Free Download |
Batch remove all page breaks in a selection or the whole document
To remove multiple page breaks from a selected area or the entire document, you can use one of two effective methods.
Using the Find and Replace feature
To remove multiple page breaks simultaneously, you can use the Find and Replace function:
Step 1. Select the contents you want to remove page breaks
If you do not select any content, the Find and Replace feature will work for the entire document
Step 2. Enable the Find and Replace feature
Press Ctrl + H to open the Find and Replace dialog box.
Step 3. Set the Find what and Replace with fields
In the Find what: field, type ^m (Or click More>> button to show more options, and choose Manual Page Break in the Special dropdown) to search for manual page breaks.
Leave the Replace with: field empty.
Click Replace All to remove all page breaks from your selected text or the entire document if no specific selection is made.

Now, all page breaks are removed.
Using Kutools for Word’s Remove Page Breaks
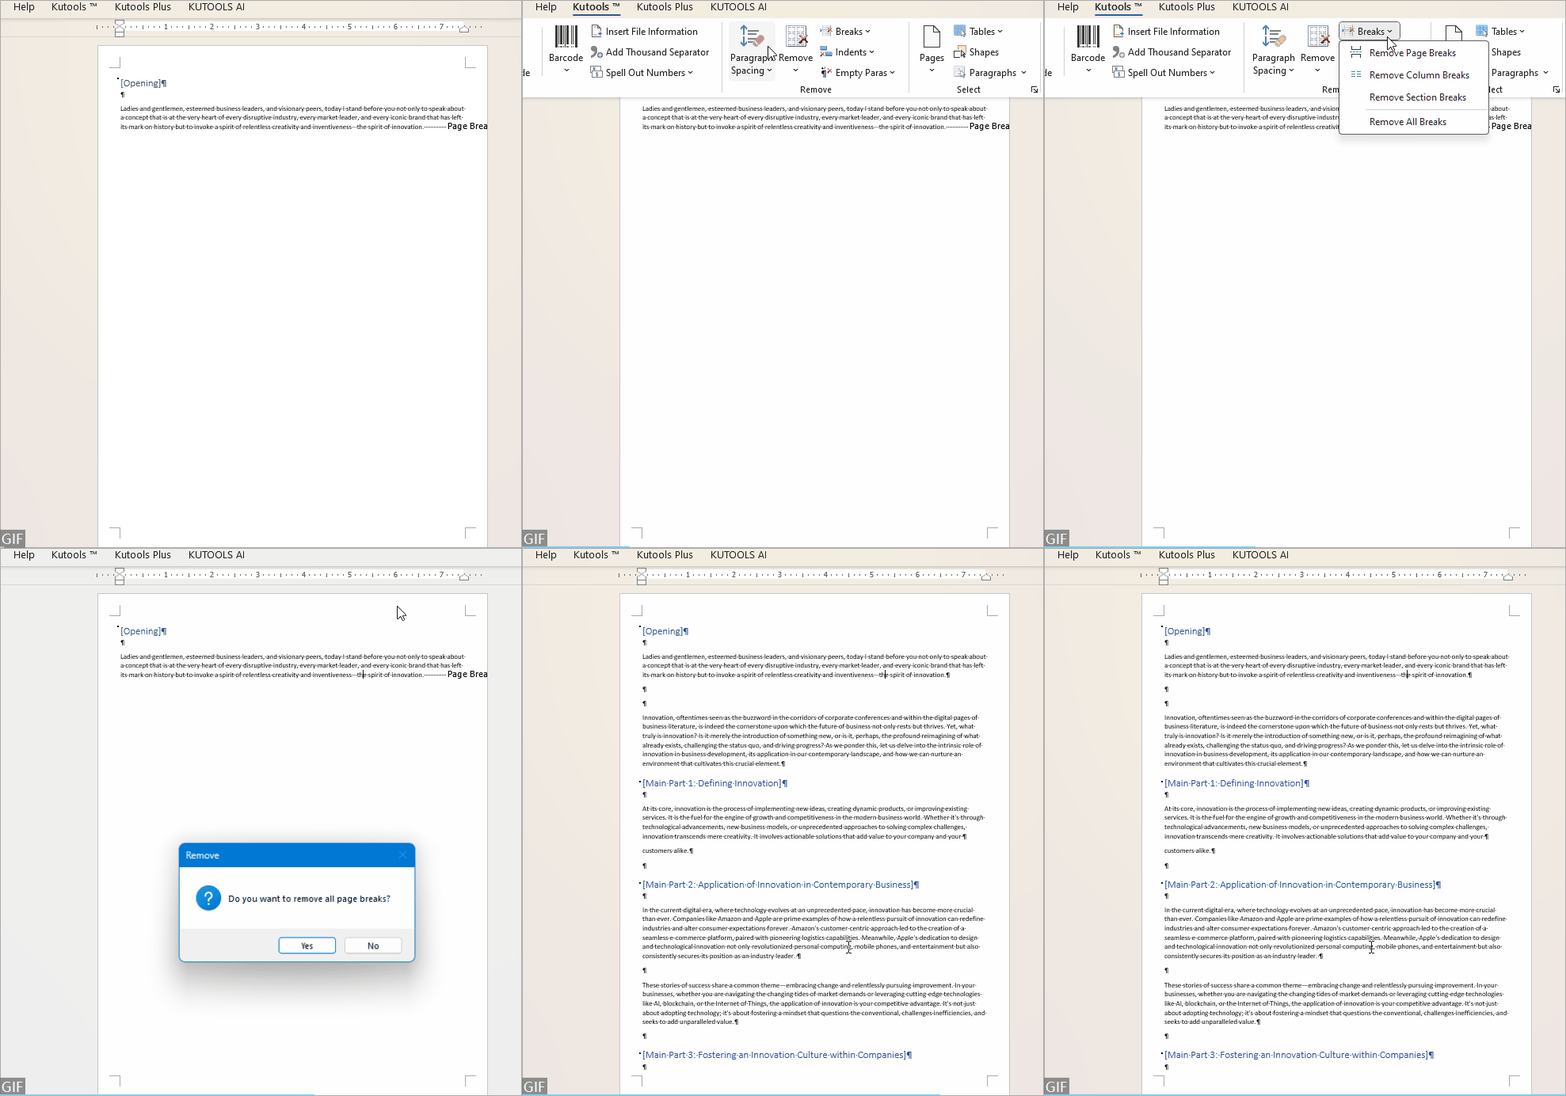
With Kutools for Word, it has never been so easy to remove all page breaks in the whole or the selection of a document.
Navigate to Kutools tab, click Breaks dropdown in the Remove group, and click Remove Page Breaks.

Recommended Productivity Tools for Word
Kutools for Word: Integrating AI 🤖, over 100 advanced features save 50% of your document handling time.Free Download
Office Tab: Introduces the browser-like tabs to Word (and other Office tools), simplifying multi-document navigation.Free Download
Remove or stop automatic page breaks
If the page breaks are inserted by the Paragraph settings, neither of the above methods can remove them. To remove such page breaks, follow the steps bellow:
Step 1. Press Ctrl + A keys to select the whole document
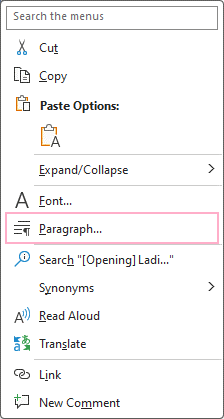
Step 2. Right-click to choose Paragraph from the context menu

Step 3. Untick Page break before checkbox
Under Line and Page Breaks tab in the Paragraph dialog, untick Page break before checkbox, then click OK.

Then all automatic page breaks are removed.
Understanding how to effectively remove page breaks can help maintain the aesthetic and functional integrity of your documents. Whether you choose manual deletion, batch processing through Find and Replace, or utilizing tools like Kutools, each method provides a way to achieve a cleaner, more professional document layout.
For additional transformative Word strategies that can significantly enhance your data management, explore further here..
Best Office Productivity Tools
Kutools for Word - Elevate Your Word Experience with Over 100 Remarkable Features!
🤖 Kutools AI Features: AI Assistant / Real-Time Assistant / Super Polish (Preserve Format) / Super Translate (Preserve Format) / AI Redaction / AI Proofread...
📘 Document Mastery: Split Pages / Merge Documents / Export Selection in Various Formats (PDF/TXT/DOC/HTML...) / Batch Convert to PDF...
✏ Contents Editing: Batch Find and Replace across Multiple Files / Resize All Pictures / Transpose Table Rows and Columns / Convert Table to Text...
🧹 Effortless Clean: Sweap away Extra Spaces / Section Breaks / Text Boxes / Hyperlinks / For more removing tools, head to the Remove group...
➕ Creative Inserts: Insert Thousand Separators / Check Boxes / Radio Buttons / QR Code / Barcode / Multiple Pictures / Discover more in the Insert group...
🔍 Precision Selections: Pinpoint Specific Pages / Tables / Shapes / Heading Paragraphs / Enhance navigation with more Select features...
⭐ Star Enhancements: Navigate to Any Location / Auto-Insert Repetitive Text / Toggle Between Document Windows / 11 Conversion Tools...
🌍 Supports 40+ Languages: Use Kutools in your preferred language – supports English, Spanish, German, French, Chinese, and 40+ others!

Office Tab - Brings Tabbed interface to Office, Make Your Work Much Easier
- Enable tabbed editing and reading in Word, Excel, PowerPoint, Publisher, Access, Visio and Project.
- Open and create multiple documents in new tabs of the same window, rather than in new windows.
- Increases your productivity by 50%, and reduces hundreds of mouse clicks for you every day!
✨ Kutools for Office – One Installation, Five Powerful Tools!
Includes Office Tab Pro · Kutools for Excel · Kutools for Outlook · Kutools for Word · Kutools for PowerPoint
📦 Get all 5 tools in one suite | 🔗 Seamless integration with Microsoft Office | ⚡ Save time and boost productivity instantly
Best Office Productivity Tools
Kutools for Word - 100+ Tools for Word
- 🤖 Kutools AI Features: AI Assistant / Real-Time Assistant / Super Polish / Super Translate / AI Redaction / AI Proofread
- 📘 Document Mastery: Split Pages / Merge Documents / Batch Convert to PDF
- ✏ Contents Editing: Batch Find and Replace / Resize All Pictures
- 🧹 Effortless Clean: Remove Extra Spaces / Remove Section Breaks
- ➕ Creative Inserts: Insert Thousand Separators / Insert Check Boxes / Create QR Codes
- 🌍 Supports 40+ Languages: Kutools speaks your language – 40+ languages supported!
