Enhance Word Mail Merge with Kutools Advanced Mail Merge
Word Mail Merge is a powerful tool for creating personalized letters and emails from a single template. However, once you start sending professional emails, you may quickly encounter several limitations. For example, Excel number and date formats may not be preserved, adding attachments to every email is inconvenient, managing Cc and Bcc recipients is limited, and there is no easy way to preview complete email settings before sending.
Advanced Mail Merge in Kutools for Word addresses these challenges by extending Word's built-in Mail Merge with formatting controls, attachment management, email preview, enhanced sending options, and document generation capabilities. This guide walks you through the complete workflow, from preparing your mail merge document to sending personalized emails or generating separate documents.
- Format Merge Fields
- Configure Attachments, Cc, and Bcc
- Preview Current Mail Settings
- Preview the Email in Outlook
- Send Personalized Emails
- Generate Individual Documents
Benefits of Advanced Mail Merge
Advanced Mail Merge enhances Word's built-in Mail Merge by making it easier to format merge fields, manage email settings, preview results, and automate document generation.
Before You Start
Before using Advanced Mail Merge, you need to prepare a standard Word Mail Merge document. If you already have one, you can start using Advanced Mail Merge right away.
- Prepare an Excel workbook containing your mail merge data, including column headers (which become mail merge fields) and the corresponding data records.
- Open your Word template.
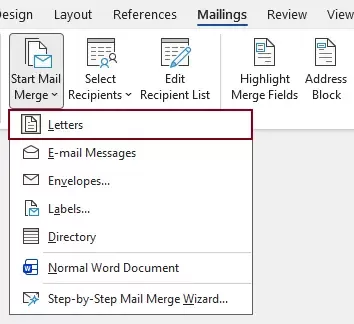
- Go to Mailings > Start Mail Merge > Letters.
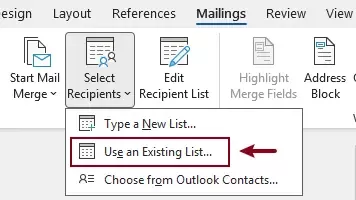
- Click Select Recipients > Use an Existing List, then choose your Excel workbook.
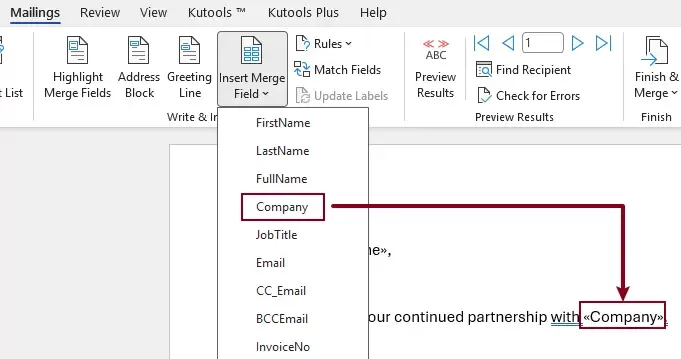
- Place the cursor where you want to insert a merge field, then select the desired field from Mailings > Insert Merge Field.
Note: The column headers in the connected Excel workbook are automatically available as merge fields in the Insert Merge Field menu.
- Repeat Step 4 until all required merge fields have been inserted into the template.
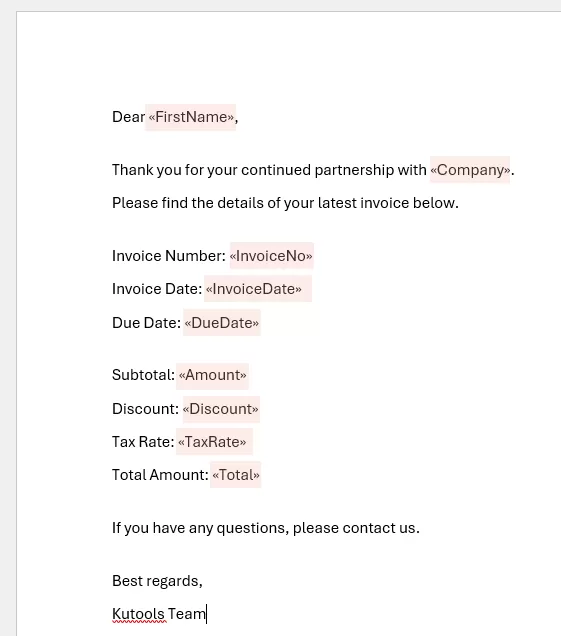
Once the merge fields have been inserted, you're ready to use the Advanced Mail Merge features.
How to Use Advanced Mail Merge
Advanced Mail Merge adds powerful capabilities to Word's built-in Mail Merge. You can preserve merge field formatting, configure attachments and Cc/Bcc recipients, preview email settings, send personalized emails, and generate individual Word or PDF documents—all from one integrated toolkit.
Format Merge Fields
One of the most common problems with Word Mail Merge is that Excel formatting is often lost during the merge process. Currency symbols may disappear, dates may display in unexpected formats, and percentages may appear as decimal values.
The Format Fields feature allows you to preserve the original formatting of merge fields from your Excel data source without manually editing Word field codes.
Step 1. Open the Format Fields dialog
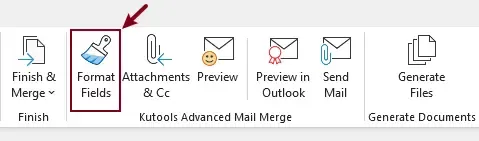
Under the Mailings tab, select Format Fields in the Kutools Advanced Mail Merge group.
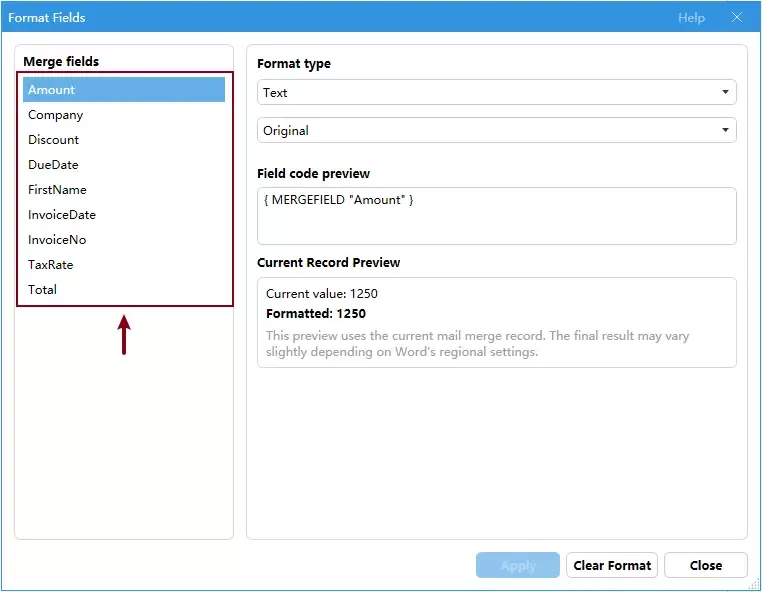
In the opening Format Fields dialog box, all merge fields in the current document will be listed.
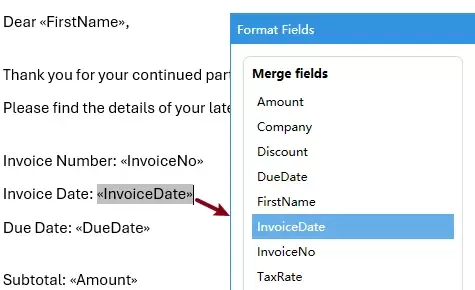
Step 2. Format the existing merge fields
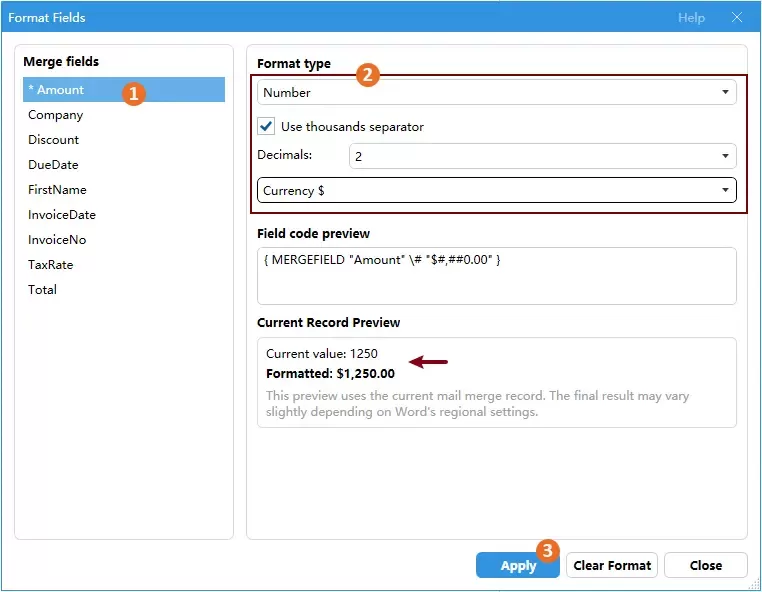
In this example, the Amount field is formatted as currency in the connected data source. However, when it is inserted into the mail merge document, it appears as a plain number. To display the Amount field with the correct currency format, do the following.
- In the Merge fields section, select the merge field that the formatting does not preserve. Here I choose Amount.
- In the right side of the dialog, choose the appropriate format options for the selected field.
In this example, I select the Number type, apply a thousands separator with two decimal places, and format the value as U.S. dollars. You can choose the formatting options that best suit your data.
- Click Apply to save the formatting.
Result
After applying the formatting, merge field values are displayed in the selected formats during mail merge. For example, currency values can include currency symbols and thousands separators, while dates and percentages appear in the desired formats.
- Format Fields supports four formatting categories: Number, Date/Time, Text, and Numbering. Choose the appropriate category based on the selected merge field.
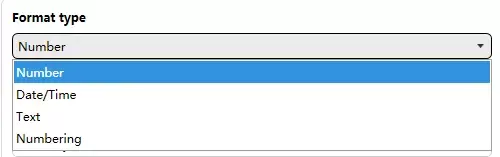
- If the same merge field appears multiple times in the document, the formatting is applied to every occurrence automatically.
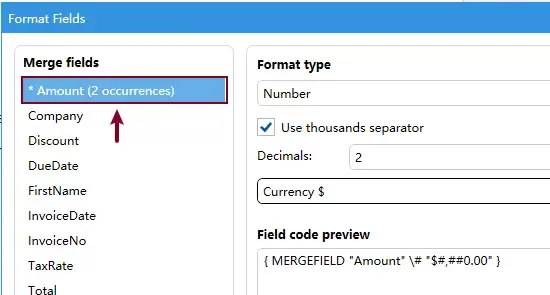
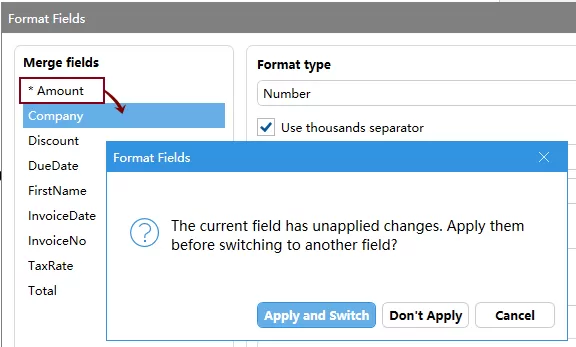
- If you modify a field and switch to another one without clicking Apply, Kutools prompts you to apply or discard your changes before continuing.
- The preview area updates automatically as you modify the formatting options.
- Click Clear Format to remove the current formatting settings and restore the default format.
Configure Attachments, Cc, and Bcc
Although Word's built-in Mail Merge can send personalized emails, it does not support adding attachments or specifying Cc and Bcc recipients. These limitations often require users to rely on VBA or other workarounds.
Advanced Mail Merge removes these limitations by allowing you to add both fixed and record-specific attachments, as well as fixed or dynamic Cc and Bcc recipients, directly within the mail merge workflow.
To configure attachments, Cc, and Bcc recipients, follow the steps below.
Step 1. Open the Attachments & Cc dialog box.
Under the Mailings tab, select Attachments & CC in the Kutools Advanced Mail Merge group.
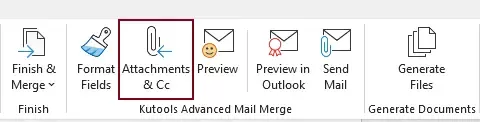
Step 2. Configure attachments, Cc, and Bcc recipients
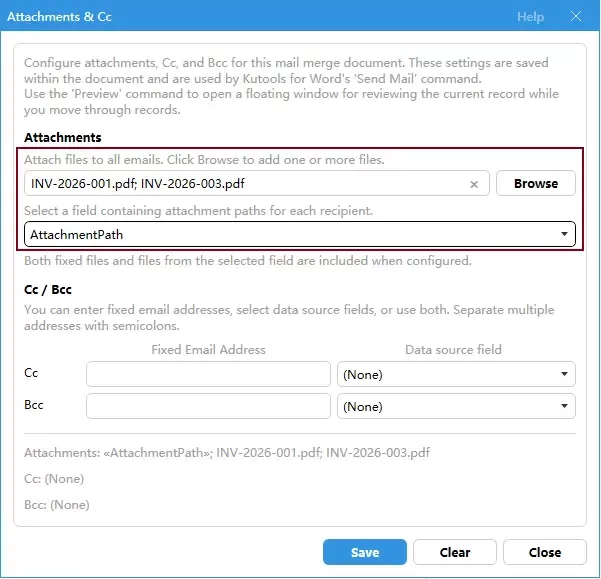
In the Attachments & Cc dialog box, configure the required email settings.
Configure attachments
The Attachments section allows you to add fixed attachments that are included in every email or specify an attachment field from the data source.
- Add fixed attachmentsClick the Browse button and select one or more files.The selected files will be sent to every recipient.
- Add an attachment fieldIf your Excel data source already contains a column with attachment file paths, select the corresponding field from the drop-down list.The attachment specified in each record will be automatically added to the corresponding email.
- Combine fixed and dynamic attachmentsYou can use both methods at the same time. When fixed attachments and an attachment field are configured together, every email includes the fixed attachment(s) as well as the attachment specified for that recipient.
Configure Cc and Bcc recipients
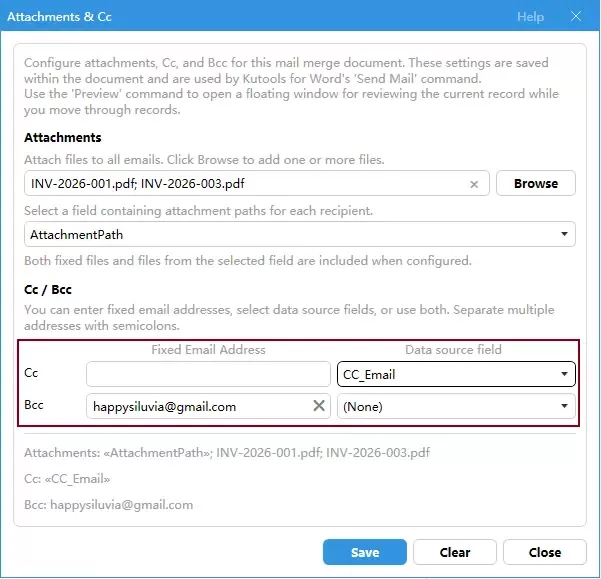
The Cc / Bcc section allows you to configure both fixed recipients and recipients stored in your data source.
- Add fixed Cc or Bcc recipientsEnter one or more email addresses in the Cc or Bcc boxes. Every personalized email will include these recipients.Tip: If you enter multiple email addresses, separate them with semicolons (;).
- Add Cc or Bcc fieldsIf your Excel data source already contains Cc or Bcc email addresses, select the appropriate field from the Data source field drop-down list.Each personalized email will automatically include the corresponding Cc or Bcc recipients.
- Combine fixed and dynamic recipientsYou can use fixed recipients, data source fields, or a combination of both.Fixed recipients are included in every email, while recipients from the selected data source fields vary according to each record.
Step 3. Save the settings.
Click Save to apply the attachment and Cc/Bcc settings.
The configured settings are stored in the current Word document and do not insert any visible content into the document itself.
Once the settings have been saved, you can preview the configured attachments, Cc, and Bcc recipients before sending your emails, as described in the next section.
Preview Current Mail Settings
Before sending personalized emails, it's important to verify the email settings for each recipient. While Word's built-in Preview Results only lets you preview the merge field values in the document, it cannot display the actual email settings, such as attachments, Cc, or Bcc recipients.
The Preview feature in Advanced Mail Merge allows you to review all sending information associated with the current mail merge record before sending.
To preview the current mail settings:
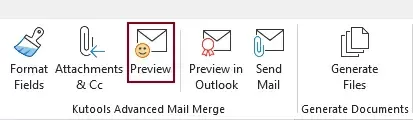
- Under the Mailings tab, click Preview in the Kutools Advanced Mail Merge group.
- In the Current Send Settings dialog box, you can:
- Review the current To recipient, Cc, Bcc, and attachment information.
- Navigate through mail merge records using the Previous and Next buttons.
- Click Email Preview to open a complete preview of the current email.
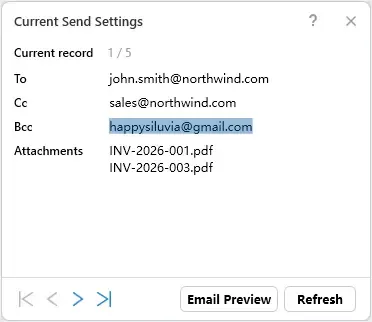
- You can select and copy any information displayed in the dialog box.
- If the To recipient information is missing, an email address appears to be invalid, or an attachment file cannot be found, a warning message is displayed next to the corresponding field in the dialog box. You can then update the corresponding data in the connected Excel workbook and try again.
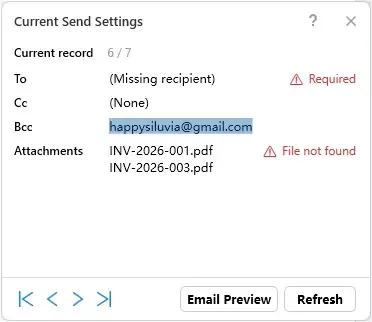
After confirming the current mail settings, you can proceed to preview the complete email in Outlook or continue with sending the mail merge emails.
Preview the Email in Outlook
After confirming the current mail settings, you can preview the complete email in Outlook before sending. This allows you to verify exactly how the email will appear to the recipient, including the email body, attachments, and recipient information.
Under the Mailings tab, select Preview in Outlook in the Kutools Advanced Mail Merge group.
Wait while Outlook prepares the email. A draft email is automatically created and opened in Outlook using the current mail merge record, with all email information populated automatically. You can then review the complete email before sending.
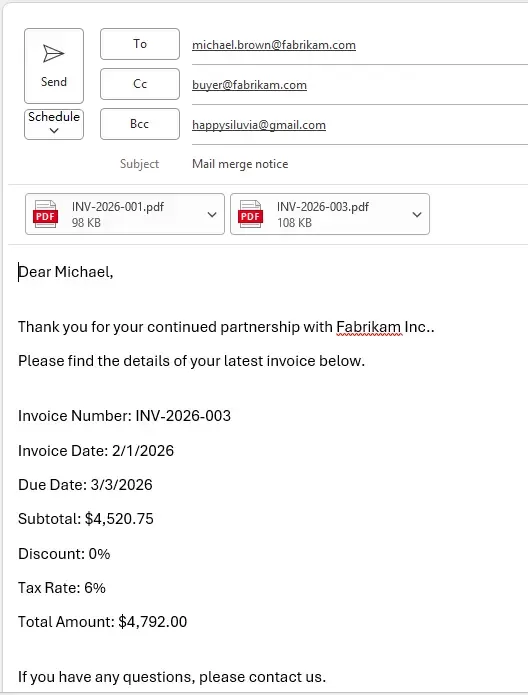
This feature is ideal for verifying the final appearance of a single email before sending the entire mail merge.
Send Personalized Emails
Once you've confirmed that your mail merge settings are correct, you can send personalized emails directly from Word using Advanced Mail Merge.
Step 1. Open the Send Mail dialog box
Under the Mailings tab, click Send Mail in the Kutools Advanced Mail Merge group.
Step 2. Review or modify the email settings
The left pane of the Send Mail dialog box displays the current email settings. Before sending, you can review or modify these settings as needed.
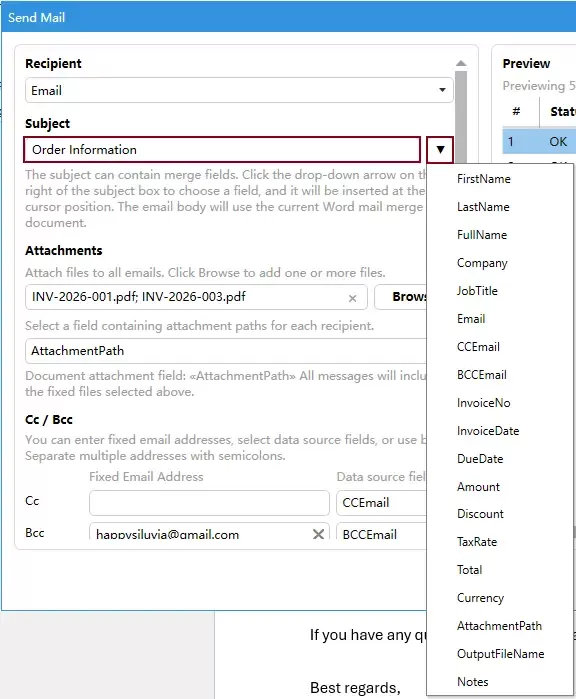
Specify the email subject
By default, the Subject box displays a predefined subject, Mail merge notice. You can either enter your own subject text or click the drop down arrow to insert a merge field from the connected Excel workbook.
If your data source contains a Subject column, each recipient can receive an email with a personalized subject line.
Step 3. Configure the sending options
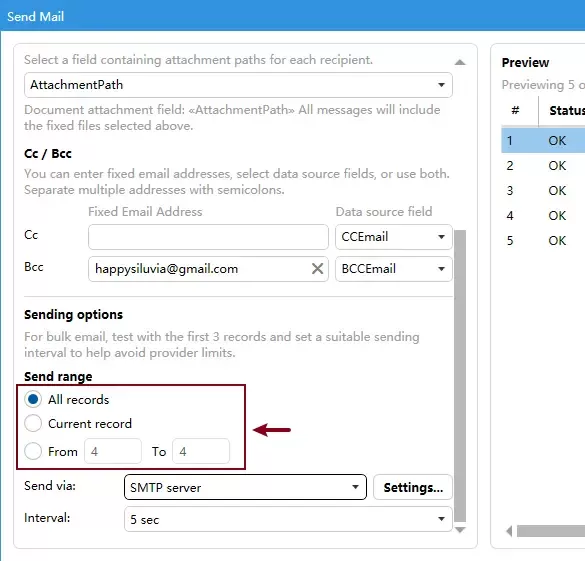
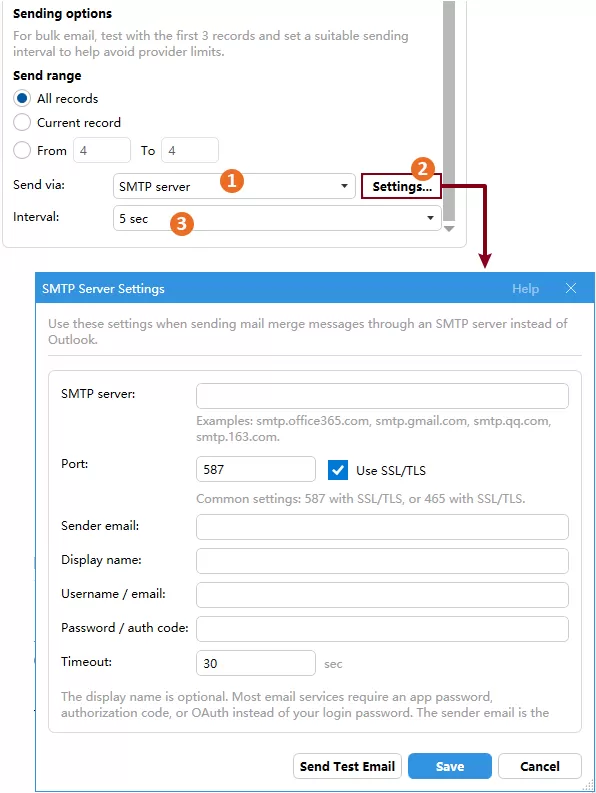
Scroll down in the left pane to the Sending options section. Here you can specify how the personalized emails will be sent.
Specify the sending range
Choose one of the following sending ranges, you can specify which records to be sent.
- All records – Send emails for every record in the data source.
- Current record – Send only the currently selected record.
- From ... To ... – Send emails within a specified record range.
Choose a sending method
Advanced Mail Merge supports three email delivery methods.
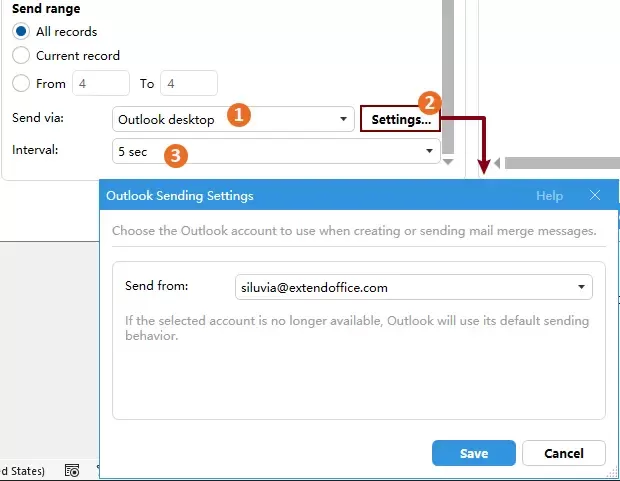
🖥️ Send via Outlook desktop
Use this option to send emails through the Outlook desktop application.
- Select Outlook desktop from the Send via drop-down list.
- Click Settings to choose the Outlook account used for sending.
- Set a sending interval to help avoid sending restrictions imposed by email providers.
☁️ Send via Microsoft 365
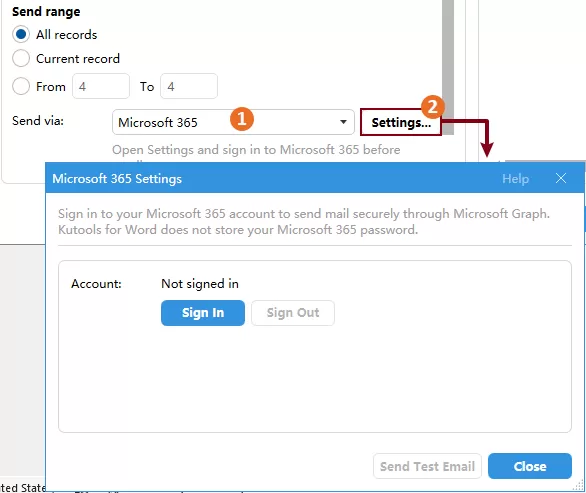
Use this option to send emails through a Microsoft account, including Outlook.com, Hotmail, Live, and Microsoft 365 work or school accounts.
- Select Microsoft 365 from the Send via drop down list.
- Click Settings, and sign in to authorize sending mail.
🌐 Send via a SMTP Server
Use this option to send emails through an SMTP server.
- Select SMTP server form the Send via drop-down list.
- Click Settings to configure the SMTP server settings.
Tip: You can send a test email to verify the configuration before sending.
- Set a sending interval to help avoid sending restrictions imposed by email providers.
Step 4. Check and send records
In this step, you can check all records and then send the personalized emails.
- Review the emails displayed in the Preview pane.
You can:
- Review the information for each email.
- Select any email in the preview list, click the Preview (eye) button to open the selected email in Outlook for a final review.
- After confirming, click Check & Send to start checking all records.
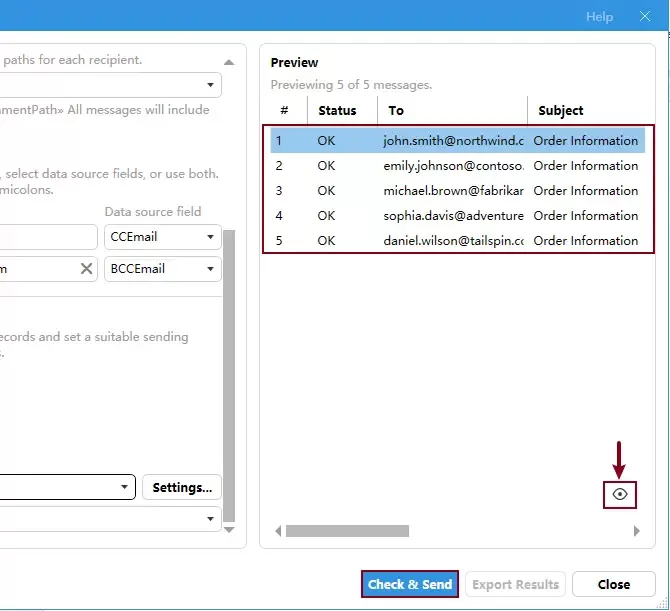
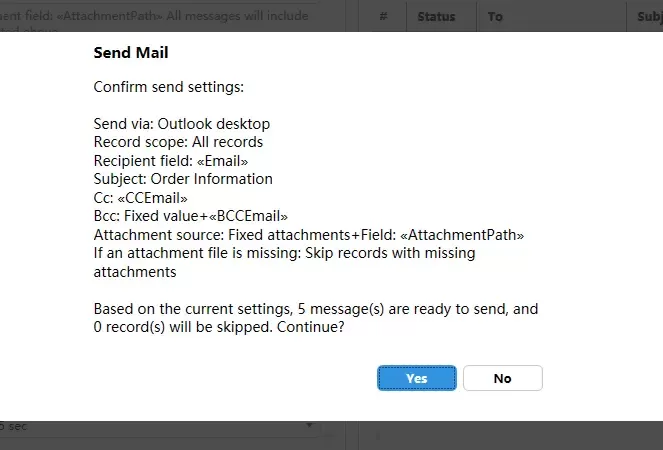
- A confirmation dialog box appears and lists the current sending settings. Click Yes to send the personalized emails.
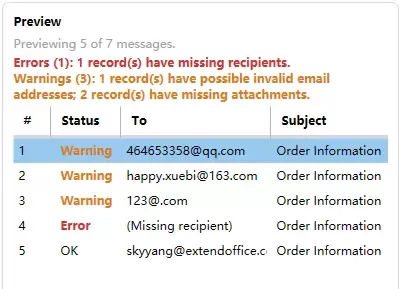
- Before you click Check & Send, the Preview pane displays up to five records for faster loading. The preview also shows the checking results for these records, together with a summary of any detected issues.
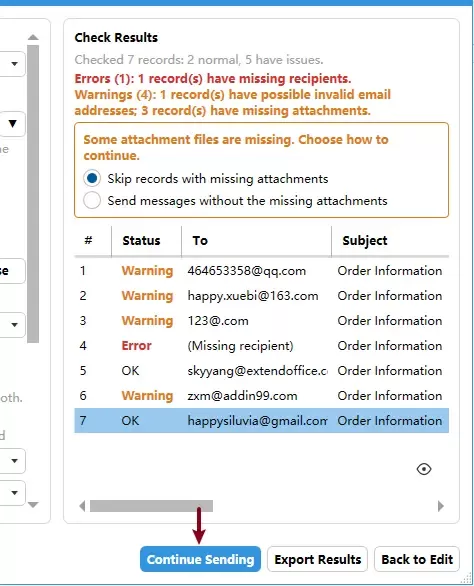
- If warnings or errors are detected, they are clearly identified in the Preview pane. Warnings may include missing attachments or potentially invalid email addresses. Errors may include missing recipients or other issues that prevent the corresponding records from being sent.
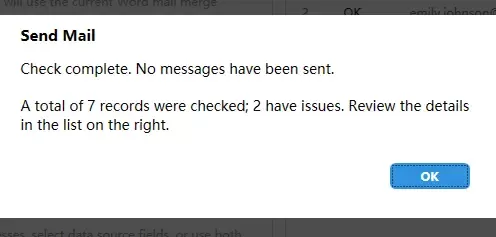
- If warnings or errors are found during the checking process, a dialog box summarizes the checking results. Click OK to open the Check Results pane.
 The Check Results pane displays the checking results. Records with warnings or errors are clearly identified, and a summary of the detected issues is shown at the top. In this pane, you can:
- Handling Missing AttachmentsIf attachment files are missing, choose one of the following options:
- Skip records with missing attachments: Sends emails only for records whose attachments are available.
- Send messages without the missing attachments: Sends the emails even if one or more attachments cannot be found.
- Updating the Data Source (optional)Click Back to Edit to return to the editing screen, where you can update the data source and run the check again.
- Continue SendingAfter reviewing the checking results, click Continue Sending to send the remaining personalized emails.
When sending is complete, the Send Mail message box displays the sending results. Click OK to close the dialog box.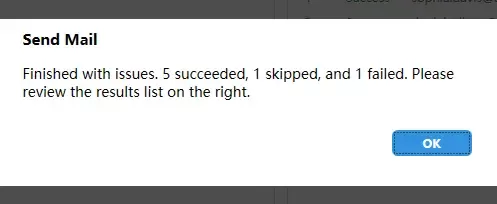
- Handling Missing Attachments
Step 5. Export the sending results
After all emails have been sent, you can export the sending results for future reference.
- Click Export Results, then choose a folder in which to save the report.
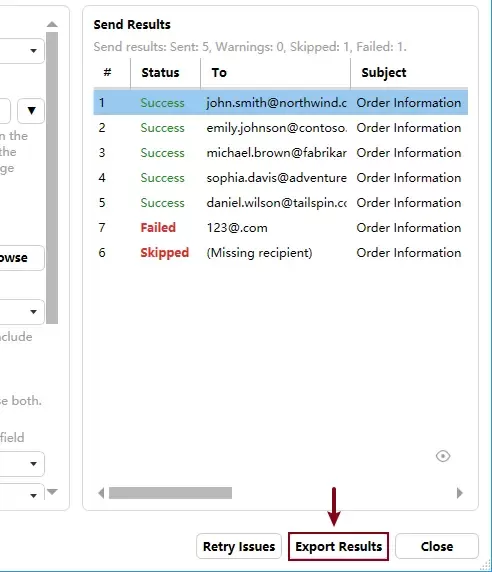
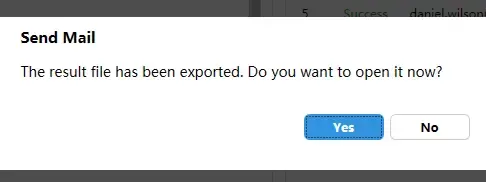
- A confirmation dialog box appears after the report has been exported successfully. Click Yes to open the report immediately, or click No to close the dialog box.
- Close the dialog box.
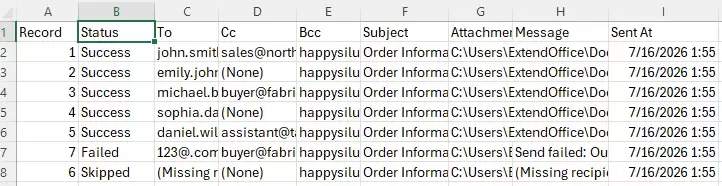
A CSV report is generated listing the sending status of every email, making it easy to review successful, skipped, or failed messages later.
Generate Individual Documents
In addition to sending personalized emails, Advanced Mail Merge allows you to generate a separate document for each mail merge record. Unlike Word's built in Mail Merge, which combines all merged records into a single document, this feature creates an individual Word or PDF file for every selected record.
This feature is particularly useful for generating invoices, contracts, certificates, reports, or other personalized documents.
To generate individual documents, follow the steps below.
Step 1. Open the Generate Files dialog box
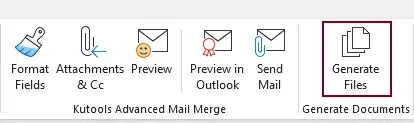
Under the Mailings tab, select Generate Files in the Kutools Advanced Mail Merge group.
Step 2. Configure the Generate Files dialog box
- Click Browse and select the destination folder where the generated files will be saved.
- Choose the output format:
- Word Document
- PDF Document
- Select a field from the File name source drop down list to use as the filename for each generated document.
- Specify the records to generate.
- Click Start.
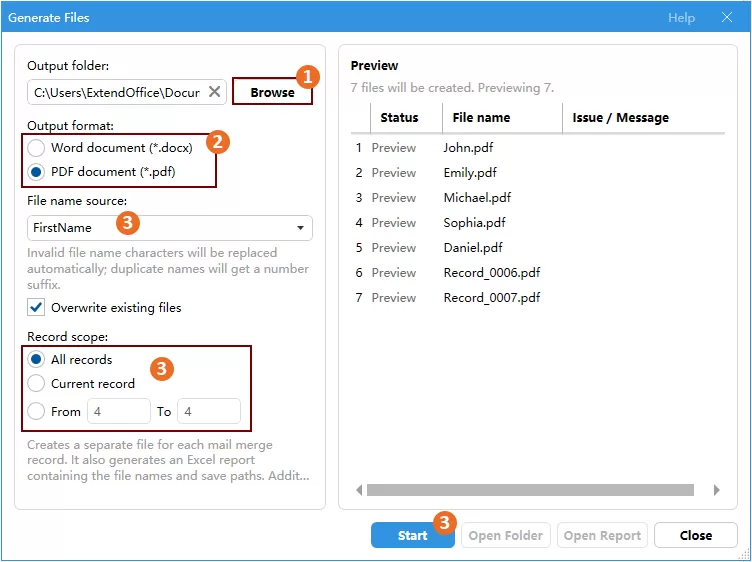
- When the generation is complete, click Open Folder to open the destination folder and view the generated files, or click Close to exit the dialog box.
Result
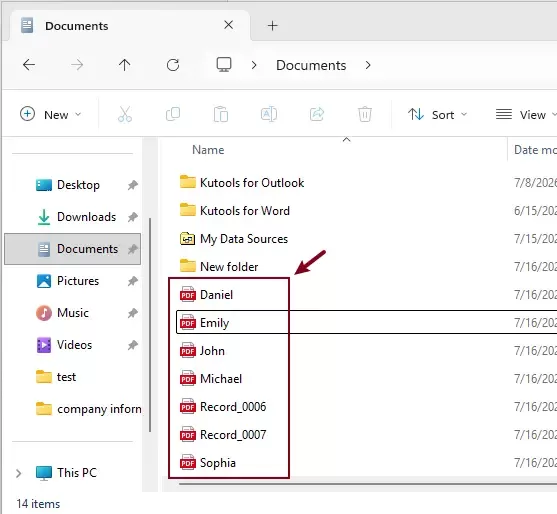
Each selected mail merge record is saved as an individual Word or PDF document.
Conclusion
Advanced Mail Merge extends the capabilities of Word's built-in Mail Merge with additional features for formatting merge fields, managing attachments and Cc/Bcc recipients, previewing email settings, and more.
Whether you're preparing invoices, contracts, notifications, or other personalized documents and emails, it helps streamline your mail merge workflow and improve efficiency.
Best Office Productivity Tools
Kutools for Word - Elevate Your Word Experience
🤖 Kutools AI Features: AI Assistant / Real-Time Assistant / Super Polish (Preserve Format) / Super Translate (Preserve Format) / AI Redaction / AI Proofread...
📘 Document Mastery: Split Pages / Merge Documents / Export Selection in Various Formats (PDF/TXT/DOC/HTML...) / Batch Convert to PDF...
✏ Contents Editing: Batch Find and Replace across Multiple Files / Resize All Pictures / Transpose Table Rows and Columns / Convert Table to Text...
🧹 Effortless Clean: Sweap away Extra Spaces / Section Breaks / Text Boxes / Hyperlinks / For more removing tools, head to the Remove group...
➕ Creative Inserts: Insert Thousand Separators / Check Boxes / Radio Buttons / QR Code / Barcode / Multiple Pictures / Discover more in the Insert group...
🔍 Precision Selections: Pinpoint Specific Pages / Tables / Shapes / Heading Paragraphs / Enhance navigation with more Select features...
⭐ Star Enhancements: Navigate to Any Location / Auto-Insert Repetitive Text / Toggle Between Document Windows / 11 Conversion Tools...
🌍 Supports 40+ Languages: Use Kutools in your preferred language – supports English, Spanish, German, French, Chinese, and 40+ others!

Office Tab - Tabs for Office, Power for You
- Enable tabbed editing and reading in Word, Excel, PowerPoint, Publisher, Access, Visio and Project.
- Open and create multiple documents in new tabs of the same window, rather than in new windows.
- Increases your productivity by 50%, and reduces hundreds of mouse clicks for you every day!

✨ Kutools for Office – One Installation, Five Powerful Tools!
Includes Office Tab Pro · Kutools for Excel · Kutools for Outlook · Kutools for Word · Kutools for PowerPoint
📦 Get all 5 tools in one suite | 🔗 Seamless integration with Microsoft Office | ⚡ Save time and boost productivity instantly
Best Office Productivity Tools
Kutools for Word - 100+ Tools for Word
- 🤖 Kutools AI Features: AI Assistant / Real-Time Assistant / Super Polish / Super Translate / AI Redaction / AI Proofread
- 📘 Document Mastery: Split Pages / Merge Documents / Batch Convert to PDF
- ✏ Contents Editing: Batch Find and Replace / Resize All Pictures
- 🧹 Effortless Clean: Remove Extra Spaces / Remove Section Breaks
- ➕ Creative Inserts: Insert Thousand Separators / Insert Check Boxes / Create QR Codes
- 🌍 Supports 40+ Languages: Kutools speaks your language – 40+ languages supported!
Table of Contents
- Benefits of Advanced Mail Merge
- Before You Start
- How to Use Advanced Mail Merge
- Format Merge Fields
- Configure Attachments, Cc, and Bcc
- Preview Current Mail Settings
- Preview the Email in Outlook
- Send Personalized Emails
- Generate Individual Documents
- Conclusion
- The Best Office Productivity Tools
Kutools for Word
Brings 100+ advanced features to Word
- 🧩 Overview
- 📥 Free Download
- 🛒 Purchase Now
- 🎁 60-Day Free Trial available