How to change the default workbook/sheet template in Excel?
When you create a new workbook in Excel without explicitly selecting a template, Excel automatically uses its built-in default settings. As shown in the screenshot below, a new workbook is typically plain and set to Microsoft’s standard formatting.
However, if you frequently start workbooks with particular styles—such as specific grid patterns, fonts, page layouts, or background settings—it can be inconvenient to manually apply these every time. Many users wish to have their preferred formatting automatically loaded whenever a new workbook is opened, without needing to specify a template each time. Excel allows you to customize this experience by changing the default template that is used for new workbooks and worksheets. This not only saves time but also ensures consistency across all your new Excel files, which can be especially helpful in team or professional settings.
Below, you’ll find practical methods for setting your own default workbook and worksheet templates, as well as related options for customizing how Excel opens files on startup. Each method has its own best-use scenarios and considerations, which are also discussed to help you choose the optimal approach.
➤ Change the default Excel’s workbook template
➤ Change the default worksheet template in Excel
➤ VBA solution for setting default templates
➤ Alternative: Set a custom start-up folder for Excel templates
Change the default Excel’s workbook template
Setting a custom default workbook template is ideal if you want every new Excel workbook to consistently use your preferred formatting, such as custom headers, color schemes, or predefined column widths. This approach is beneficial for individuals and teams needing to standardize workbook appearance or layout company-wide. However, this setting does not affect existing workbooks—only newly created workbooks will use this default template.
To set up a default workbook template:
1. Open Excel and create a new workbook. Apply all the formatting, styles, and configurations you wish to have as the default for future workbooks. For example, modify font type and size, insert a company logo, set up headers or footers, adjust default column width, or change the sheet background. Double-check that all desired customizations are present before proceeding.
2. Go to File > Save > Computer > Browse (in Excel 2013/2016/2019/365). For Excel 2007/2010, click the File tab (or Office button) > Save.
3. In the Save As dialog box, configure the following settings:
- 1) File name: Enter Book (no file extension). The name must be exactly Book for Excel to recognize it as the default template.
- 2) Save as type: Choose Excel Template (*.xltx). Avoid selecting a macro-enabled template (*.xltm) unless you specifically need macros in your default workbook.
- 3) Save location: Paste one of the following paths into the address bar and press Enter to navigate: If you're unsure, open File Explorer and search for XLSTART.
C:\Users\%username%\AppData\Roaming\Microsoft\Excel\XLSTART
(For older systems, use:C:\Documents and Settings\%username%\Application Data\Microsoft\Excel\XLSTART) - 4) Click Save.

4. After saving, close and restart Excel. From now on, whenever you create a new workbook using File > New > Blank Workbook (or press Ctrl + N), Excel will use your custom default template automatically.
Tips and Notes:
- This applies only to new workbooks created using Excel’s standard method. Other templates or opening existing files are not affected.
- If the template file is deleted or becomes corrupted, Excel will revert to its default settings.
- Custom settings like print areas, page breaks, and hidden sheets will be preserved in your template.
- To update the default, repeat these steps and overwrite the existing Book.xltx file with your new version.

Unlock Excel Magic with Kutools AI
- Smart Execution: Perform cell operations, analyze data, and create charts—all driven by simple commands.
- Custom Formulas: Generate tailored formulas to streamline your workflows.
- VBA Coding: Write and implement VBA code effortlessly.
- Formula Interpretation: Understand complex formulas with ease.
- Text Translation: Break language barriers within your spreadsheets.
Change the default worksheet template in Excel
Changing the default workbook template does not affect new worksheets inserted into existing workbooks. To ensure all new sheets use your preferred formatting—such as custom row heights, background fills, formulas, or page settings—you need to save a default worksheet template separately. This is especially useful for standardized forms or data-entry layouts.
Follow these steps to set up a custom worksheet template:
1. Open a new workbook in Excel and format a single worksheet exactly how you want new sheets to appear. Customize items like cell size, text alignment, number formats, headers/footers, and formulas.
2. Delete all other worksheets except the one you've customized. (Right-click each extra sheet tab and choose Delete until only one remains.)
3. Go to File > Save > Computer > Browse (in Excel 2013/2016/2019/365). In Excel 2007/2010, use the File or Office button > Save.
4. In the Save As dialog box, configure the following:
- 1) File name: Enter Sheet (no file extension).
- 2) Save as type: Select Excel Template (*.xltx).
- 3) Location: Paste this into the address bar and press Enter: (For older systems:
C:\Users\%username%\AppData\Roaming\Microsoft\Excel\XLSTARTC:\Documents and Settings\%username%\Application Data\Microsoft\Excel\XLSTART)
If you're unsure, open File Explorer and search for “XLSTART”. - 4) Click Save.

5. Restart Excel. From now on, whenever you insert a new worksheet (e.g., by clicking the + tab or pressing Shift + F11), Excel will use your custom worksheet formatting.
Additional Reminders:
- To revert to Excel’s original defaults, go to the XLSTART folder and delete Book.xltx and Sheet.xltx.
- Do not overwrite your template files unless you want to update the defaults.
- Ensure the file extension and type are correct—Excel may not recognize incorrectly saved templates.
- Worksheet templates support most formatting, but not all workbook-level features.
- Templates are user-specific. Each user on a shared device must save templates in their own XLSTART folder.
VBA: Automatically create default workbook template
If you want to automate the creation of default workbook or worksheet templates—especially across multiple systems—VBA provides a convenient solution. This is particularly useful in enterprise environments where IT teams or power users need to deploy consistent settings for all users quickly and programmatically.
1. Open Excel and press Alt + F11 to open the Visual Basic for Applications editor. In the VBA window, click Insert > Module to create a new module, then paste the following code:
Sub CreateDefaultWorkbookTemplate()
    Dim ws As Worksheet
    Dim savePath As String

    On Error Resume Next
    xTitleId = "KutoolsforExcel"

    savePath = Environ("AppData") & "\Microsoft\Excel\XLSTART\Book.xltx"
    Application.DisplayAlerts = False
    Workbooks.Add
    Set ws = ActiveSheet
    ws.Name = "TemplateSheet"
    ws.Range("A1:B2").Value = "Customized!" ' Fill a sample range with content
    ActiveWorkbook.SaveAs Filename:=savePath, FileFormat:=xlOpenXMLTemplate
    ActiveWorkbook.Close False
    Application.DisplayAlerts = True
    MsgBox "Default workbook template created in XLSTART.", vbInformation, xTitleId
End Sub2. In the VBA editor, place the cursor inside the macro and press F5 to run. The script will create a new workbook, format it, and save it as Book.xltx in your personal XLSTART folder.
Tips:
- Macro security: Macros must be enabled. Always review macro code before running it to ensure safety.
- If you want to create a worksheet template instead, save the file as Sheet.xltx and ensure it contains only one customized sheet.
- This approach is faster than navigating through folders and is ideal for scripting repetitive template setups.
- Use
Environ("AppData")for a user-specific folder path that works across different systems.
Limitations and notes:
- Macros must be enabled—some corporate environments restrict macro use.
- Templates created via code will overwrite existing files without warning unless precautions are added.
- This method is recommended for experienced users or IT administrators; casual users should consider the manual method.
Alternative: Set a custom start-up folder for Excel templates
As an additional practical option, you can configure Excel to automatically load files from a specific folder every time it starts. This is especially useful if you frequently use certain templates, reference workbooks, or tools and want them to be readily available immediately upon launching Excel. Unlike default templates, this method opens the actual files themselves.
To configure a custom start-up folder in Excel:
- Go to File > Options > Advanced.
- Scroll down to the General section.
- In the field labeled At startup, open all files in:, enter the full path of the folder that contains the files you want to load automatically. Then click OK to apply.
After setting this path, Excel will automatically open all workbooks, templates, or add-ins stored in that folder each time it starts. This setup is ideal for users who rely on specific files every day, such as dashboards, shared templates, or macro tools.
Tips and notes:
- Be cautious: all files in the folder will open at every startup, which may affect Excel’s loading speed if the folder contains many or large files.
- To disable this behavior later, simply clear the folder path in the same At startup, open all files in field.
- This feature complements the default template setting, but does not replace the blank workbook that opens when using File > New.
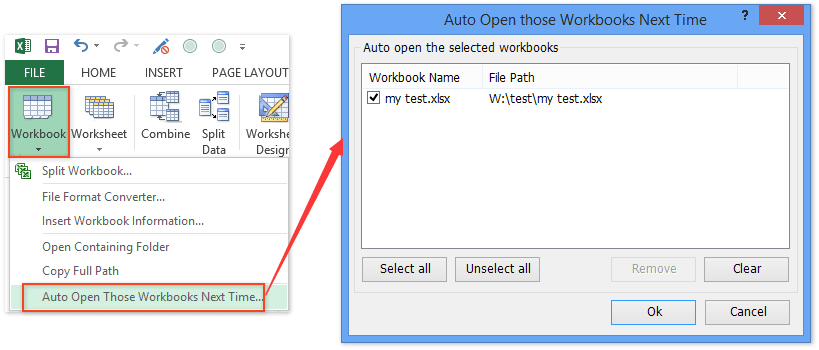
Automatically open certain workbooks when starting Excel Program
Kutools for Excel’s Auto Open Those Workbooks Next Time can open some certain workbooks automatically when you start Microsoft Excel program. When creating a new workbook, these workbooks will cover the new one; while opening an existing workbook, these workbooks will be opened with the existing one.
Kutools for Excel - Supercharge Excel with over 300 essential tools, making your work faster and easier, and take advantage of AI features for smarter data processing and productivity. Get It Now
Related articles:
How to make a read-only template in Excel?
How to protect/lock an Excel template being overwritten with password?
How to find and change default save location of Excel templates?
How to edit/change a personal template in Excel?
VBA solution for setting default templates
Alternative: Set a custom start-up folder for Excel templates
Best Office Productivity Tools
Supercharge Your Excel Skills with Kutools for Excel, and Experience Efficiency Like Never Before. Kutools for Excel Offers Over 300 Advanced Features to Boost Productivity and Save Time. Click Here to Get The Feature You Need The Most...
Office Tab Brings Tabbed interface to Office, and Make Your Work Much Easier
- Enable tabbed editing and reading in Word, Excel, PowerPoint, Publisher, Access, Visio and Project.
- Open and create multiple documents in new tabs of the same window, rather than in new windows.
- Increases your productivity by 50%, and reduces hundreds of mouse clicks for you every day!
All Kutools add-ins. One installer
Kutools for Office suite bundles add-ins for Excel, Word, Outlook & PowerPoint plus Office Tab Pro, which is ideal for teams working across Office apps.
- All-in-one suite — Excel, Word, Outlook & PowerPoint add-ins + Office Tab Pro
- One installer, one license — set up in minutes (MSI-ready)
- Works better together — streamlined productivity across Office apps
- 30-day full-featured trial — no registration, no credit card
- Best value — save vs buying individual add-in