How to make a monthly budget template in Excel?
Budgeting is an essential practice not only for companies looking to plan their financial activities over the coming years, but also for individuals and families aiming to save money, reduce deficits, and make informed spending decisions. Creating a detailed monthly budget helps track income and expenses, control costs, and set financial goals efficiently. In this article, you will learn how to download a professionally designed budget template from Office.com in Excel, as well as how to create or customize a personal monthly budget template to suit unique requirements. You will also find advanced techniques such as using Conditional Formatting to highlight budget concerns, automating tasks with VBA, quickly summarizing data with Pivot Tables, and leveraging Kutools for Excel to enhance workflow efficiency.
- Customize a monthly budget template in Excel
- Download a monthly budget template from Office.com
- Save customized monthly budget table as AutoText entry for easy reusing with only one click
Customize a monthly budget template in Excel
In some cases, the available budget templates might not fully meet your specific needs. Building your custom monthly budget template in Excel allows you to define categories and layouts that align with your personal, family, or business objectives. This flexibility is particularly valuable if you have unique types of income, specific expense tracking requirements, or want to follow a particular reporting structure. Follow the steps below to create a tailored monthly budget template.
Step 1: Prepare your budget table by designing the layout with clear row and column headers as shown below. Common headers might include months (January to December) along columns, and income or expense categories along rows. Well-defined headers will allow easier calculation and summarization of budget data later on.

Step 2: Populate your table with relevant budget data, including all sources of income and individual expense items. Calculating totals at this stage provides immediate visibility into your planned finances and helps ensure data consistency.
(1) Calculate total income per month: Click on Cell B7 and input the following formula to sum up all income items for January (adjust according to your data range):
=SUM(B4:B6)
Next, use the Fill Handle to drag this formula across to range C7:M7, thereby calculating monthly totals for each subsequent month.
(2) Calculate the total income by item: In Cell N4, enter:
=SUM(B4:M4)
Then drag the Fill Handle down to N5:N6 so each row’s total is calculated across the year.
(3) Calculate the total income for the year: In Cell N7, confirm your totals are accurate by entering:
=IF(SUM(N4:N6)=SUM(B7:M7), SUM(N4:N6), FALSE)
This cross-checks the calculated annual total through both columns and rows to ensure the values match.

Step 3: Calculate the total expenses for each month and by item, following a similar process. Ensuring your expense calculations are correct will help you monitor spending and prevent overspending.
(1) For monthly expense totals: In cell B16, use:
=SUM(B10:B15)
Drag across to C16:M16 to calculate for each month.
(2) For total expenses by item: In cell N10, input:
=SUM(B10:M10)
Then fill down to N11:N15.
(3) For yearly total expenses: In cell N16, check your totals by entering:
=IF(SUM(B16:M16)=SUM(N10:N15), SUM(N10:N15), FALSE)
This helps confirm data reliability.

Step 4: Compute the monthly surplus or deficit so you can quickly identify profitable or problematic months. In cell B18, enter:
=B7-B16
Use the Fill Handle to apply this formula through C18:N18. This provides a clear, at-a-glance view of whether each month is operating at a surplus or deficit, which is essential for financial planning and timely adjustments.

Step 5: Visualize your income sources by creating a pie chart:
(1) Select the category column for incomes (e.g., A4:A6), then hold Ctrl and select the annual totals (e.g., N4:N6).
(2) Go to the Insert tab, click the Pie Chart icon (or Insert Pie and Doughnut Chart in newer Excel versions), and select the chart style you prefer from the drop-down list.

Step 6: Customize the appearance of your pie chart to communicate your results more clearly.
(1) Right-click the pie chart to select Add Data Labels for better data visibility.
(2) Add or edit the chart title. In Excel 2007/2010, use Layout > Chart Title > Above Chart, and input a relevant title such as "Incomes in Budget." In Excel 2013 and later, the title field appears automatically.
Step 7: Similarly, create a pie chart for expenses. Select the relevant expense categories (A10:A15) and their totals (N10:N15), then follow the previous steps for creating and formatting the chart.
Step 8: Once satisfied, save your work as a template, so it can be reused for future budget cycles. In Excel 2013, click File > Save > Computer > Browse. In Excel 2007/2010, use File / Office button > Save.
Step 9: In the Save As dialog, assign a meaningful name in the File name field. In the Save as type dropdown, select Excel Template (*.xltx), then click Save.

This approach ensures you have a reusable and adaptable personal template, saving time and maintaining consistency each month. Remember to protect your template if you wish to prevent unintentional overwriting in the future.
Practical tip: Review your template structure at the end of each budgeting cycle. If your income or expense categories changed, consider updating your template accordingly to ensure accuracy and relevance in future plans.
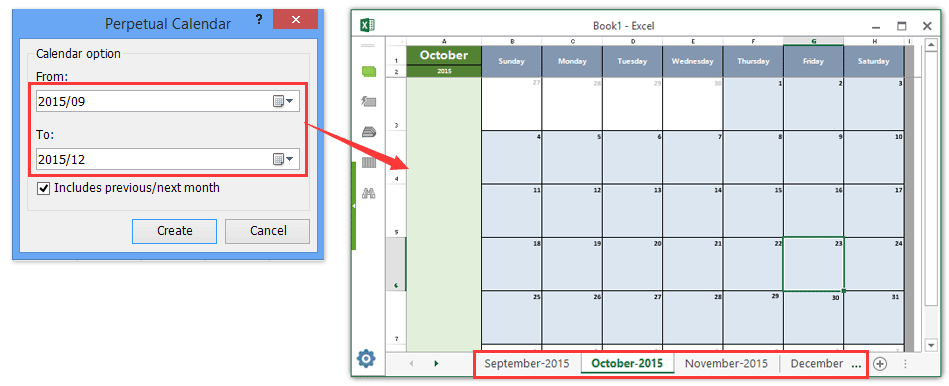
Easily create monthly calendar within specified date period in Excel
Kutools for Excel's Perpetual Calendar utility can help users create monthly calendar in a new workbook, and layout each calendar month in a new worksheet as below screenshot shown.
Download a monthly budget template from Office.com
If you prefer to use a professionally designed template or want to save time, Excel offers a variety of ready-made budget templates available directly from Office.com. Using these templates is especially helpful for beginners, small businesses, or users who need to set up a budget quickly. These templates come pre-formatted with standard categories, built-in formulas, and charts, making financial management easier right out of the box.
To use this feature, go to an open workbook and navigate to File > New. In the search box, type Budget and press Enter. Browse the selection of templates—such as personal monthly budgets, household budgets, or business expense trackers. Click your desired template and then press Create or Download to begin customizing it with your own data.

Advantages: These templates offer a standardized format, making them ideal for users who want a reliable solution without designing from scratch. They also showcase best practices in layout and formulas.
Limitations: If your budget structure or data tracking needs are more complex or unique, using these pre-designed templates may require significant customization. Always review the formulas and categories to ensure they fit your situation.
Save customized monthly budget table as AutoText entry for easy reusing with only one click
Beyond saving your budget as a template, Kutools for Excel’s AutoText feature makes it even easier to preserve customized tables—complete with formats and formulas—and insert them into any workbook instantly. This approach is perfect for users who frequently use the same budget layout in different files or want to set up recurring budget reports quickly. It significantly reduces repetitive work and helps maintain uniformity across different spreadsheets. All formatting and formula settings are retained, improving efficiency and accuracy.
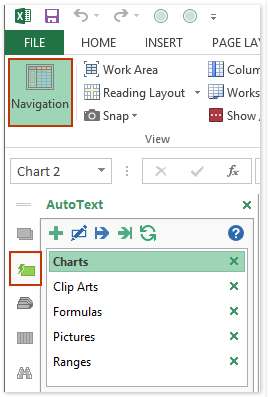
1. After creating your customized monthly budget table (see also how to create a Bell Curve chart?), activate the AutoText pane by clicking Kutools > Navigation > AutoText button ![]() at the far left of Navigation Pane. Refer to the illustration on the left:
at the far left of Navigation Pane. Refer to the illustration on the left:
2. Select your completed budget table. In the AutoText pane, click the Add button ![]() . This step adds your selection as an AutoText entry.
. This step adds your selection as an AutoText entry.

3. In the New AutoText dialog box that opens, assign a descriptive name and specify the group to save this AutoText. Click Add to finish.

This method effectively saves your customized budget table for future use. From now on, you can quickly insert this table into any workbook with just one click from the AutoText pane, ensuring consistency and saving valuable time. If you later update your standard budget layout, simply create a new AutoText entry or overwrite the previous one.
Kutools for Excel - Supercharge Excel with over 300 essential tools, making your work faster and easier, and take advantage of AI features for smarter data processing and productivity. Get It Now
Related articles:
How to make a read-only template in Excel?
How to protect/lock an Excel template being overwritten with password?
How to find and change default save location of Excel templates?
How to edit/change a personal template in Excel?
How to change the default workbook/sheet template in Excel?
How to create a Macro-enabled template in Excel?
Best Office Productivity Tools
Supercharge Your Excel Skills with Kutools for Excel, and Experience Efficiency Like Never Before. Kutools for Excel Offers Over 300 Advanced Features to Boost Productivity and Save Time. Click Here to Get The Feature You Need The Most...
Office Tab Brings Tabbed interface to Office, and Make Your Work Much Easier
- Enable tabbed editing and reading in Word, Excel, PowerPoint, Publisher, Access, Visio and Project.
- Open and create multiple documents in new tabs of the same window, rather than in new windows.
- Increases your productivity by 50%, and reduces hundreds of mouse clicks for you every day!
All Kutools add-ins. One installer
Kutools for Office suite bundles add-ins for Excel, Word, Outlook & PowerPoint plus Office Tab Pro, which is ideal for teams working across Office apps.
- All-in-one suite — Excel, Word, Outlook & PowerPoint add-ins + Office Tab Pro
- One installer, one license — set up in minutes (MSI-ready)
- Works better together — streamlined productivity across Office apps
- 30-day full-featured trial — no registration, no credit card
- Best value — save vs buying individual add-in