Schedule Emails
Pick the perfect send time — later today, tomorrow morning, or a custom date.
- One-click "Schedule Send" presets
- Perfect for cross-time-zone scheduling
Take control of your Outlook like never before with Kutools — the all-in-one productivity add-in designed to simplify every step of your email workflow. From AI-powered smart replies and instant translations to powerful bulk actions and intelligent scheduling, Kutools helps you manage your inbox faster, smarter, and with less effort. Fully compatible with all Microsoft Office languages, it’s built to fit seamlessly into your Outlook, so you can focus on what matters most — getting things done.
100+ powerful features for Outlook
Includes AI tools like smart reply and summarization
Supports all Microsoft Office languages
Free to use for 30 days, no limitations
Download Purchase
Discover new features designed to streamline your Outlook workflow.
Pick the perfect send time — later today, tomorrow morning, or a custom date.
Temporarily move emails to the "Snoozed" folder and bring them back at the right time.

Manage contacts with a tree view and powerful folder actions.

Pick recipients faster with tree view and suggestions.

Kutools streamlines daily email tasks with batch tools for sending, forwarding, and managing attachments — saving you valuable time.
Smart AI features — including instant replies, content summarization, email drafting, and translation — make your communication faster, more accurate, and contextually precise.
Kutools is built to work naturally within Outlook’s interface, with intuitive tools that feel like native features — no steep learning curve.
Download NowDesigned for global users, Kutools supports all Microsoft Office languages — eliminating language barriers and making every feature fully accessible, no matter your preferred language.

Outlook removes attachments when you reply — which means manual re‑attaching and wasted time. With Kutools, you can Reply or Reply All and keep original attachments intact. Great for multi‑party reviews, vendor feedback loops, or legal/finance threads where files must go back and forth.

Temporarily tuck emails away and bring them back exactly when you’re ready — like Gmail’s Snooze. Messages reappear at the top of your Inbox marked as unread, so nothing slips through the cracks. Ideal for non‑urgent requests, cross‑time‑zone replies, or items you’ll handle after a meeting.

Export one or many emails to PDF/HTML/TXT/CSV/Word/Excel in a few clicks for archiving, sharing, or compliance. Preserve headers, timestamps, and attachment references. Batch export saves tons of time for audits and reporting.

Batch save, detach, compress, auto‑save/auto‑detach attachments to keep your mailbox lean and organized. Excellent for teams that handle large files (design, legal, engineering) or inboxes nearing storage limits.

Detect and remove duplicate messages from selected messages. Reclaim mailbox space, reduce clutter, and speed up search — especially useful after imports or rule misconfigurations.

Select recipients faster with a tree view and smart suggestions. Perfect for teams with layered org structures or frequent To/CC/BCC combinations.

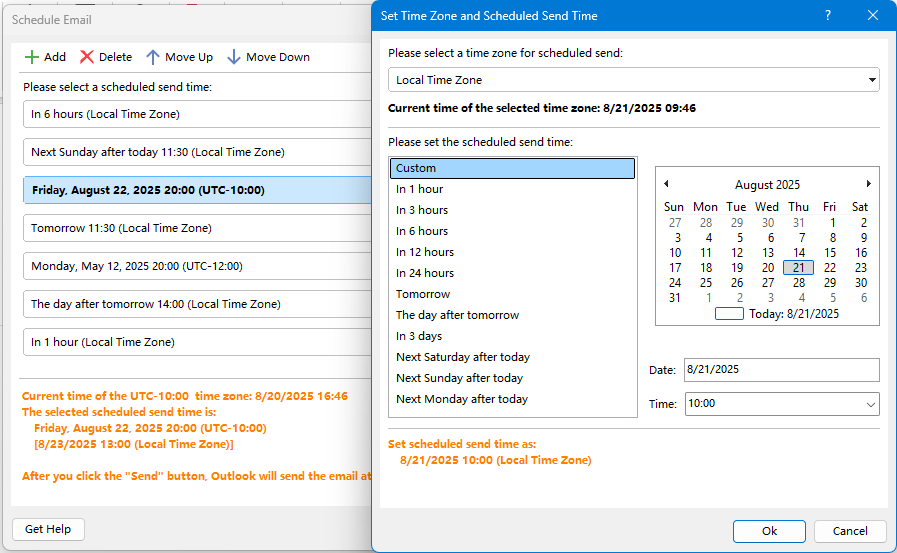
Compose now, send later. Choose an exact date and time or use smart presets. Great for cross‑time‑zone communication, campaign planning, and respectful off‑hours delivery.

Automate routine messages with flexible schedules — send emails daily, weekly, monthly, or on custom intervals. Set start/end dates, choose specific weekdays, and optionally skip weekends or holidays. Use templates, include attachments. Easily edit or cancel the series at any time and keep your follow-ups consistent without manual effort.

Add CC/BCC automatically based on flexible rules (account, keywords, recipients, etc.). Eliminate manual errors and ensure the right stakeholders are always in the loop.

Instantly create contacts from selected emails (add senders and multiple recipients). Clean up scattered addresses and build a reliable address book for faster composing and fewer mistakes.
The tools are organized below according to the Ribbon groups in which they appear.
 |
| Help |
 |
|
| Related Group Features |
Note: The Kutools tab appears when you open an email in the Outlook reading pane.
 |
| Related Group Features |
Note: The Kutools tab becomes visible when an email is opened in the Outlook reading pane.
👉 Experience a faster, smarter Outlook — download Kutools for Outlook for free today!
AI Mail Assistant: AI Mail Assistant utilizes the most advanced AI technology to assist you in replying to emails swiftly, precisely, and intelligently. Moreover, it optimizes email content, summarizes email messages, translates them into various languages, and extract the important info from the email contents, and analyze the emails, Additionally, you can create new templates to suit your specific needs, such as identifying contract loopholes.
AI Utilities:
Tip: If you don’t have your own AI key, you can register for a Kutools AI key to get 100 free uses across all AI-powered features.
Smart Recipients: With cross-account contact access, advanced search, effortless sorting and filtering, customizable display options, and intuitive visual indicators, Smart Recipients ensures that your email communication is seamless and efficient.
Smart Address Book: Access contacts across accounts with ease. Quickly switch between accounts, search with full-field filters, display custom contact fields, and sort flexibly—all in one powerful contact management tool.
Bulk Processing: Includes a set of tools for bulk processing emails
Add Contacts:

Tab Bar: Enable a tabbed interface in Outlook. All open windows—emails, contacts, tasks—are displayed in a tab bar for quick, easy switching between them.
Resource Pane: When enabled, a pane appears on the right side of the Outlook window (in the reading pane or pop-up). From here, you can insert emojis, AutoText entries, or bookmarks into your messages.
Toolbar: Enable this to display a floating emoji toolbar in Outlook, allowing you to insert emojis quickly while composing messages.
Utilities: When enabled, a pane appears on the right side of the Outlook window (in the reading pane or pop-up). From here, you can insert emojis, AutoText entries, or bookmarks into your messages.

Snooze: Temporarily move selected emails to the Snooze folder and bring them back to your inbox at a scheduled time.
Schedule Email: Customize when your email is sent. The message will be delivered automatically at the scheduled time you set.
Recurring Email: Customize when your email is sent. The message will be delivered automatically at the scheduled time you set.
Delay Email: Delay the delivery of all outgoing emails by a specified time. During this delay, you can freely cancel or edit the email before it's actually sent.
Send Separately: Send the same email to multiple recipients individually, each with a personalized greeting (e.g., “Dear John,” “Dear Sarah”)—without exposing other recipients' addresses. Tutorial...
Reply with Attachment: Keep original attachments when replying to an email—attachments won’t be lost during the reply.
Reply All with Attachment: When replying to all recipients, this feature ensures the original attachments are retained in your response.
Respond:

Advanced Rules: Provides more rule types and customization options than Outlook’s default settings—giving you greater control over how emails are handled.
Anti-Phishing: Automatically or manually check hidden links in emails and reveal the actual URLs—helping you avoid phishing scams and stay safe online.
Junk: A comprehensive group of tools to block or unblock specific emails and reduce unwanted messages in your inbox.

Add date into subject when creating a new email: Automatically insert the current date into the subject line when composing a new email.
Add a signature with date when create, reply to and forward email: Automatically include the current date in your signature when composing, replying to, or forwarding emails.
Always reply with default account: Ensure that all replies are sent from your default email account, regardless of which account received the message.
Add greeting when create, reply to and forward an email: Automatically insert a personalized greeting into the email body when composing, replying to, or forwarding messages.
Include myself when reply all: Automatically include your own address in the recipient list when using "Reply All".
Warning when Reply / Reply All: Show a confirmation prompt when replying to a message with multiple recipients.
Warning me when reply all to a message that have me in Bcc: Display a warning dialog if your address is in the BCC field of an email you’re replying all to.
Use default account to forward: Automatically use the default account when forwarding emails.
Show: It will display a notification to tell you that what Kutools for Outlook has done for you. There are 6 options:
Enable Log: Keep a log of all successful and failed automated actions performed by Kutools for Outlook.
Change default text zoom: Adjust the default zoom level for reading, composing, replying, and forwarding emails.
Enable query builder: Quickly enable Outlook’s hidden Query Builder for advanced search functionality.
Change maximum attachment size: Modify the attachment size limit to accommodate larger files.
Configure attachment types: Unblock or allow access to specific file extensions in email attachments.
Change the default attachment saving folder: Specify a default folder for saving email attachments.

Log: It helps to record the successful and failed results for the automatic operations of Kutools for Outlook.
Check for Updates: Check for and install the latest version of Kutools for Outlook.
Help:

Statistics: Quickly count emails in Outlook based on specific time periods or folder selections. You can optionally export the results to a new file, such as an Excel workbook. This tool is ideal for generating email activity insights.
Report:

Delete Duplicate Emails: Quickly scan and delete duplicate emails from selected folders across one or multiple accounts. Optionally, move duplicates to a specific folder instead of deleting them permanently.
Delete Duplicate Contacts: Delete duplicate contacts from one or multiple contact folders at once. You may also choose to move duplicates to another folder instead of deleting them.
Note: By default, duplicates are defined as contacts with the same Full Name and Email 1 Address. You can customize matching criteria.
Merge Duplicate Contacts: Merge duplicate contacts in one or more folders using specified matching fields.
Note: Default duplicate fields are Full Name and Email 1 Address, which can be customized.
Delete Duplicate Tasks: Quickly remove all duplicate tasks in a single folder or across multiple folders—keeping only one copy of each.
Remove Subject Prefix: Automatically remove common reply/forward prefixes such as RE: or FW: from selected emails or from entire folders. You can also define custom prefixes to remove.
Delete:

Attachment Manager: The Attachment Manager provides a centralized way to manage multiple attachments across multiple emails. You can quickly save, delete, compress, or detach attachments in bulk. It also supports automation—automatically detaching or compressing attachments for incoming and outgoing emails based on your rules.
Attachment Tools: This group collects some useful tools for easily handling Outlook attachments:
Auto Save attachments:Automatically save all incoming attachments to a specific folder. Rules can be set to save only attachments that meet certain conditions (e.g., by file name, sender, size, type).
Auto Detach attachments: Automatically detach all attachments from incoming emails. You can configure rules to control which types of attachments to detach.
Auto Compress attachments: Automatically compress attachments in both incoming and outgoing emails. Custom rules allow you to specify conditions for when compression occurs.
Attachment Options: Click the right-arrow button in the Attachments group to open Attachment Options. Here, you’ll find useful settings for managing how attachments are saved, detached, and compressed—making it easy to fine-tune your workflow.

Utilities Group:
Auto Reply: Easily create auto-reply rules for one or multiple accounts. Customize the subject and message content to fit your out-of-office or busy status scenarios.
Auto Forward: Automatically forward incoming emails to specific recipients based on customizable rules. Example rules include:
Auto CC / BCC: Automatically add CC or BCC recipients when sending emails based on specific rules. Example scenarios include:

Split to Multiple Contact Groups: Quickly split a single contact group (distribution list) into two or more smaller groups for better management.
Break Contact Group: Convert all members of a contact group into individual contact entries in your Contacts folder.

Folder:

Advanced Search: Easily search across Emails, Contacts, Tasks, Appointments, and Meetings using one or more conditions simultaneously. You can save your search settings as scenarios for reuse—saving time and improving productivity.
Search emails by sender
Search emails by recipient:
Search emails by current reply to:
(Search) This Contact: Quickly find all emails that include a specific contact from your address book.
Clear Search History: Instantly remove all recent Outlook search history with a single click.

Advanced Print: A powerful printing tool that enables flexible print options for various Outlook items.
Print Selection: Print only the selected content from an email—no need to print the entire message.

Remove Birthday Reminder: Disable all birthday reminders from your Outlook calendar with a single click.
Restore Birthday Reminder: Easily re-enable all previously disabled birthday reminders in your calendar.

Duplicate Names: Remove all duplicate email addresses from the To, Cc, and Bcc fields with a single click.
My Names: Automatically remove your own email addresses from the To, Cc, and Bcc fields when composing a message.
Insert History Message: If you've used Reply Without History or Reply All Without History, click this button to reinsert the original message content into your current reply window.
Send Separately: Send the same email to multiple recipients with personalized greetings—without revealing other recipients’ addresses.
Direct Reply To: After setting a default reply-to address, you can disable it for individual emails using this option while composing.
Skip Auto CC / BB: Temporarily bypass auto CC or BCC rules for the current email, even if it matches existing conditions.

Rely Selection: Reply to an email using only the selected portion of text—perfect for quoting or referencing specific content.
Signature to Contact: Convert the sender’s signature into a contact entry with one click.

Information: Quickly count the number of members in a contact group with a single click.
Kutools for Outlook boosts productivity with 100+ Pro features.
Generally speaking, random data are a series of numbers, text strings or other symbols which are used in statistical sampling, data encryption, lottery, testing or training, or other fields where unpredictable results are desired. In this article, we will introduce different methods for generating random numbers, text strings, dates and times in normal Excel and Excel 365.
This section will talk about various kinds of solutions for generating numbers, text strings, dates and times in an Excel worksheet.
To generate or insert multiple random numbers in a worksheet, the normal RAND or RANDBETWEEN function can help you a lot. Besides the formulas, there are other codes and easy tools that also can do you a favor.
Generate random decimal numbers between two numbers
The RAND function can be used to generate random decimal numbers between 0 and 1, between 0 and any other number or between two specific numbers.
| Formula | Description |
| =RAND() | Generate random decimal numbers between 0 and 1. |
| =RAND()*N | Generate random decimal numbers between 0 and N. |
| =RAND()*(B-A)+A | Generate random decimal numbers between any two numbers you specified. (A is the lower bound value and B is the upper bound value.) |
Please copy the above formula you need, and apply the formula to as many cells as you want, then you will get the results as below screenshots shown:
| =RAND() | =RAND()*50 | =RAND()*(100-50)+50 |
 |
 |
 |
Generate random integer numbers between two numbers
To generate some random integers, you should combine the RAND and INT functions together as shown in the table below:
| Formula | Description |
| =INT(RAND()*N) | Generate random integers between 0 and N. |
| =INT(RAND()*(B-A)+A) | Generate random integers between any two numbers you specified. (A is the lower bound value and B is the upper bound value.) |
Please apply the above formula you need, then drag and copy the formula to other cells as you need, and then you will get the results as below screenshots shown:
| =INT(RAND()*100) | =INT(RAND()*(500-200)+200) |
 |
 |
In Excel, there is a RANDBETWEEN function which can also help you create random numbers quickly and easily.
Generate random integer numbers between two numbers
For example, if you want to generate random integers between 100 and 200, please apply the below formula into a blank cell, and then drag and copy the formula to other cells you want, see screenshot:

Tips: This RANDBETWEEN function also can create both positive and negative numbers. To insert random numbers between -100 and 100, you just need to change the bottom value to -100, see below formula:

Generate random numbers with specified decimal places between two numbers
To create random numbers with specified decimal places, you need to change the RANDBETWEEN formula as this:
Here, I want to get a list of random numbers between 10 and 50 with two decimal places, please apply the below formula, and then drag and copy the formula to other cells as you need, see screenshot:

The following User Defined Function also can help you to generate random integer numbers or numbers with specific decimal places in a range of worksheet. Please do as follows:
1. Hold down ALT + F11 keys to open the Microsoft Visual Basic for Applications window.
2. Click Insert > Module, and paste the following code in the Module window.
VBA code: Generate random numbers
Public Function RandomNumbers(Num1 As Long, Num2 As Long, Optional Decimals As Integer)
'Updateby Extendoffice
Application.Volatile
Randomize
If IsMissing(Decimals) Or Decimals = 0 Then
    RandomNumbers = Int((Num2 + 1 - Num1) * Rnd + Num1)
Else
    RandomNumbers = Round((Num2 - Num1) * Rnd + Num1, Decimals)
End If
End Function
3. Then, close the code and go back to the worksheet, in a blank cell, type this formula =RandomNumbers(X,Y,Z).
Note: In the above formula, X indicates the lower limit of the numbers, Y indicates the upper limit of the numbers, and Z is the specified decimal places of random numbers, please change them to your needed numbers.
1.) To generate random whole numbers between 50 and 200, please use this formula:
2.) To insert random numbers between 50 and 200 with 2 decimal places, please apply the below formula:
4. At last, drag and copy the formula to other cells as you want, you will get the results as below screenshots shown:
 |
 |
If you are tired of remembering and entering formulas, here, I recommend a useful feature – Insert Random Data of Kutools for Excel. With this feature, you can generate random integers or decimal numbers without any formulas.
Kutools for Excel - Packed with over 300 essential tools for Excel. Enjoy permanently free AI features! Download now!
1. Select a range of cells where you want to generate random numbers, and then click Kutools > Insert > Insert Random Data, see screenshot:

2. In the Insert Random Data dialog box:
1.) Generate random whole numbers:
Under the Integer tab, in the From and To boxes, type the number range you will generate random whole numbers between, and then click Ok or Apply button to get the random whole numbers as below screenshot shown:

2.) Generate random numbers with specific decimal places:
Under the Decimal tab, specify two numbers separately in the From and To boxes that you want to generate random decimal numbers between. And then choose decimal place in Decimal place text box and click the Ok or Apply button to generate random decimals. See screenshot:

Tips: To generate random decimals with no duplicates, please check the Unique values option.
When using the formulas or code to generate random numbers, some duplicate numbers will be produced as well. If you want to create a list of random numbers without duplicates, this section will demonstrate some methods for you.
For instance, I want to generate random numbers between 100 to 200 without duplicate numbers, here is a complex array formula that could help you, please do with the following steps:
1. Specify lower limit and upper limit values in two cells. In this example, I will enter 100 and 200 into cell B2 and B3, see screenshot:

2. Then, copy the following formula into a blank cell, D3 for example, (don’t put the formula into a cell of the first row), and then press Ctrl+ Shift + Enter keys together to get the first numbers, see screenshot:
Note: In the above formula, B1 is the lower value, and B2 is the upper value you want to return random numbers between. D2 is the cell above the formula.

3. Then, drag and copy this formula to other cells as you want to generate the random numbers between 100 and 200:

If the above formula is somewhat difficult for you to understand, you can apply the below VBA code, please do as this:
1. Hold down ALT + F11 keys to open the Microsoft Visual Basic for Applications window.
2. Click Insert > Module, and paste the following code in the Module window.
VBA code: Generate random numbers without duplicates
Sub Range_RandomNumber()
'Updateby Extendoffice
Dim xStrRange As String
Dim xRg, xCell, xRg1 As Range
Dim xArs As Areas
Dim xNum_Lowerbound As Integer
Dim xNum_Upperbound  As Integer
Dim xI, xJ, xS, xR As Integer
xStrRange = "A1:B20"
xNum_Lowerbound = 100
xNum_Upperbound = 200
Set xRg = Range(xStrRange)
Set xArs = xRg.Areas
xRgCount = 0
For xI = 1 To xArs.Count
    Set xCell = xArs.Item(xI)
    xRgCount = xCell.Count + xRgCount
Next xI
xS = (xNum_Upperbound - xNum_Lowerbound + 1)
If xRgCount > xS Then
    MsgBox ("Number of cells greater than the number of unique random numbers!")
    Exit Sub
End If
    xRg.Clear
For xI = 1 To xArs.Count
    Set xCell = xArs.Item(xI)
    For xJ = 1 To xCell.Count
        Set xRg1 = xCell.Item(xJ)
        xR = Int(xS * Rnd + xNum_Lowerbound)
        Do While Application.WorksheetFunction.CountIf(xRg, xR) >= 1
            xR = Int(xS * Rnd + xNum_Lowerbound)
        Loop
        xRg1.Value = xR
    Next
Next
End Sub
Note: In the above code, xStrRange = "A1:B20" indicates that you want to generate random numbers in the range A1:B20. xNum_Lowerbound = 100 and xNum_Upperbound = 200 indicate that the lower and upper values to create random numbers between 100 and 200. Please change them to your need.
3. Then press F5 key to run this code, and the unique random numbers will be inserted into the specified range.
To quickly create multiple unique random numbers, the Kutools for Excel’s Insert Random Data feature supports a smart option – Unique values. By checking this small option, you will solve this task with ease.
1. Select a range of cells where you want to generate random numbers.
2. And then click Kutools > Insert > Insert Random Data. In the popped-out dialog box, please do the below operations:

If you want to generate some random even or odd numbers in a range of cell, you just need to put the RANDBETWEE function inside the EVEN or ODD function, the generic syntaxes are:
| Formula | Description |
| =EVEN(RANDBETWEEN(bottom,top)) | Generate random even numbers between two given numbers. |
| =ODD(RANDBETWEEN(bottom,top)) | Generate random odd numbers between two given numbers. |
For instance, to generate random even or odd numbers from 10 to 100, please apply the following formulas:
And then, copy the formula to other cells you want by dragging the fill handle, then, you will get the results as below screenshots shown:
 |
 |
Sometimes, you may need to create a set of random numbers that add up to a predetermined value. For example, I want to generate 5 or n random numbers between 10 and 50 that come to a total of 100 as below screenshot shown. To solve this puzzle in Excel, I will introduce two methods for you.

Here, the following formulas can help you. Please follow the instruction step by step as they are a little complex:
1. First, you should create your needed data: the predetermined total value, start number, end number and how many random numbers you want to generate as below screenshot shown:

2. Then, please copy the below formula into a blank cell where you want to generate the numbers. In this example, I will put the formula into cell A4, and press Enter key to get the first random number, see screenshot:
Note: In the above formula: A2 is the given total value; B2 and C2 are bottom and top values you want to generate random numbers between; D2 indicates the number of random numbers you want to generate; A4 is the cell where you enter this formula.

3. Go on copying the following formula into cell A5, and press Enter key to get the second random number, see screenshot:
Note: In the above formula: A2 is the given total value; B2 and C2 are bottom and top values you want to generate random numbers between; D2 indicates the number of random numbers you want to generate; A4 is the cell to put the first formula; and A5 is the cell to put the second formula.

4. Then, select the second generated number, drag down to copy this formula to the below three cells. And now, you will get 5 random numbers as below screenshot shown:

5. To test the result, you can sum these numbers to check if the total is 100. Press F9 to refresh the random numbers dynamically, and their total sum will always be 100.

We can use the above formulas to generate random numbers that meet our needs. However, if you want to list all the possible number combinations consisting of the numbers you specified with a specific total sum, here, I will recommend an easy tool – Kutools for Excel. With its Make Up A Number feature, you can get all sets of random number combinations with the same specific sum.
1. First, you should list the numbers you specified. Here, we listed all the numbers between 10 and 50 as shown in the screenshot below:

2. Then, click Kutools > Content > Make Up A Number, see screenshot:

3. In the popped-out Make up a number dialog box, please do the following operations:

4. After processing, you will see all sets of random numbers with a total sum of 100, consisting of numbers from 10 to 50, listed as follows.

Tips: It is optional for you to specify the number of combinations and number of random numbers in each combination. For example, to generate 10 combinations and each combination contains 5 random numbers, you can set the operations in the dialog box under Advanced settings as follows:

And you will get the results as this:

This section will show you how to generate random letters in Excel, such as uppercase letters from A to Z, lowercase letters from a to z or some special character (! " # $ % & ' ( ) * + , - . /).
In Excel, you can combine the CHAR and RANDBETWEEN functions with some ANSI character codes to create formulas as shown below:
| Formula | Description |
| =CHAR(RANDBETWEEN(65, 90)) | Generate random uppercase letters between A and Z. |
| =CHAR(RANDBETWEEN(97, 122)) | Generate random lowercase letters between a and z. |
| =CHAR(RANDBETWEEN(33, 47)) | Generate random special characters, such as: ! " # $ % & ' ( ) * + , - . / |
Please apply any one of the above formulas you need, and copy the formula into as many cells as you want, then you will get the results as below screenshots shown:
| =CHAR(RANDBETWEEN(65, 90)) | =CHAR(RANDBETWEEN(97, 122)) | =CHAR(RANDBETWEEN(33, 47)) |
 |
 |
 |
Tips: If you want to generate random text strings with several letters, you just need to use the & character to join the letters as you need.
1.) To generate random strings with four uppercase letters, please apply the below formula:

2.) To generate random strings with four lowercase letters, please apply the below formula:
3.) To generate random strings with the first two uppercase letters and the last two lowercase letters, please use the following formula:
You can use the simple formulas and & character to make various combinations that meet your needs.
If you have installed Kutools for Excel, you can generate random letters and strings quickly and easily without remembering any formulas.
1. Select a range of cells to insert the letters or strings.
2. And then click Kutools > Insert > Insert Random Data, in the popped-out dialog box, please do the following operations:

When you create a password, the password should have 8 characters at least and contain a mix of uppercase letters, lowercase letters, numbers and some special characters. In this section, I will introduce some tricks for generating random passwords in Excel.
For instance, here, I will create random passwords with the length of 8 characters. You just need to combine the three formulas that are provided in Generate random letters and text strings with formulas section.
Please copy the below formula into a blank cell:
Note: In the above formula, the first CHAR and RANDBETWEEN functions generate a random uppercase letter, and the second and third expressions generate two lowercase letters, the fourth expression is used to generate one uppercase letter, the fifth expression generates a 3-digit number between 100 and 999, and the last expression is used to generate a special character, you can modify or adjust the order of them to your need.

To insert random passwords in Excel, the following User Defined Function also can do you a favor, please do as this:
1. Hold down the ALT + F11 keys, and it opens the Microsoft Visual Basic for Applications window.
2. Click Insert > Module, and paste the following macro in the Module window.
VBA code: Generate random passwords in Excel
Function RandomizeF(Num1 As Integer, Num2 As Integer)
'Updateby Extendoffice
Dim Rand As String
Application.Volatile
getLen = Int((Num2 + 1 - Num1) * Rnd + Num1)
Do
    i = i + 1
    Randomize
    Rand = Rand & Chr(Int((85) * Rnd + 38))
Loop Until i = getLen
RandomizeF = Rand
End Function
3. Then close the code and go back to the worksheet. In a cell, enter this formula =RandomizeF(8,10) to generate a random text string with a minimum length of 8 characters, and a maximum length of 10 characters.
4. Then drag and copy the formula to other cells as you want. The random strings with alphanumeric and specific characters with the length of between 8 and 10 will be created. See screenshot:

Is there a quick and easy way to generate multiple random passwords in Excel? Kutools for Excel provides an excellent feature - Insert Random Data. With this feature, you can insert random passwords with only several clicks.
1. Select a range of cells where to insert the passwords.
2. Then click Kutools > Insert > Insert Random Data. In the popped-out dialog box, please do the following operations:

Have you ever tried to display or list some specific text values randomly in Excel? For example, to list some given texts (item1, item2, item3, item4, item5) randomly in a list of cells, the following two tricks may help you solve this task.
In Excel, you can create a formula based on the CHOOSE and RANDBETWEEN functions to randomly list the specific texts, the generic syntax is:
Please apply the below formula into a blank cell, and then drag the fill handle down to fill the cells where you want to list the specific values randomly, see screenshot:

If you have Kutools for Excel, its Insert Random Data feature also can help you to insert custom text values randomly in a range of cells.
1. Select a range of cells where to insert the specific texts.
2. Then click Kutools > Insert > Insert Random Data, in the popped-out dialog box, please do the following operations:
 button to open another Kutools for Excel prompt box, enter or select your own custom text values that you want to list randomly. (The entries should be separated by comma when typing them manually.)
3. Then, click Ok to return to the Insert Random Data dialog, your own custom texts list has been displayed into the list box. Now, select the new list items, click Ok or Apply button to insert the values into selected cells randomly.

Tips: To list randomly the specified texts without duplicates, please check Unique values option.
Supposing, you have a long list of names, to pick up some random names from that list as the lucky names or research objects as below screenshot shown. How could you solve this problem in Excel?

In Excel, there is no direct way for us to pull out random values from a list, but you can create a formula based on the INDEX, RANDBETWEEN and ROWS functions to extract some random values.
1. Please copy the below formula into a blank cell where you want to put the extracted value:
Note: In the above formula, A2:A12 is the list of values that you want to pick up random values from.
2. Then, drag the fill handle down to several cells where you want to display the random values, and you will get the result as following screenshot shown:

When using the above formula, some duplicate values will be displayed. To skip the duplicate values, you should create a helper column first, and then apply a formula based on the INDEX and RANK.EQ functions. Please do as follows:
1. Enter the below formula into a blank cell to get a list of random numbers, see screenshot:

2. Then, copy the below formula in a cell of another column where you want to extract some random values, and then drag and copy this formula to the below cells to display some non-repeating random values, see screenshot:
Note: In the above formula, A2:A12 is the list of values you want to generate some random values from, B2 is the first cell of the helper column, B2:B12 is the helper formula cells you are created in step 1.

Here I will recommend a useful feature – Sort / Select Range Randomly of Kutools for Excel. With this feature, you can select some random cells, rows or columns as you need.
1. Select the list of cells you want to select some random values from.
2. And then, click Kutools > Range > Sort / Select Range Randomly, see screenshot:

3. In the Sort / Select Range Randomly dialog box, please do the following operations:

4. After selecting the cells, you can copy and paste them to other cells as you need.
Assume that you have a list of names, now, you want to divide the names to three groups (Group A, Group B, Group C) randomly as below screenshot shown. In this section, I will discuss some formulas for solving this task in Excel.

To randomly assign people to specified groups, you can use the CHOOSE function in combination with the RANDBETWEEN function.
1. Please copy or enter the following formula into a cell where you want to generate the group:
Note: In the above formula, Group A, Group B, and Group C indicate the group names you want to assign, and the number 3 indicates how many groups you want to distribute.
2. Then, drag the fill handle to fill this formula to other cells, and the names will be divided into three groups as below screenshot shown:

If you want all the groups have an equal number of names, the above formula will not work correctly for you. In this case, you can create a helper column with random values by the RAND function, and then apply a formula based on the INDEX, RANK and ROUNDUP functions.
For instance, I list the group names that you want to assign based on in the cells F2:F4. To assign people to the groups (Group A, Group B, Group C), and each group has 4 participants, please do as this:
1. Enter this formula: =RAND() into a blank cell to get a list of random numbers, see screenshot:

2. Then, In the next column, for instance, in cell D2, copy or type the below formula:
Note: In the above formula, C2 is the first cell of the helper column, C2:C13 is the helper formula cells you created in step 1, the number 4 indicates how many names you want each group contains, F2:F4 is the range of cells contain the group names that you want to assign for the data.
3. Drag fill handle down to generate random groups for the list of data, and the names will be divided into equal groups, see screenshot:

To generate arbitrary dates between two given dates, I will introduce some methods for you.
For example, I want to generate some dates between 2021-5-1 and 2021-10-15 randomly. Normally, in Excel, you can accomplish the task by using a combination of the RANDBETWEEN and DATE functions, please do as this:
1. Select a cell where you want to insert a random date, and then enter the following formula:
Note: In this formula, 2021, 5, 1 is the starting date, and 2021, 10, 15 is the ending date, you can replace them as you need.
2. Then, drag and copy this formula to other cells that you want to fill this formula, five-digit numbers will be displayed in the cells as below screenshot shown:

3. And then, you should format the numbers to date format. Please select the formula cells, and right-click, choose Format Cells from the context menu.
4. In the Format Cells dialog box, click Number tab, and select Date from the Category pane, then select a date format you need from the Type drop-down list. See screenshot:

5. Click OK to close the dialog. Now, the numbers have been converted to the normal dates. See screenshot:

Tips: If you want to generate random workdays excluding the weekends, the below formula may help you:
Kutools for Excel’s Insert Random data also provides an option to help you to generate random dates, workdays, weekends between two given dates.
1. Select a range of cells where to insert the random dates.
2. Then click Kutools > Insert > Insert Random Data, in the popped-out dialog box, please do the following operations:

Tips: To generate some random distinct dates, please check Unique values option.
After inserting random numbers, text strings and dates, in this section, I will talk about some tricks for generating random times in Excel.
Generate random times with a formula
To generate random times in a range of cell, a formula based on the TEXT and RAND functions can do you a favor.
Please enter the below formula into a blank cell, and then drag and copy the formula to other cells where you want to get the times, see screenshot:

Generate random times between two given times with a formula
If you need to insert some times randomly between two specific time, such as the times from 10 o’clock to 18 o’clock, please apply the below formula:
Note: In the above formula, the number 18 is the end time, and 10 stands for the start time. You can change them to meet your demands.
And then, drag and copy the formula to other cells where you want to generate the random times between two given time ranges, see screenshot:

Generate random times at specific intervals with a formula
For instance, if you want to generate random times at specific intervals in Excel, such as inserting random times at a 15-minute interval. To deal with this job, you can use the RAND and FLOOR functions within the TEXT function.
Copy or enter the below formula into a blank cell, and then drag and copy this formula to the cells that you want to get the random times, see screenshot:
Note: In the formula, the number 15 is the time interval, if you need the random times at a 30-minute interval, just replace the 15 with 30.

If you have Kutools for Excel, its Insert Random Data feature also can help you to generate random times between given times in a worksheet.
1. Select a range of cells where to generate the times.
2. Then click Kutools > Insert > Insert Random Data, in the popped-out dialog box, please do the following operations:

If you want to generate random dates and times together, the below formula can help you.
1. Enter or copy the following formula into a cell where you want to generate the random datetimes:
Note: In this formula, 2021-10-15 12:00:00 is the end date and time, and 2021-1-1 9:00:00 is the start date and time, you can modify them to your need.
2. Then, drag and copy this formula to other cells where you want the random datetimes to be displayed, see screenshot:

This section will show how to generate random numbers, dates, and get random selection and assign data to groups randomly in Excel 365, Excel 2021, and future versions with a new dynamic array function - RANDARRAY.
The RANDARRAY function is used to return an array of random numbers between any two numbers that you specify.
The syntax of RANDARRAY function is:
To generate random whole or decimal numbers in Excel 365, Excel 2021, and future versions, you can use this new RANDARRAY function.
To create a list of random numbers within a specific range, please apply the following formulas:
Please enter any of the below formulas as you need, and then press Enter key to get the results, see screenshots:
 |
 |
When using the normal RANDARRAY function to generate random numbers, some duplicate numbers may also be generated. To avoid the duplicates, here, I will talk about some formulas for solving this task.
Generate a list of non-repeating random numbers
To generate a column or a list of unique numbers randomly, the generic syntaxes are:
Random integers without duplicates:
Random decimals without duplicates:
For example, here, I will insert a list of 8 random numbers from 50 to 100 with no repeats, please apply the below any formulas you need, and then press Enter key to get the results:
 |
 |
Generate a range of non-repeating random numbers
If you want to generate non-repeating random numbers in a range of cells, you just need to define the number of rows and columns into the SEQUENCE function, the generic syntaxes are:
To generate a column or a list of unique numbers randomly, the generic syntaxes are:
Random integers without duplicates:
Random decimals without duplicates:
Here, I will fill a range of 8 rows and 3 columns with unique random numbers from 50 to 100, please apply any of the below formulas you need:
 |
 |
By using this new RANDARRAY function, you can also generate multiple random dates or workdays in Excel quickly and easily.
To create a list of random dates between two specific dates, you can apply the below formula:
1. Enter the following formula into a blank cell to generate the random dates, and press Enter key to get a list of five-digit numbers, see screenshot:

2. Then, you should format the numbers to normal date format: Select the numbers, and then right click, then choose Format Cells from the context menu. in the following Format Cells dialog box, please do as this:

3. And then, click OK button, the numbers will be formatted in the date format you specified, see screenshot:

Tips: Of course, you can also type the start date and end date directly into the formula as this:
To produce random workdays in a range of cells, embed the RANDARRAY function within the WORKDAY function.
1. Enter or copy the below formula into a blank cell, and then, press Enter key to get a list of numbers as below screenshot shown:

2. Then, format the numbers to a specific date formatting as you need in the Format Cells dialog box, and you will get the date format as shown in the screenshot below:

Tips: You can also type the start date and end date into the formula directly as this:
In In Excel 365, Excel 2021, and future versions (such as Excel 2024), if you want to generate or return some random values from a list of cells, this section will introduce some formulas for you.
To extract random values from a list of cells, this RANDARRY function with the INDEX function can do you a favor. The generic syntax is:
For example, to extract 3 names from the name list A2:A12, please use the below formulas:
Then, press Enter key, and you will get 3 names randomly at once, see screenshot:

With the above formula, you may find duplicates in the results. To make a random selection from a list with no repeats, the generic syntax is:
If you need to return 5 names from the name list A2:A12 randomly, please enter or copy one of the below formulas:
Then, press Enter key to get 5 random names from the list A2:A12 with no repeats, see screenshot:

Sometimes, you may need to pick up some random rows from a range of cells in Excel. To achieve this task, here, I will talk about some formulas.
The generic syntax to generate random rows from a range of cells is:
For extracting 3 rows of data from the range A2:C12, please use any of the following formulas:
Then, press Enter key to get 3 random rows of data from the range A2:C12, see screenshot:

Similarly, the above formula can produce duplicate data as well. To prevent the duplicate rows from occurring, you can use the generic syntax below:
For instance, to pick up 5 rows of data from the range A2:C12, please use any of the below formulas:
And then, press Enter key, 5 random rows without duplicates will be extracted from range A2:C12 as below screenshot shown:

Probably, you have noticed that all of the randomizing functions in this article, such as RAND, RANDBETWEEN, and RANDARRAY, are volatile. The generating results will be recalculated every time when the sheet is changed, and random new values will be produced afterwards. To stop the random values from changing automatically, here are two quick tricks for you.
Normally, you can apply the Copy and Paste feature to copy and paste the dynamic formulas as values, please do as this:
1. Select the cells with your random formula, and then press Ctrl + C to copy them.
2. Then, right click the selected range, and click Values option from the Paste Options section, see screenshot:
Tips: You can also press Shift + F10 and then V to activate this option.

3. And all the formula cells will be converted to values, the random values will not change any more.
If you have installed Kutools for Excel, the To Actual feature can help you to convert all selected formula cells to values with only one click.
1. Select the cells with the random formula, and then click Kutools > To Actual, see screenshot:

2. And now, all the selected formulas have been converted to values.
Supercharge Your Excel Skills with Kutools for Excel, and Experience Efficiency Like Never Before. Kutools for Excel Offers Over 300 Advanced Features to Boost Productivity and Save Time. Click Here to Get The Feature You Need The Most...
Kutools for Office suite bundles add-ins for Excel, Word, Outlook & PowerPoint plus Office Tab Pro, which is ideal for teams working across Office apps.


